


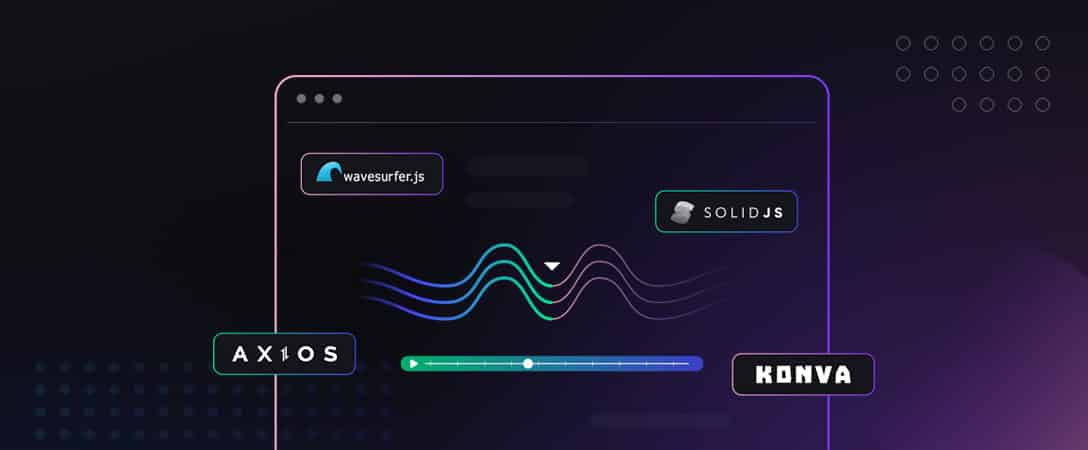
In this blog post, we will guide you through creating a frontend application to upload and visualize your audio, to annotate on your waveform, to communicate with dolby.io Media API, and to download the enhanced audio. A few libraries will be used in this example, they are:
- wavesurfer.js : is used to visualize your audio into waveform.
- konva : is used to create interactive elements to further annotate your audio.
- axios : is used to handle AJAX requests with dolby.io APIs.
- SolidJS : is used as the web application framework, which helps to build a dynamic user interface, equivalent to React or Vue.
Note: To follow along, check out the project on this GitHub repository.
dolby.io Account Setup
To begin with, you first need to have signed up for an account on dolby.io, free credits are available upon registration without requiring a credit card.
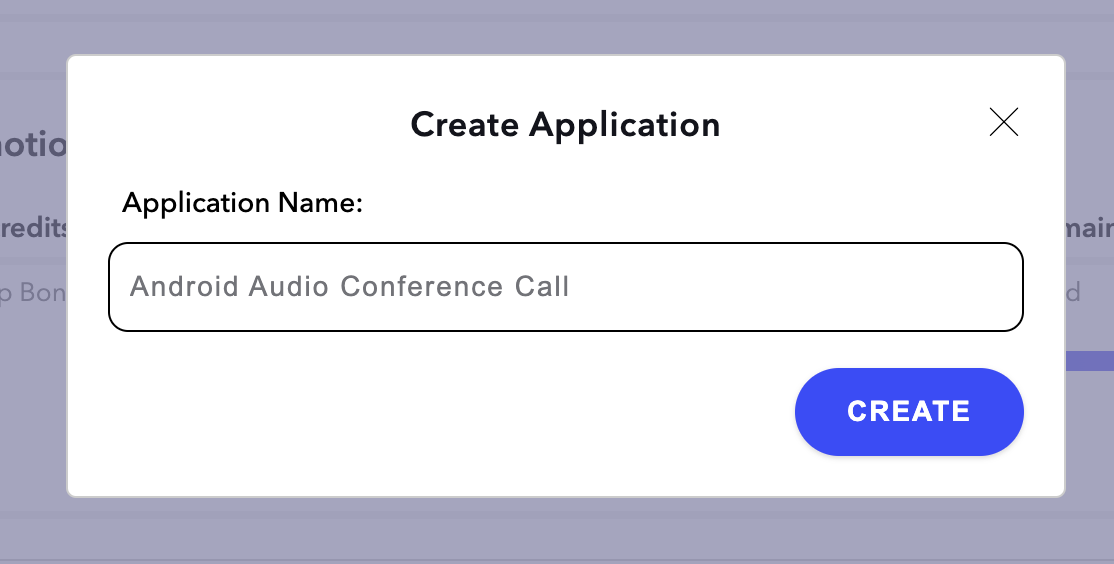
Once registered and logged in, create an application. You shall find Get API Keys inside the application you created. For the newly created Apps, you should be seeing an integrated App Key and Secret.
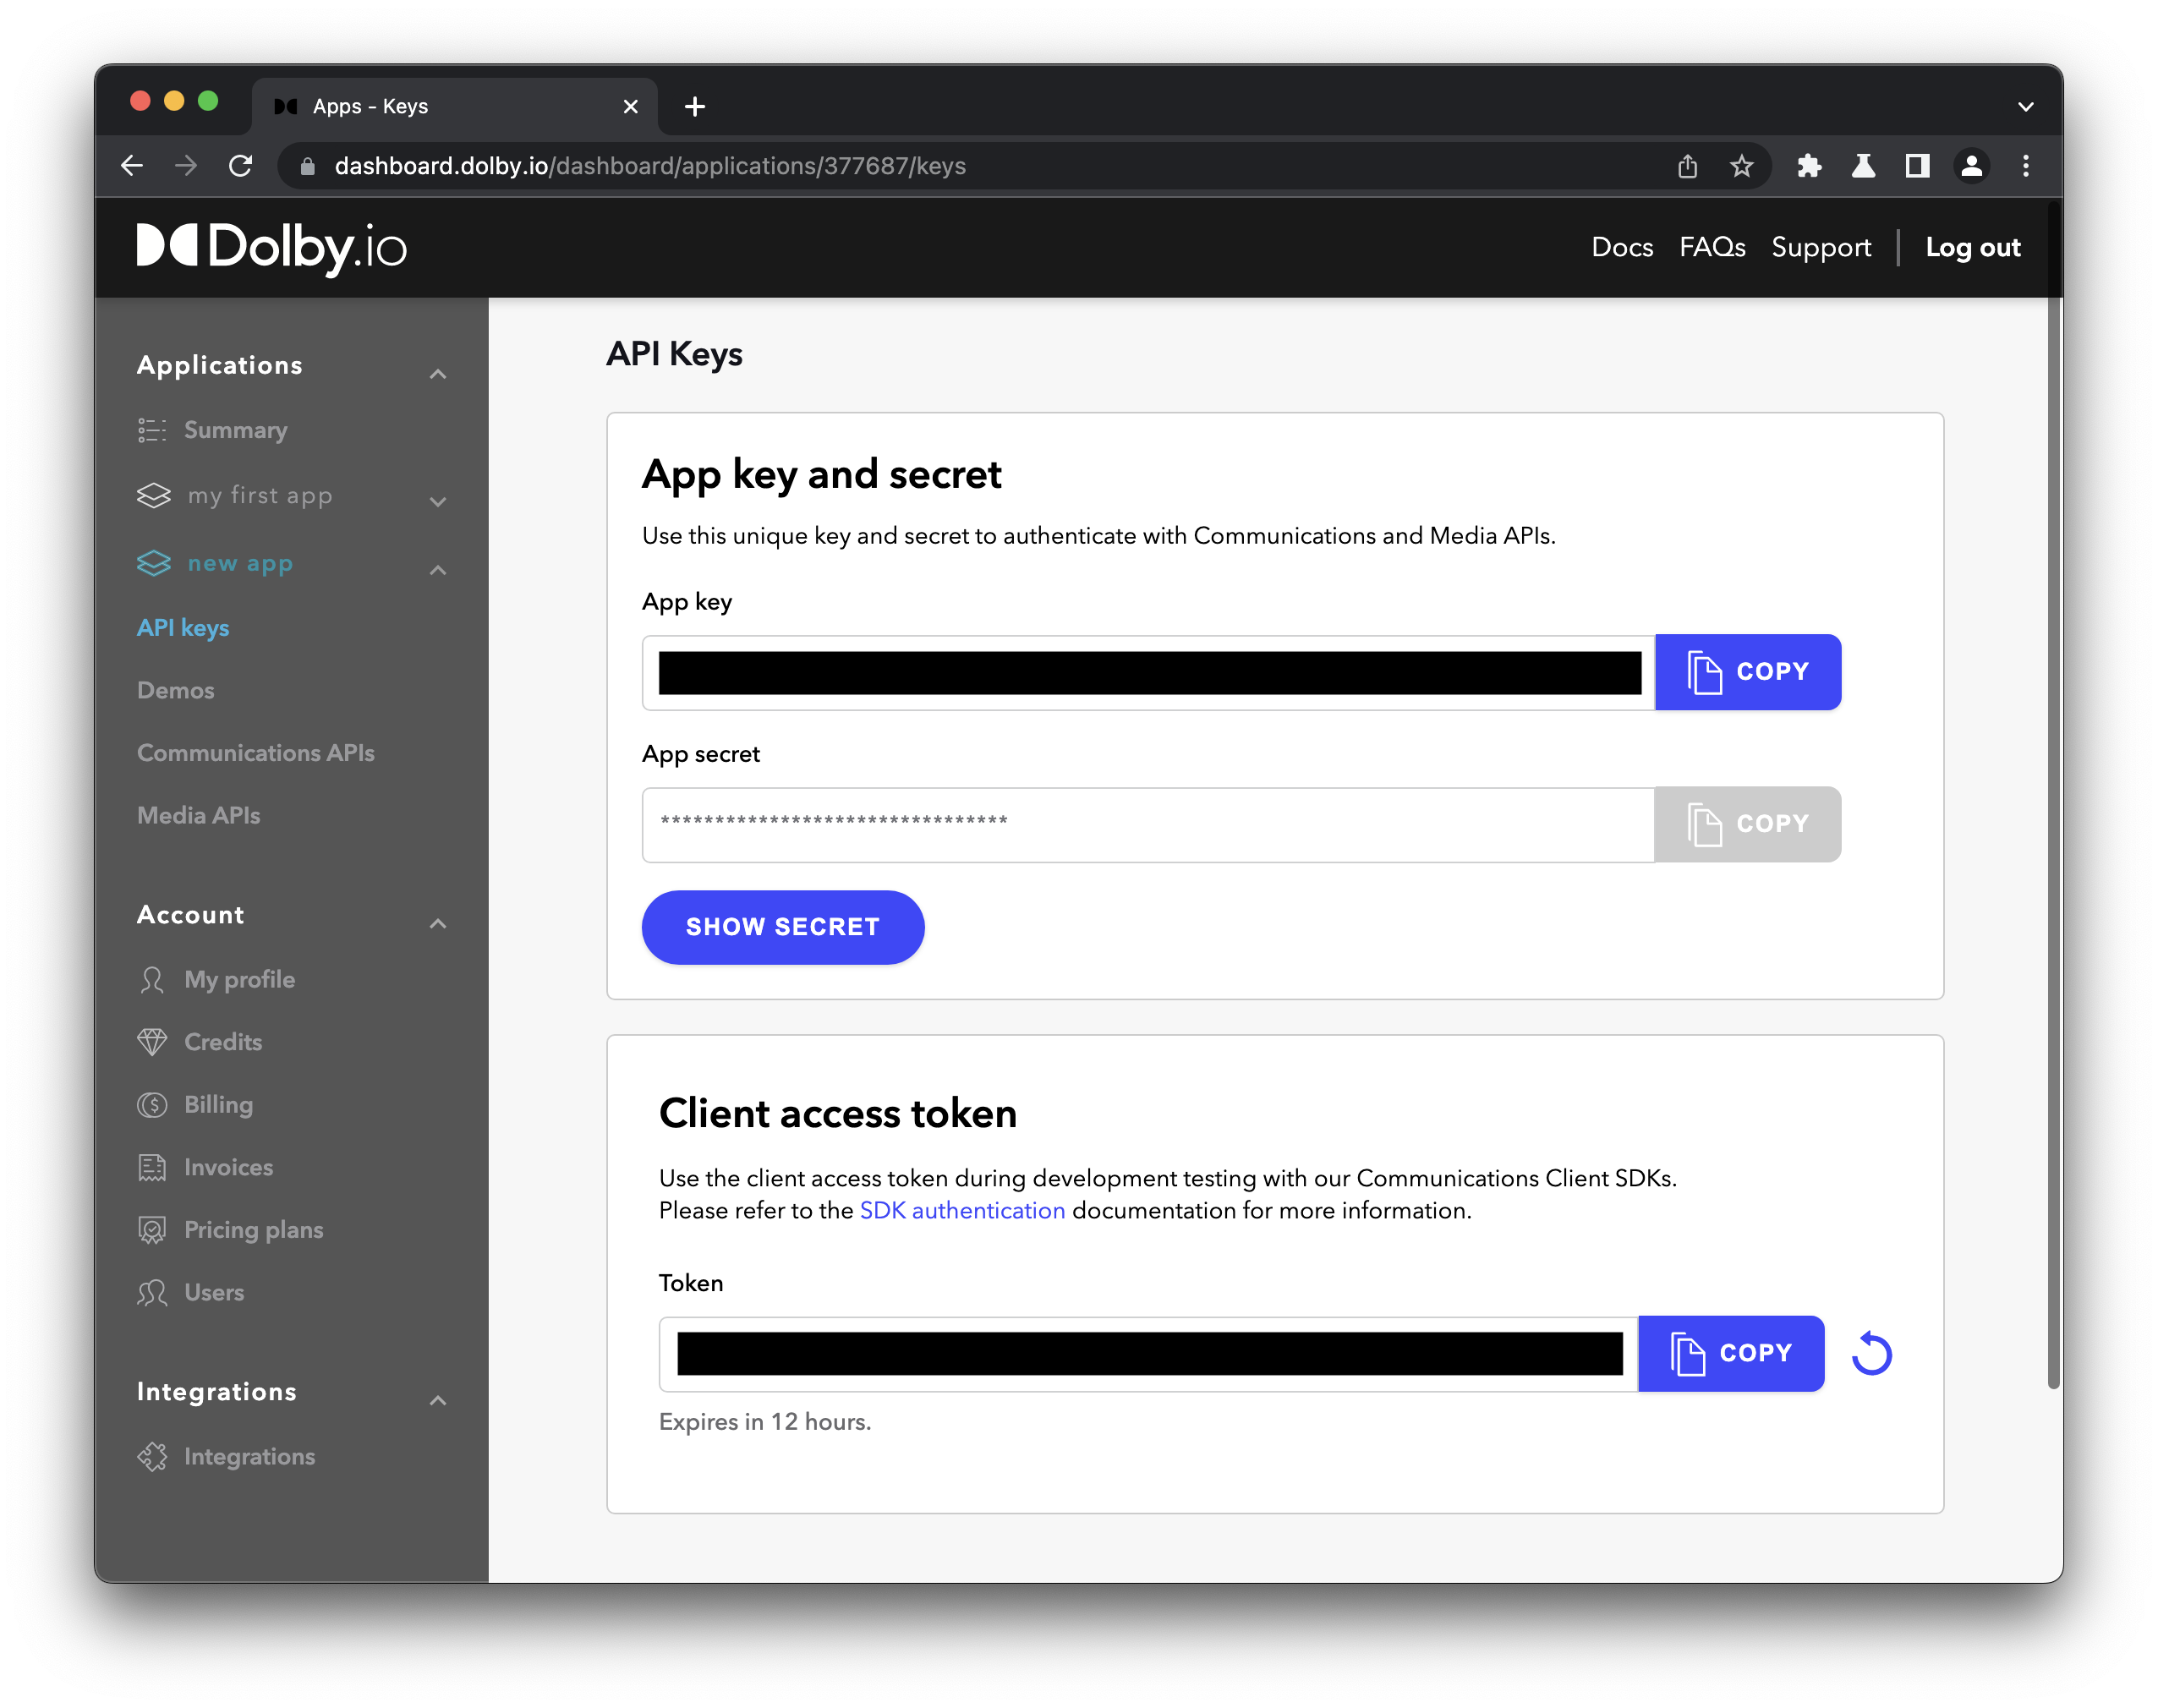
Let’s copy down the App Key and App Secret.
dolby.io Media APIs Features
Media APIs put a bunch of useful tools onto the cloud enabling us to access it through Restful APIs, such as the Transcode API and Enhance API. Take the Transcode API for example, we can not only convert a video from H264 to H265, we can also convert video into HTTP streaming formats such as HLS or DASH. There is a lot to explore with Media APIs, and we will use the Enhance API as an example here.
Why SolidJS
Solid provided a very small and performant bundle upon build, while maintaining a modern web development experience similar to React, or sometimes even improved. Nowadays, a small and performant bundle is very favorable for Static Site Generation style of serverless hosting, while Solid embraces the pre-compilation practice to minimize the size of your application rather than shipping the whole library framework over HTTP. Nonetheless if you are a Javascript developer, you might have heard of Solid being the top ranked frontend framework in State of JS 2021.
Solid shares many similarities with React as it is inspired by React. They both have declarative data in nature and support JSX syntax, such that an existing React project can migrate to Solid without much hassle. Despite Solid looks like React on appearance, Solid has fundamental differences from React in several aspects, such as absence of Virtual DOM, and with render-once mental model, Solid is able to remove the ambiguity and side effects of stale closure where most React developers suffer. So a developer can develop their apps on Solid as if they were developing on React without managing the stale closure problem while having the benefit of a performance boost.
Project Setup
npx degit solidjs/templates/ts dolbyioMediaAPIsFirst, we will use degit , a project creation tool, to copy our typescript template from SolidJS repository. Inside the project directory, we install our project dependencies.
npm install --save axios file-to-sha256 wavesurfer.js konva js-file-download
npm install --save-dev @types/wavesurfer.js
The project is basically set up to be able to run with npm start . Under the hood, the project is using the vite suite as the building and debugging server.
Media API Authorization
In order to use Media APIs, an access token is required. Either by using our App Key, or by OAuth we can authenticate ourselves as the dolby.io application owner. Since OAuth is the industrial de-facto standard, we will be using OAuth workflow to obtain an access token.
Attention: In real-world applications, the OAuth workflow should be implemented on the backend such that dolby.io API Keys could be protected from malicious usage. Since this is a demo, we will skip the backend part and implement OAuth on frontend instead. You may test this demo locally, but please refrain from deploying this demo onto the public domain, as your API Keys will be leaked in the build.
For our API Keys, we will serve them through environment variables. To access environment variables from our Solid app:
// Take in environmental variables
const CONSUMER_KEY = import.meta.env.VITE_CONSUMER_KEY;
const CONSUMER_SECRET = import.meta.env.VITE_CONSUMER_SECRET;
vite has also provided an easy way to inject environmental variables, simply create a “.env” file at your project root directory with the following contents:
VITE_CONSUMER_KEY=<COPY_FROM_MEDIA_API_APP_KEY>
VITE_CONSUMER_SECRET=<COPY_FROM_MEDIA_API_APP_SECRET>
Replace <COPY_FROM_MEDIA_API_APP_KEY> with you App Key, and replace <COPY_FROM_MEDIA_API_APP_SECRET> with your App Secret. vite will automatically pick up .env file from the directory after restart.
Our example OAuth authentication which should be implemented on the backend:
import axios from 'axios';
const API_BASE = import.meta.env.VITE_API_BASE || "https://api.dolby.com/";
const OAUTH_API = "media/oauth2/token";

// Cautions: This method should be implemented on the backend to secure the Key & Secret
async function obtainAccessToken(): Promise<string> {
    // Encode string to base64
    const base64APIKey = btoa(`${CONSUMER_KEY}:${CONSUMER_SECRET}`);
    // dolby.io only accepts 'x-www-form-urlencoded' for this particular request
    return axios({
        method: 'POST',
        url: (new URL(OAUTH_API, API_BASE)).toString(),
        headers: {
            'Content-Type': 'application/x-www-form-urlencoded',
            'Authorization': `Basic ${base64APIKey}`
        },
        data: new URLSearchParams({
            grant_type: 'client_credentials',
        }).toString(),
    })
    .then(response => response.data.access_token);
}
After obtaining our Bearer Access Token from OAuth, the best practice is we shall use this access token until it expires. So we may store this access token in our localStorage. Solid provides a number of methods allowing us to access resources asynchronously and reactively. Such as:
They provide a getter/setter method pair, where you could use them as if it is a variable, and it will be hooked when it is read inside a JSX. What it means by hooked or reactivity, is that whenever the value is changed, the DOM element will be updated, as known as DOM reacts. By using the createEffect method, you can also achieve reactivity outside JSX, as shown in the following scripts.
import { createEffect } from "solid-js";
import { createStore, SetStoreFunction, Store } from "solid-js/store";

// Solidjs Store integrated with localStorage
export default function createLocalStore<T>(
    name: string,
    init: T
): [Store<T>, SetStoreFunction<T>] {
    const localState = localStorage.getItem(name);
    const [state, setState] = createStore<T>(
        init,
        localState ? JSON.parse(localState) : init
    );
    // Whenever store value is changed, update localStorage
    createEffect(() => localStorage.setItem(name, JSON.stringify(state)));
    return [state, setState];
}

const [store, setStore] = createLocalStore("dolbyio", {} as DolbyIOStore);
// Lazy singleton accessor
async function accessToken() {
    if (store.accessToken) return store.accessToken;
    return renewAccessToken();
}
// Ajax call to renew access token, at the same time storing it in localStorage
async function renewAccessToken() {
    const newAccessToken = await obtainAccessToken();
    setStore("accessToken", newAccessToken);
    return newAccessToken;
}
This way we created a lazy accessible singleton access token, in addition, the access token will “reactively” be written into localStorage.
Frontend Page
Once we have our OAuth set up, we can try uploading Audio file via Media APIs. Before that, we may create our page to allow users to select file to upload.
/* App.tsx */
import { Component, createSignal } from 'solid-js';
enum MEDIA {
AUDIO,
IMAGE,
}
enum APP_STATE {
WAITING,
UPLOADING,
UPLOADED,
ENCODING,
ENCODED,
ERROR
}
const App: Component = () => {
const [progress, setProgress] = createSignal(0);
const [audio, setAudio] = createSignal<File>();
const [state, setState] = createSignal(APP_STATE.WAITING);
function onSelectFile(type: MEDIA, event: Event) {
const {files} = event.target as HTMLInputElement;
const file = files && files[0];
if (!file) return;
if (!(event.target as HTMLInputElement).accept.split(",").map(s => s.trim()).includes(file.type)) return console.error("Invalid file type");
switch(type) {
case MEDIA.AUDIO:
setAudio(file);
break;
case MEDIA.IMAGE:
break;
}
}
// State machine
function changeState(forceState?: APP_STATE) {
if (forceState) setState(forceState);
switch(state()) {
case APP_STATE.WAITING:
return setState(APP_STATE.UPLOADING);
case APP_STATE.UPLOADING:
return setState(APP_STATE.UPLOADED);
case APP_STATE.UPLOADED:
return setState(APP_STATE.ENCODING);
case APP_STATE.ENCODING:
return setState(APP_STATE.ENCODED);
}
}
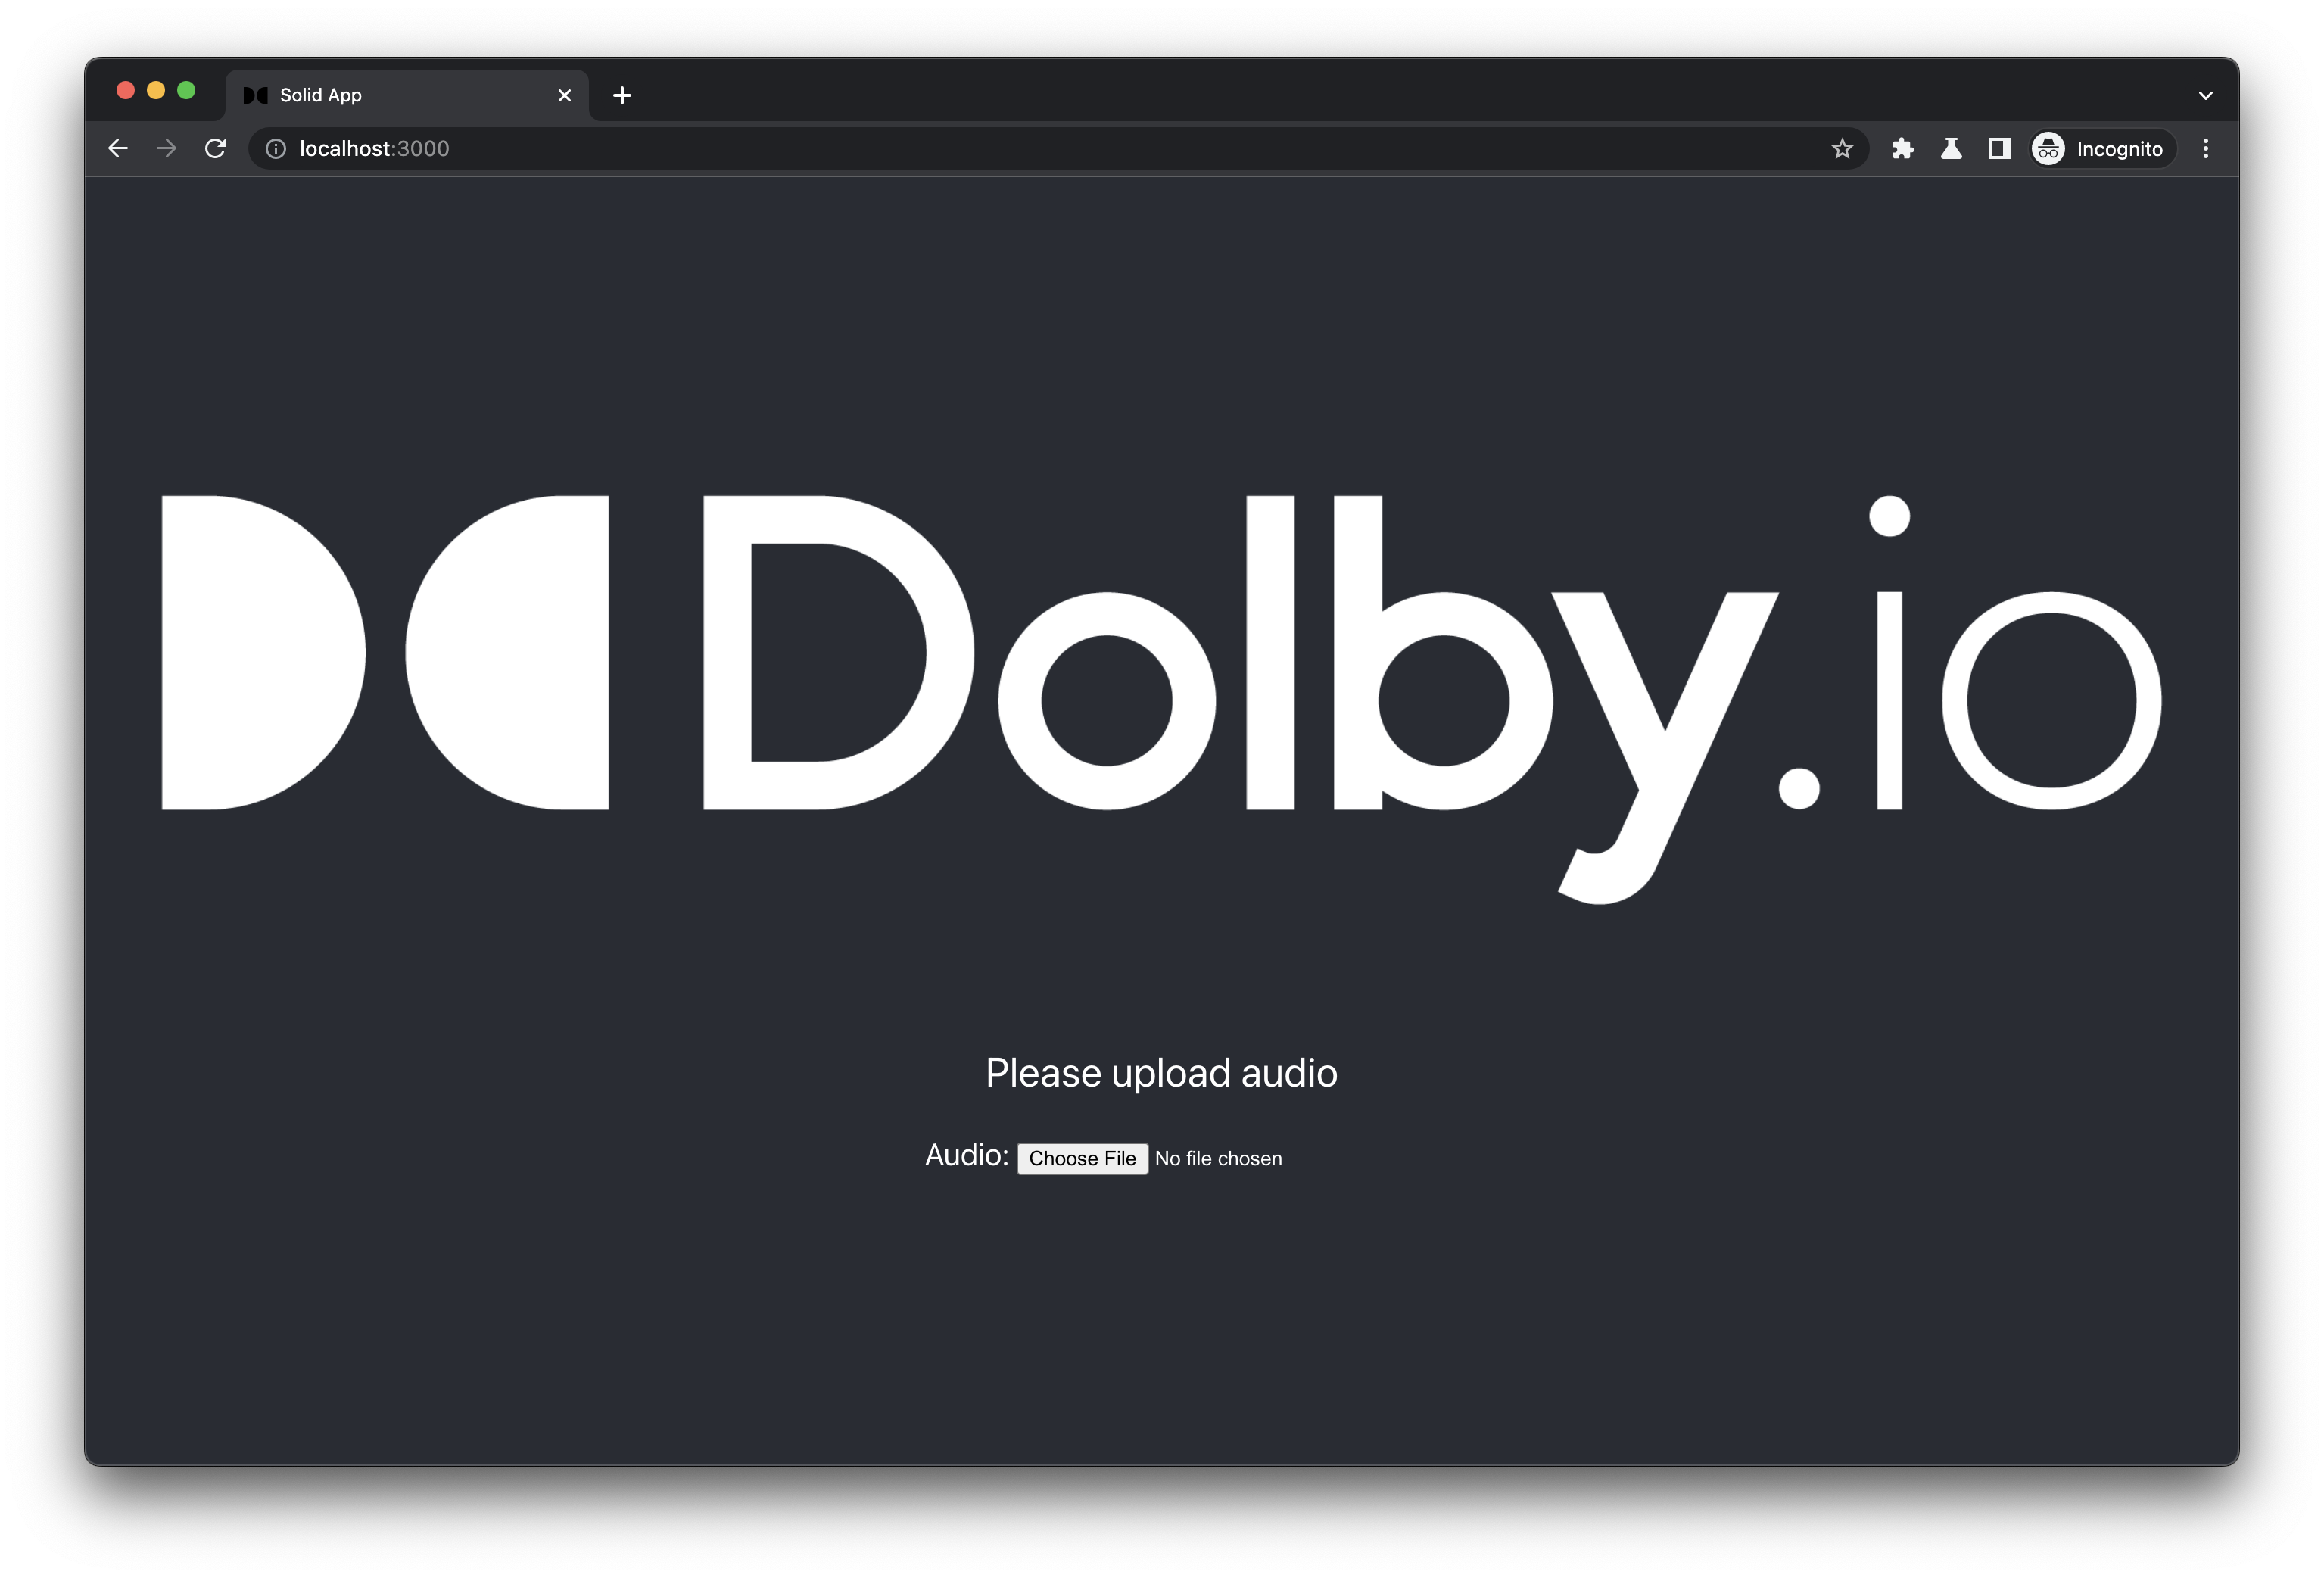
function statusText() {
switch(state()) {
case APP_STATE.WAITING:
return (<p>Please upload audio</p>);
case APP_STATE.UPLOADING:
return (<p><code>Uploading...{progress()}%</code></p>);
case APP_STATE.UPLOADED:
return (<p>Add image to annotate or start Enhancement</p>);
case APP_STATE.ENCODING:
return (<p><code>Enhancement...{progress()}%</code></p>);
case APP_STATE.ENCODED:
return (<p>Enhancement completed! Please wait for download...</p>);
default: return (<p>Something went wrong :(</p>);
}
}
function userInput() {
switch(state()) {
case APP_STATE.WAITING:
return (<div class={styles.inputFields}>Audio: <input type="file" onChange={[onSelectFile, MEDIA.AUDIO]} accept="audio/wav, audio/aac, audio/mpeg, audio/ogg, audio/webm, audio/x-m4a" /></div>);
case APP_STATE.UPLOADED:
return (<div class={styles.multiInputs}>
<div class={styles.inputFields}>Image: <input type="file" onChange={[onSelectFile, MEDIA.IMAGE]} accept="image/jpeg, image/png, image/webp" /></div>
</div>);
default: return (<></>);
}
}
return (
<div class={styles.App}>
<header class={styles.header}>
<img src={logo} alt="logo" />
<div class={styles.userInterface}>
{statusText()}
{userInput()}
</div>
</header>
</div>
);
};In this example, we have implemented a finite state machine as our state management methodology. Generally our app steps through WAITING → UPLOADING → UPLOADED → ENCODING → ENCODED, 5 different states. During states WAITING or UPLOADED, we allow users to select Audio file or Image file with respectively. Just a reminder that Enhance API could take up Video files as well, it’s just we use Audio files in this particular demo only.
In our JSX, we have used statusText() & userInput() functions to hydrate the HTML, where the functions will be triggered whenever the encapsulated variable is changed. We saw an advantage of using Solid against Svelte here when comparing the JSX hydration using functions, where Svelte loses reactivity when hydrated through functions and has to use single-lined conditional statements.
Media Upload
We can now implement our Media Upload logic. One of the advantages of using Axios against native Fetch is that we can track the upload progress as uploading takes some time. By using Axios, which uses XMLHttpRequest under the hood, we can create a more reflective interface.
/* DolbyIO.tsx */

import { blobToSHA256 } from 'file-to-sha256';
const INGEST_API = "media/input";
const DLB_SCHEME = "dlb://";

type onUploadProgressType = ({loaded, total} : {loaded: number, total: number}) => void;
async function uploadMedia(file?: File, onUploadProgress?: onUploadProgressType) {
    if (!file) return;
    return uploadMediaToDolbyIO({
        file,
        accessToken: await accessToken(),
        renewAccessToken,
        onUploadProgress
    });
}

interface DolbyIOInterface {
    accessToken: string,
    renewAccessToken: () => Promise<string>,
}
interface UploadMediaArg extends DolbyIOInterface{
    file: File,
    onUploadProgress?: onUploadProgressType,
}
async function uploadMediaToDolbyIO(arg: UploadMediaArg): Promise<string> {
    const {file, onUploadProgress, accessToken, renewAccessToken} = arg;
    // Calculate SHA256 hash to avoid filename collisions or violations
    const fileHash = await blobToSHA256(file);
    const url = `${DLB_SCHEME}${fileHash}.${file.name.split('.').pop()}`;
    // Obtain Presigned URL
    return axios({
        method: 'POST',
        url: (new URL(INGEST_API, API_BASE)).toString(),
        headers: {
            'Authorization': `Bearer ${accessToken}`,
        },
        data: {
            url,
        },
    })
    .then(response => response.data.url)
    .then(url => axios({
        method: 'PUT',
        url,
        data: file,
        onUploadProgress,
    }))
    .then(() => url)
    // Handle token expiration
    .catch(error => {
        if (isAccessTokenExpired(error)) {
            return renewAccessToken()
            .then(newAccessToken => uploadMediaToDolbyIO({...arg, accessToken: newAccessToken}));
        }
        throw error;
    });
}
function isAccessTokenExpired(error: AxiosError) {
    if (!error.response) throw error;
    if (error.response.status !== 401) throw error;
    if (!error.response.data || (error.response.data as DolbyIOAPIError).type !== "/problems/access-token-expired") throw error;
    return true
}
From our App.tsx , we may call the api like this:
/* App.tsx */

function uploadMedia() {
    changeState();  // enter UPLOADING state
    return DolbyIO.uploadMedia(audio(), ({loaded, total}) => setProgress((Math.floor((loaded/total)*100))))
    .then(url => {
        setAudioUrl(url);
        changeState();  // enter UPLOADED state
    })
    .catch(() => changeState(APP_STATE.ERROR));
}
uploadMedia() may be called immediately after audio has been set by setAudio(file);
We are using the temporary dlb:// space to store our media file, detailed in Dolby Media Temporary Cloud Storage. The API will return an AWS pre-signed url for upload.
Visualize your audio with wavesurfer.js
/* Waveform.tsx */

import { Component, createEffect, onCleanup, onMount } from 'solid-js';
import WaveSurfer from 'wavesurfer.js';
import EncodingSettingsModel from './EncodingSettingsModel';
import styles from './App.module.css';

const Waveform: Component = () => {
    const { audio, setDuration } = EncodingSettingsModel;

    let container!: HTMLDivElement, // Auto-referenced by the returning JSX
        wavesurfer: WaveSurfer;

    // Used for handling browser window resizing
    function responsiveHandler() {
        if (!wavesurfer) return;
        wavesurfer.setHeight(Math.max(document.documentElement.clientHeight || 0, window.innerHeight || 0) * 2);
    }
    onMount(() => {
        wavesurfer = WaveSurfer.create({
            container,
            waveColor: 'violet',
            progressColor: 'purple',
            height: Math.max(document.documentElement.clientHeight || 0, window.innerHeight || 0) * 2,
            responsive: true,
            interact: false,
        });
        // Obtain duration after waveform is ported
        wavesurfer.on('ready', () => {
            const duration = wavesurfer.getDuration();
            setDuration(duration);
        });
        window.addEventListener('resize', responsiveHandler);
    });
    onCleanup(() => window.removeEventListener('resize', responsiveHandler));

    createEffect(() => {
        const file = audio();
        if (file && wavesurfer) wavesurfer.loadBlob(file);
    });

    return <div ref={container} class={styles.waveContainer}></div>;
};
export default Waveform;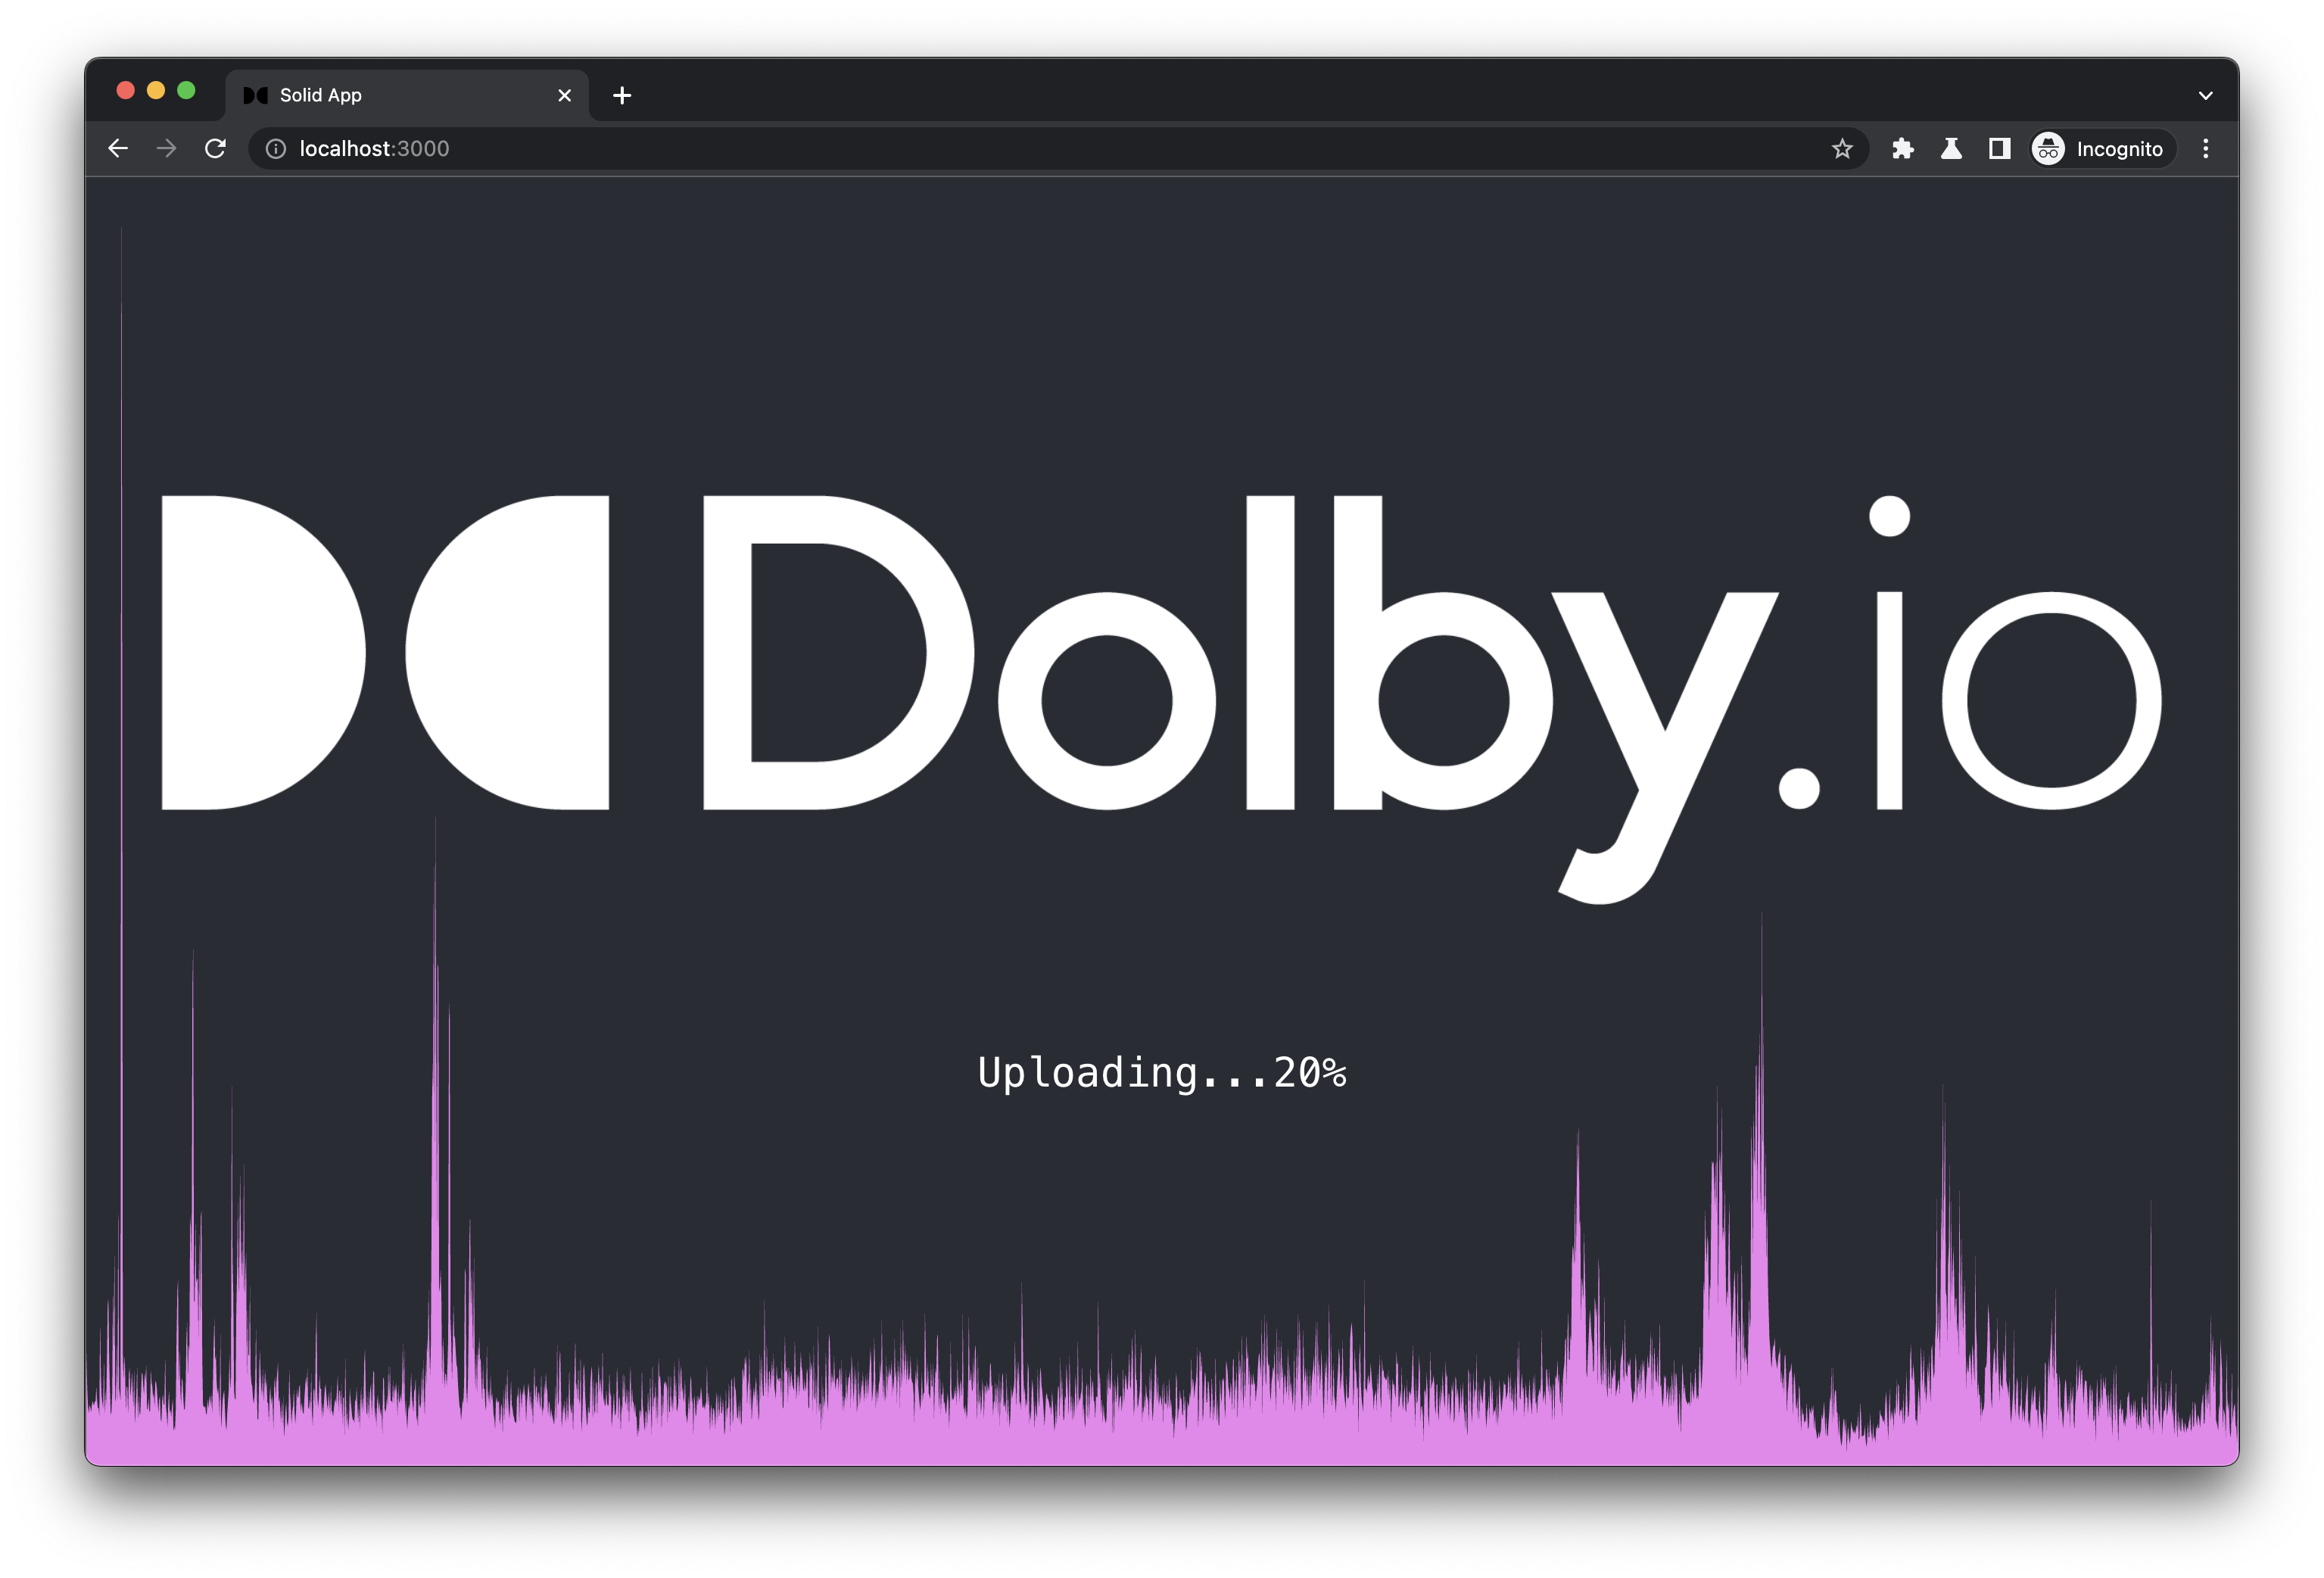
Normally a waveform is symmetric, in this example, we multiplied the height twice to get the upper side of the wave, such that we have a nice flaming-like waveform drawn across our page. Also, thanks to Solid, we can port the waveform reactively upon the audio being set. In the meantime, we take advantage of wavesurfer.js to obtain our audio’s duration, which is helpful for our annotation later.
Back in App.tsx , we just need to add the Waveform component in our JSX.
/* App.tsx */

<div class={styles.App}>
    <header class={styles.header}>
        <img src={logo} alt="logo" />
        <div class={styles.userInterface}>
            {statusText()}
            {userInput()}
        </div>
    </header>
    <Waveform />
</div>
Annotate your audio with konva
After plotting the waveform, we might want to annotate the audio with some images over the waveform. One approach is to let users to enter a timecode then we position the images, but it requires users to perform a typing action, which is not UI-friendly, and user text inputs are prone to errors.

In our demo, users select an image from their directory locally. The selected graphic will be shown at the centre of the screen. Users can drag and move the image anywhere within the browser, and a line will be shown following where the mouse is positioned at, to indicate the represented time across the waveform. In this way, we created an interactive UI with our users, where users intuitively know the mouse position while dragging the image represents the time along the waveform. Moreover, we can reduce the errors of time input by users by restraining the draggable boundaries.
/* Annotations.tsx */

import EncodingSettingsModel from "./EncodingSettingsModel";
import Konva from "konva";
import { onCleanup, onMount, createUniqueId } from "solid-js";
import { Stage } from "konva/lib/Stage";
import { Layer } from "konva/lib/Layer";
import styles from './App.module.css';

const IMG_WIDTH = 178;
const IMG_HEIGHT = 100;
const TXT_HEIGHT = 20;

// Translating Decimal time to HH:MM:SS.ss timestamp
function timeToTimestamp(timeSec: number): string {
    const hours = Math.floor(timeSec/3600);
    const minutes = Math.floor((timeSec%3600)/60);
    const seconds = timeSec%60;
    return `${("0"+hours).slice(-2)}:${("0"+minutes).slice(-2)}:${("0"+seconds).replace(/d?(d{2}(.?d{0,2}))d*/, "$1")}`;
}

// Event bus for unidirectional one-off event, which does not leave the event in memory space
export const AnnotationsEventDispatcher = new EventTarget();

function Annotations() {
    const {graphTimeline, duration} = EncodingSettingsModel;
    let stage: Stage, layer: Layer;

    // Used for handling browser window resizing
    function responsiveHandler() {
        if (!stage) return;
        stage.width(Math.max(document.documentElement.clientWidth || 0, window.innerWidth || 0));
        stage.height(Math.max(document.documentElement.clientHeight || 0, window.innerHeight || 0));
    }
    // Handling new image
    function newImageAdded(imgFile: File) {
        if (!stage) {
            // Lazy initialization for Konva's Stage
            stage = new Konva.Stage({
                container: "timeline",
                width: Math.max(document.documentElement.clientWidth || 0, window.innerWidth || 0),
                height: Math.max(document.documentElement.clientHeight || 0, window.innerHeight || 0),
            });
        }
        if (!layer) {
            // Lazy initialization for Konva's Layer
            layer = new Konva.Layer();
            stage.add(layer);
        }
        // Line of which the cursor is dragging, hide when it is not initialized (dragged)
        const timeIndicator = new Konva.Line({
            points: [0, 0, 0, stage.height()],
            stroke: 'cyan',
            strokeWidth: 1,
            visible: false,
        });

        const imgElement = new Image();
        imgElement.src = URL.createObjectURL(imgFile);
        const image = new Konva.Image({
            image: imgElement,
            width: IMG_WIDTH,
            height: IMG_HEIGHT,
        });
        // Time label of which cursor position (timeIndicator) correspond in time
        const timeText = new Konva.Text({
            fontFamily: 'Helvetica',
            width: IMG_WIDTH,
            height: TXT_HEIGHT,
            y: IMG_HEIGHT,
            align: 'right',
            fontSize: 18,
            text: "Please drag...",
        });
        const rect = new Konva.Rect({
            width: IMG_WIDTH,
            height: IMG_HEIGHT + TXT_HEIGHT,
            fill: 'lightgreen',
        });
        // Assign an unique ID to the annotation
        const id = createUniqueId();
        const imageGroup = new Konva.Group({
            x: (stage.width() - IMG_WIDTH) / 2,
            y: (stage.height() - IMG_HEIGHT) / 2,
            draggable: true,
            dragBoundFunc: pos => {
                const boundWidth = stage.width();
                const boundHeight = stage.height();
                const pointer = stage.getPointerPosition();
                if (!pointer) return pos;
                // Prevent timeIndicator goes beyond boarders
                const pointerX = Math.min(Math.max(pointer.x, 0), boundWidth);
                const pointerInTime = (pointerX / boundWidth) * duration();
                timeText.text(timeToTimestamp(pointerInTime));
                timeIndicator.x(pointerX);  // Set timeIndicator position

                // Initialize when first dragged, show timeIndicator
                if (!timeIndicator.visible()) {
                    timeIndicator.show();
                    // Initialize timeIndicator position in graphTimeline
                    graphTimeline.set(id, {imgSrc: imgFile.name, time: pointerInTime});
                } else {
                    // Update timeIndicator position
                    const node = graphTimeline.get(id);
                    node!.time = pointerInTime;
                }
                // Position the imageGroup boundary, based on top-left corner
                return {
                    x: pos.x < 0 ?
                        0 :
                        pos.x + IMG_WIDTH > boundWidth ?
                            boundWidth - IMG_WIDTH :
                            pos.x,
                    y: pos.y < 0 ?
                        0 :
                        pos.y + IMG_HEIGHT > boundHeight ?
                            boundHeight - IMG_HEIGHT :
                            pos.y,
                };
            },
        });
        imageGroup.on('mouseover', () => {document.body.style.cursor = 'pointer';})
        imageGroup.on('mouseout', () => {document.body.style.cursor = 'default';})
        imageGroup.add(rect);
        imageGroup.add(timeText);
        imageGroup.add(image);
        layer.add(timeIndicator);
        layer.add(imageGroup);
        return;
    }
    type CustomEventListener = EventListener & ((e: CustomEvent) => void);
    function customEventHandler(e: CustomEvent) {
        if (e.detail) return newImageAdded(e.detail);
    }
    onMount(() => {
        window.addEventListener('resize', responsiveHandler);
        AnnotationsEventDispatcher.addEventListener('image', customEventHandler as CustomEventListener);
    });
    onCleanup(() => {
        window.addEventListener('resize', responsiveHandler);
        AnnotationsEventDispatcher.removeEventListener('image', customEventHandler as CustomEventListener);
    });

    return (<>
        <div id="timeline" class={styles.timeline}></div>
    </>);
}

export default Annotations;
Konva provided a number of high level Shape Classes, such as Rect, Line, Text, Image, etc. where we could easily create graphics on HTML5 canvas. On top of that, we could implement interactivity by specifying “draggable” in Shape attributes, which comes in very handy. The above code allows image to be added whenever AnnotationsEventDispatcher receives an “image” event. The added image will be placed at the centre of the page. Users are allowed to drag the image across the page, while timeText label will reflect the timing of where the dragged image is currently positioned across the audio track’s duration.
Be careful of the draggable boundaries, since users can drag to spaces outside the browser, we have to take care the numbers are not negative or exceeding the ceiling, to ensure our numbers are aligned with the waveform.
The reason for using AnnotationsEventDispatcher is because we do not require a copy of the image in our app. It is possible that we can implement the data flow using createSignal and receive updates by createEffect, but that would leave a footprint of the last image selected in our app’s memory. Unlike audio, where we would upload the file and plot the waveform simultaneously, image data flow is one-off unidirectional. Therefore an EventTarget plus CustomEvent is sufficient in our case.
Same as Waveform.tsx , we add the Annotations component in our App.tsx together with our trigger.
/* App.tsx */

import Annotations, {AnnotationsEventDispatcher} from './Annotations';

function onSelectFile(type: MEDIA, event: Event) {
    const {files} = event.target as HTMLInputElement;
    const file = files && files[0];
    if (!file) return;
    if (!(event.target as HTMLInputElement).accept.split(",").map(s => s.trim()).includes(file.type)) return console.error("Invalid file type");

    switch(type) {
        case MEDIA.AUDIO:
            setAudio(file);
            uploadMedia();
            break;
        case MEDIA.IMAGE:
            AnnotationsEventDispatcher.dispatchEvent(new CustomEvent('image', {detail: file}));
            break;
    }
}

// JSX part
<div class={styles.App}>
    <header class={styles.header}>
        <img src={logo} alt="logo" />
        <div class={styles.userInterface}>
            {statusText()}
            {userInput()}
        </div>
    </header>
    <Annotations />
    <Waveform />
</div>
Media Enhance API
For our Enhance API implementation, we want the uploaded audio to be enhanced, at the same time, feedback the status to our app, and finally download the enhanced audio automatically. We can archive the status feedback by obtaining the Job ID after we submitted a Media API request, and then we probe the job status periodically.
/* DolbyIO.tsx */

const ENHANCE_API = "media/enhance";
type onProgressType = (progress: number, status: string) => void;

interface EnhanceMediaArg extends DolbyIOInterface {
    audioUrl: string,
    onProgress?: onProgressType,
}

async function enhanceMediaUsingDolbyIO(arg: EnhanceMediaArg): Promise<void> {
    const {audioUrl, onProgress, accessToken, renewAccessToken} = arg;
    const output = audioUrl.replace(/.[^.]+$/, "-enhanced$&");
    // Start encoding Job
    return axios({
        method: 'POST',
        url: (new URL(ENHANCE_API, API_BASE)).toString(),
        headers: {
            'Authorization': `Bearer ${accessToken}`,
        },
        data: {
            input: audioUrl,
            output,
        },
    })
    .then(response => response.data.job_id)
    // Track encoding progress
    .then(jobId => probeJob({
        jobId,
        accessToken,
        onProgress,
    }))
    // Download Media
    .then(() => downloadMedia(output, accessToken, audioUrl.replace(DLB_SCHEME, "")))
    // Handle token expiration
    .catch((error: AxiosError) => {
        if (isAccessTokenExpired(error)) {
            return renewAccessToken()
            .then(newAccessToken => enhanceMediaUsingDolbyIO({...arg, accessToken: newAccessToken}));
        }
        throw error;
    });
}
For the status feedback, we used a recursive loop to constantly probe for the progress.
/* DolbyIO.tsx */

interface probeJobArg {
    jobId: string,
    accessToken: string,
    intervalSec?: number,
    onProgress?: onProgressType,
}
export const DOLBYIO_JOB_STATUS = {
    PENDING: "Pending",
    RUNNING: "Running",
    SUCCESS: "Success",
    FAILURE: "Failed",
}

// Constantly probe for job status at intervalSec until job is finalized (Success or Failure)
async function probeJob(arg : probeJobArg): Promise<void> {
    const {jobId, accessToken, onProgress, intervalSec = 5} = arg;
    return axios({
        url: (new URL(ENHANCE_API, API_BASE)).toString(),
        headers: {
            'Authorization': `Bearer ${accessToken}`,
        },
        params: {
            'job_id': jobId
        },
    })
    .then(response => response.data)
    .then(data => {
        const {progress, status} = data;
        // Calling feedback function to report progress & status
        if (onProgress) onProgress(progress, status);
        switch(status) {
            // Continue probing if state is Pending or Running
            case DOLBYIO_JOB_STATUS.PENDING:
            case DOLBYIO_JOB_STATUS.RUNNING:
                return new Promise((resolve) => setTimeout(resolve, intervalSec*1000))
                    .then(() => probeJob(arg));
            // Otherwise quit probing
            case DOLBYIO_JOB_STATUS.SUCCESS:
                return;
            default:
                throw new Error(JSON.stringify(data));
        }
    });
}
For download, it is a little bit tricky:
/* DolbyIO.tsx */

import fileDownload from 'js-file-download';
const EGRESS_API = "media/output";

async function downloadMedia(outputUrl: string, accessToken: string, outputFilename: string) {
    return axios({
        url: (new URL(EGRESS_API, API_BASE)).toString(),
        params: {
            url: outputUrl,
        },
        headers: {
            'Authorization': `Bearer ${accessToken}`,
        },
    })
    // Since previous request uses Authorization header
    // the header is mistakenly carried on by browser redirection
    // causes conflicting Authorization mechanics
    // a hack is required
    .catch(error => {
        // Expecting HTTP 400 Bad Request from AWS
        if (error.response.status !== 400) throw error;
        const url = error.request.responseURL;  // Presigned URL
        return axios({
            url,
            responseType: 'blob',
        });
    })
    .then(response => response.data)
    .then(file => fileDownload(file, outputFilename));
}
Finally, we add handlers on our App.tsx
/* App.tsx */

function enhanceMedia() {
    setProgress(0);
    changeState();
    return DolbyIO.enhanceMedia(audioUrl(), (progress, status) => {
        switch(status) {
            case DOLBYIO_JOB_STATUS.PENDING:
            case DOLBYIO_JOB_STATUS.RUNNING:
                return setProgress(progress);
            case DOLBYIO_JOB_STATUS.SUCCESS:
                return changeState();
            case DOLBYIO_JOB_STATUS.FAILURE:
                return changeState(APP_STATE.ERROR);
        }
    });
}
and add a button to our JSX, all things done.
case APP_STATE.UPLOADED:
    return (<div class={styles.multiInputs}>
        <div class={styles.inputFields}>Image: <input type="file" onChange={[onSelectFile, MEDIA.IMAGE]} accept="image/jpeg, image/png, image/webp" /></div>
        <button onClick={enhanceMedia}>Enhance</button>
    </div>);
Summary
All with the help from Solid, benefitting from a performant and small sized bundle, also with familiar modern developer experience as React, using declarative data modeling and JSX syntax, we demonstrated how easy we can achieve reactivity from a user input to plotting a waveform with wavesurfer.js and uploading the audio file to dolby.io simultaneously. Furthermore, we have implemented an interactive UI where users can drag the images across the waveform to annotate their audio track with the help of konva, which provides a suite of useful Shape Classes for HTML5 Canvas.
On the other hand, we demonstrated the usage of dolby.io Media APIs, authenticated with OAuth mechanism. We managed to upload a user’s media file to Dolby Media Temporary Cloud Storage for dolby.io to access the media, then trigger the enhancement API to process the uploaded media. While the enhancement API is running in background, our probing function will tap for the job status and progress, which are fully reflected in our UI with the help from Solid’s reactivity. Finally the enhanced media will be downloaded when dolby.io has finished processing it. All these processes are done with our AJAX library, axios, as it utilizes XMLHttpRequest to provide more granular feedback than native Fetch API in regards to File uploads. We pursued a realtime user experience as a whole.
If you feel interested, please check out our git repository here. To read more, see this post that dives deeper on how Enhance parameters affect waveforms.


")