


Dolby.io Enhance API has options to improve your audio in terms of loudness, noise reduction, dealing with unwanted frequencies, adjusting profile of audio. All of these options can help you make the best of your recording, whether it comes from the mobile phone conversation, the video call made using laptop microphone, or recording from microphone placed in the conference room.
Dolby.io enables you to apply many settings / presets at once. However, for experimental reasons, let’s take a look at the processing chain, where the recording from the laptop microphone will be processed in 3 steps. We will observe, which characteristics of audio signal are affected by different options and which settings work best for our case.
Note: To follow along, check out the project in this GitHub repository.
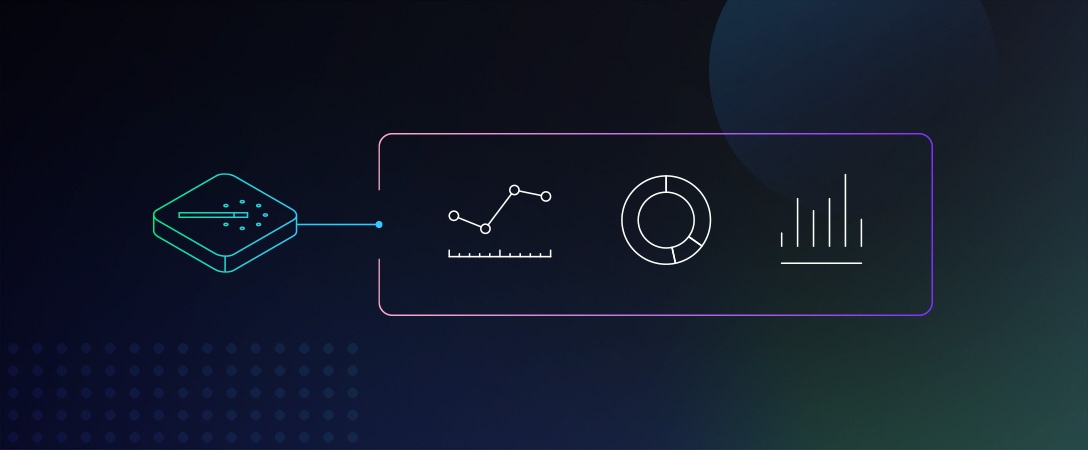
Workflow for Dolby.io Enhance
We will take the original signal and process it step by step with different enhancing parameters. For each parameter we will use and compare 2-3 options or levels. An example enhance function will look like the following:
def enhance_media(input, output, params, headers):
    # Set Enhance API URL
    url = "https://api.dolby.com/media/enhance"
    body = {
        "input": input,
        "output": output
    }

    body.update(params)
    response = requests.request("POST", url, json=body, headers=headers)

    print('{} processed to: {}'.format(input, output))
    print(response.text)
    return output
After each step we will take a look at a new signal’s waveform and spectrogram, interpret results and compare with the others. The code for spectrogram and waveform plot can be found here:
def plot_a_waveform_and_spectrum(wave_file, title=None):
    # Create a figure object to make two plots
    fig = plt.figure(1)
    if title:
        fig.suptitle(title)

    # Plot a waveform of wav_file
    plot_waveform = plt.subplot(211)
    sample_rate, data = wavfile.read(wave_file)
    duration = len(data) / sample_rate
    time_data = np.linspace(0, duration, len(data))

    plot_waveform.plot(time_data, data)
    plot_waveform.set_xlabel('Time')
    plot_waveform.set_ylabel('Amplitude')
    ax = plt.gca()
    ax.set_xlim([0, 5])

    # Calculate and create a spectogram plot
    plot_spectrogram = plt.subplot(212)
    plot_spectrogram.specgram(data[:], Fs=sample_rate, NFFT=1024, noverlap=900)
    plot_spectrogram.set_xlabel('Time')
    plot_spectrogram.set_ylabel('Frequency')
    ax = plt.gca()
    ax.set_xlim([0, 5])

    fig.tight_layout()
    plt.savefig('{}.png'.format(wave_file))
Then, the best signal will be used in the next step. It will be chosen based on our hearing capabilities and metrics shown on plots.
Audio parameters used in this article are described on Dolby.io Enhance API page.
Original signal
The input audio signal is a famous English tongue-twister “She sells seashells by the seashore”. It was recorded on a laptop, sitting by a desk – this is a common environment that is used to make a video calls while working remotely. The tone and loudness of voice is that of a video call as well. Here you can listen to the original audio:
Step 1 – CONTENT Enhancing Parameters
The first thing we’ll try to do in this section is to try to enhance our original signal using the content parameter. This parameter enables us to enhance audio depending on the distance from the microphone to the speaker, as well as the kind of recorded content. For our purposes, I decided to compare “conference” and “meeting” modes.
from config import *
import utils

# Upload local input file which we want to enhance
initial_input_file = utils.upload_input_file(input_file_local, input_file_base, headers)

# Part 1: "Content" parameter
print('nnnEnhancing Part 1 - "Content" parametern')

# OPTION 1 - "conference"
output_content_conference = 'CONTENT_conference.mp4'
param_content_conference = {"content": {"type": "conference"}}

utils.enhance_download_analyze(initial_input_file,
                               output_content_conference,
                               output_file_base,
                               output_local_file_base,
                               param_content_conference,
                               headers,
                               output_content_conference)

# OPTION 2 - "meeting"
output_content_meeting = 'CONTENT_meeting.mp4'
param_content_meeting = {"content": {"type": "meeting"}}
utils.enhance_download_analyze(initial_input_file,
                               output_content_meeting,
                               output_file_base,
                               output_local_file_base,
                               param_content_meeting,
                               headers,
                               output_content_mee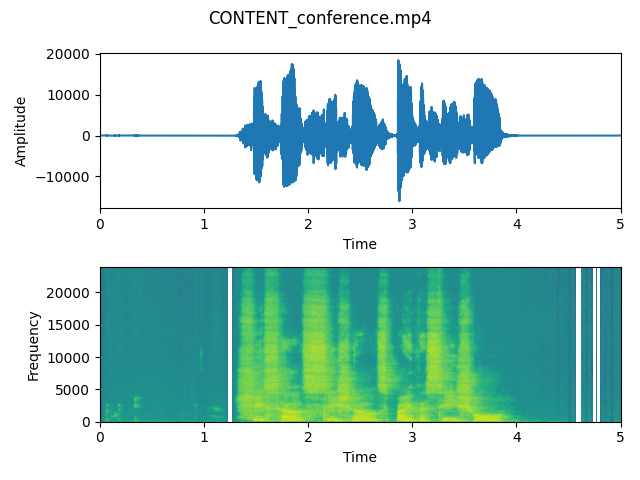
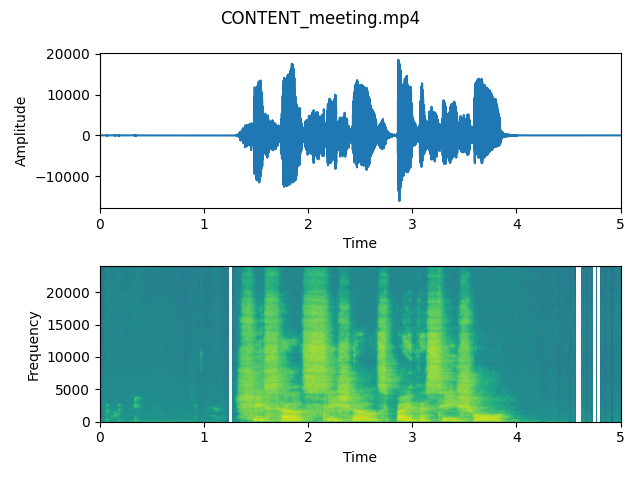
As we can observe on these plots, the waveforms don’t differ very much in case of both signals – that means that the energy of recording is really similar. This is probably because a laptop microphone creates an environment which is something in between a conference and a meeting (it is not too close to the speaker as microphone located in headphones, however it is not very distant).
In both cases we can hear that the voice is enhanced and we can hear it clearly.
However spectrograms show a slight difference between energy in frequencies present when the speaker is silent. That means that both parameters can extract a human’s voice from the whole recording and adjust the volume of background noises.
After listening to both output files, we think that the “Conference” is sligthly better. We will use it as an input to the step 2.
Step 2 – NOISE parameter
In this section we will try get rid of noise generated by a built-in laptop microphone. We will try to compare two sizes of this parameter and decide which result is better in case of output signal.
from config import *
import utils

# Part 2: "Audio NOISE" parameter
print('nnnEnhancing Part 2 - "Audio NOISE" parametern')

# Set this variable to chosen file from Part 1
output_after_step_1 = 'CONTENT_conference.mp4'  # TODO: set to choosen signal's path
best_after_step_1 = '{}/{}'.format(output_file_base, output_after_step_1)

# OPTION 1 - amount: low
output_noise_low = 'NOISE_low.mp4'
param_noise_low = {"audio": {"noise": {"reduction": {
    "enable": True,
    "amount": "low"
}
}
}}

utils.enhance_download_analyze(best_after_step_1,
                               output_noise_low,
                               output_file_base,
                               output_local_file_base,
                               param_noise_low,
                               headers,
                               output_noise_low)

# OPTION 2 - amount: high
output_noise_high = 'NOISE_high.mp4'
param_noise_high = {"audio": {
    "noise": {"reduction": {
        "enable": True,
        "amount": "high"
    }
    }
}}

utils.enhance_download_analyze(best_after_step_1,
                               output_noise_high,
                               output_file_base,
                               output_local_file_base,
                               param_noise_high,
                               headers,
                               output_noise_high)
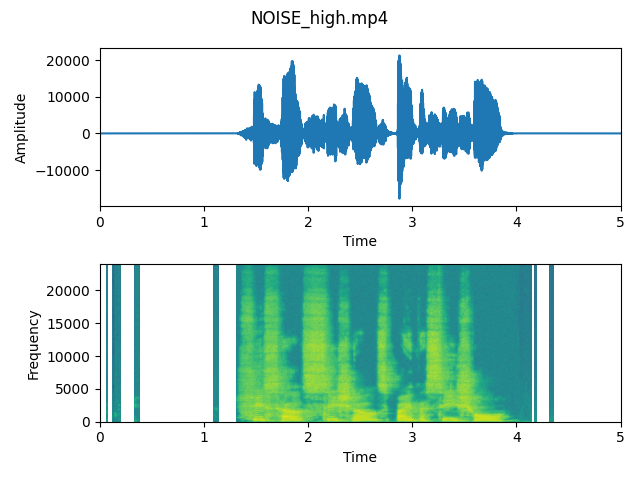
As we can see on the plots, differences are quite visible. Especially spectrograms show that the higher level of noise reduction results in eliminating some frequencies from the signal. It shows us that the algorithm works and it really enables us to lower the power of unwanted frequencies.
After listening to both output files, we think that the “Noise high” is sligthly better and more clear for listeners. On the waveform we can observe that especially in the beginning of voice recording, the noise is detected and the part of signal is reduced. We will use it as an input to the step 3.
Step 3 – SPEECH parameter
In this last section we will try to adjust some speech parameters, which are linked to irritating sounds made by sounds like “p”, “sh”, or sounds produced by mouth before and after opening it. We will try to compare 3 types of parameters and compare what result they have on our signal chosen from the previous step.
from config import *
import utils

# Part 3: "Audio SPEECH" parameter
print('nnnEnhancing Part 3 - "Audio SPEECH" parametern')

# It doesn't need so much noise reduction
output_after_step_2 = 'NOISE_high.mp4'  # TODO: set to choosen signal's path
best_after_step_2 = '{}/{}'.format(output_file_base, output_after_step_2)

# OPTION 1 - speech: sibilance
output_speech_sibilance = 'SPEECH_sibilance.mp4'
param_speech_sibilance = {"audio": {
    "speech": {
        "sibilance": {"reduction": {
            "enable": True,
            "amount": "high"}
        }}}}

utils.enhance_download_analyze(best_after_step_2,
                               output_speech_sibilance,
                               output_file_base,
                               output_local_file_base,
                               param_speech_sibilance,
                               headers,
                               output_speech_sibilance)

# OPTION 2 - speech: plosive
output_speech_plosive = 'SPEECH_plosive.mp4'
param_speech_plosive = {"audio": {
    "speech": {
        "plosive": {"reduction": {
            "enable": True,
            "amount": "high"}
        }}}}

utils.enhance_download_analyze(best_after_step_2,
                               output_speech_plosive,
                               output_file_base,
                               output_local_file_base,
                               param_speech_plosive,
                               headers,
                               output_speech_plosive)

# OPTION 3 - speech: click
output_speech_click = 'SPEECH_click.mp4'
param_speech_click = {"audio": {
    "speech": {
        "click": {"reduction": {
            "enable": True,
            "amount": "high"}
        }}}}

utils.enhance_download_analyze(best_after_step_2,
                               output_speech_click,
                               output_file_base,
                               output_local_file_base,
                               param_speech_click,
                               headers,
                               output_speech_click)
As we can see on the plots, differences are almost invisible. Comparing to previous steps, the voice was almost untouched and spectrogram only lost some data about frequencies where the voice is silent.

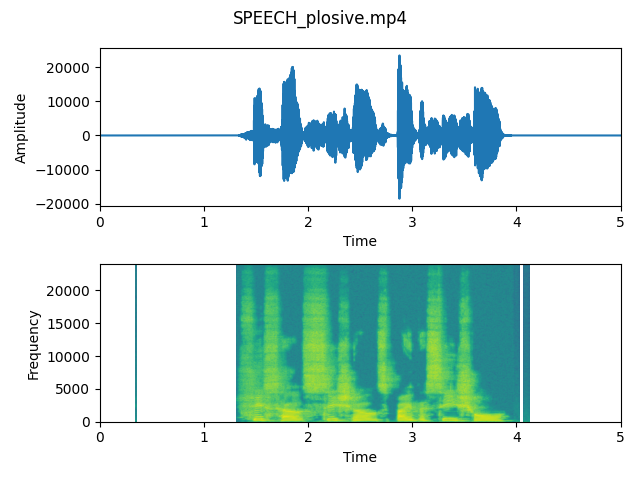
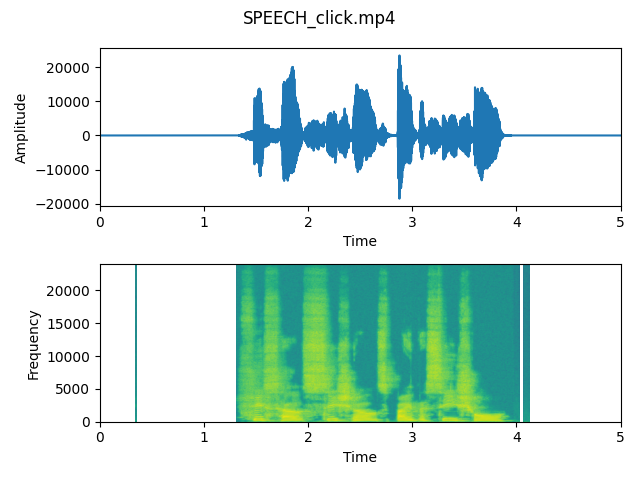
After listening to all output files, we think that the difference is not so significant. The signal has not a lot of problematic sounds, so we don’t need to be surprised about the results. In case of recordings where the microphone is placed really close to the speaker, harsh sounds are more visible on the plots and reduced after applying parameters.
Summary of Dolby.io Enhance Paramters
In this little experiment, we were able to observe how different Enhance API parameters affect processed audio files.
We are also able to compare original input with audio file processed by the Dolby.io Enhance API. We see that the processed file is better in terms of extracting voice from the whole audio file.
Of course, if we decide which workflow is the best for our case, we can apply all needed parameters at once, without doing 3 separate steps. It enables us to create only one output file and save time, money and memory on our cloud storage provider.
With this article, you can experiment with your settings and choose different metrics to find the perfect configuration for your audio files.
Source code
Source code, plots and signals can be found on GitHub: https://github.com/dolbyio-samples/media-sample-python-enhance-parameters. To read more, see this post on waveform visualization.


")