


On December 4th, Twilio announced it has decided to end-of-life Twilio Programmable Video. Twilio Video was a programable real-time WebRTC video delivery service perfect for building high-quality video experiences for e-commerce, education, and telehealth.
Since Twilio is ending this product, users must switch to an alternative WebRTC streaming provider that can provide quality, scalable, low-delay video and audio streams.
Enter Dolby Millicast.
Dolby.io Millicast is a real-time WebRTC streaming service for delivering high-quality and scalable web broadcasting making it perfect for one-to-many and few-to-many use cases.
Given that Twilio is ending Twilio Video, the Dolby.io team wanted to put together a guide to help migrate users that fit into the one-to-many and few-to-many use cases. In the below sections, we’ll compare and contrast Twilio Video and Dolby Millicast and provide some examples and sample code for migrating platforms.
Twilio Video vs Dolby Millicast Streaming
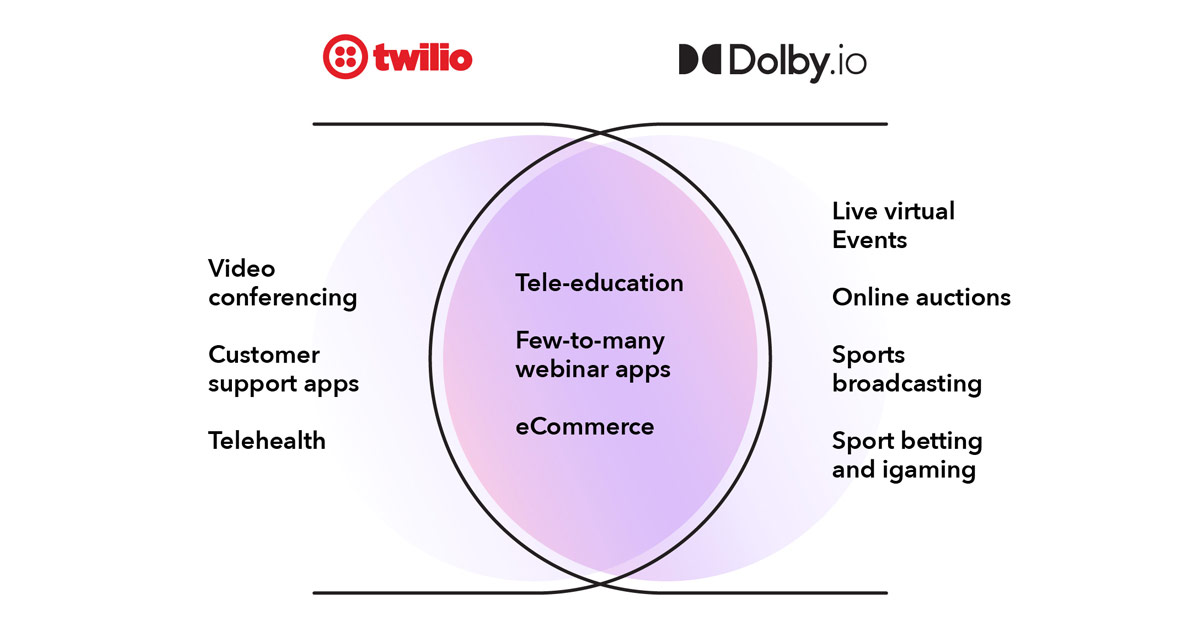
The main difference between Twilio Video and Dolby.io Real-time Streaming is that Dolby.io is a WebRTC streaming service whereas Twilio Video is a WebRTC audio-video service designed for the video conferencing use case. This means that Dolby.io Real-time Streaming’s media servers are configured first for real-time scale and quality whereas Twilio’s is configured for multi-participant conferencing.
Twilio’s media servers are configured in such a way that the service can create conferences with dozens and dozens of video and audio participants. Given that Dolby.io Real-time Streaming was designed differently, Dolby.io is much more suited for few-to-many broadcast scenarios such as tele-education or live events, where you might have a few presenters and hundreds, thousands, or millions of viewers.
At a glance, the two services have similar offerings, however, Dolby.io focuses on quality and scale. Below is a list of common features offered by both platforms:
Twilio Video
– Optimized large-conference interactivity
– Supports broadcasts up to 1080p
– Video limited at 30 FPS
– Supports video codecs VP8 and H264
– Encrypted video and audio
– Billed by minutes consumed
– Pay-as-you-go or contract
– WebRTC Simulcast Support
– 24/7 Support
– Global Feed Delivery
– Geoblocking
– IP Blocking
– Recording Supported
– Screen sharing supported
– Broad SDK support
Dolby.io Real-time Streaming
– Optimized for large viewership
– Low delay streaming (<500ms)
– Supports broadcasts up to 4k
– We support video all the way up to 60 FPS
– Supports video codecs VP8, VP9, AV1, H264, and H265.
– Encrypted video and audio
– Billed by bandwidth consumed
– Pay-as-you-go or contract
– WebRTC Simulcast Support
– 24/7 Support
– Global Stream Delivery
– Geoblocking
– IP Blocking
– Recording Supported
– Screen sharing supported
– Broad SDK support
– Dolby.io includes many more features. If you’re curious feel free to reach out.
At a high level, Dolby.io Real-time streaming has all the tools to build an excellent conferencing experience. Dolby.io’s SDKs are designed for building streaming experiences giving the power to the developer to decide how to present the experience. This means that when building a webinar application you need to self-manage things like tile placement for incoming video feeds. For example, to provide end-viewers an optimal experience, we limit the amount of bandwidth that a viewer can consume to 12 Megabits of video and audio per second. It is up to you to decide how to manage quality. This could be 12 1-megabit video streams or 3 4-megabit video streams. If you leverage simulcast, the adaptive bitrate mechanism in WebRTC, you can have some tiles consume the higher bandwidth layer and some consume the lower bandwidth layer (think of large presenters vs smaller tiles on the side). But don’t worry, we have plenty of samples to get you started.
If you have questions about how to structure stream playback to fit within our SDK and these limitations please feel free to contact us.
Migrating from Twilio Video to Dolby.io Streaming
The best way to understand how to migrate to Dolby.io Streaming is to build an example webinar app. In this section, we’ll be outlining how to migrate your platform from Twilio Video to Dolby.io Streaming using the JavaScript SDKs as an example.
Building a webinar app with multiple presenters is very straightforward using the Dolby.io platform. To get started first create a free Dolby.io account. Once you have an account created follow the 5-minute getting started guide to get familiar with the dashboard and build a simple streaming app.
For Dolby.io we have slightly different terminology for how we organize broadcasts, for the rest of the blog keep in mind that:
- A Twilio Conference Room is a Dolby.io stream.
- A Participant is a source within a Dolby.io Multisource stream.
- A viewer like in Twilio, is just a viewer.
With the basics out of the way, we can learn how to create a multi-presenter broadcast and how to handle client-side mixing.
If you’d rather just learn by looking at a completed project check out this GitHub repo here.
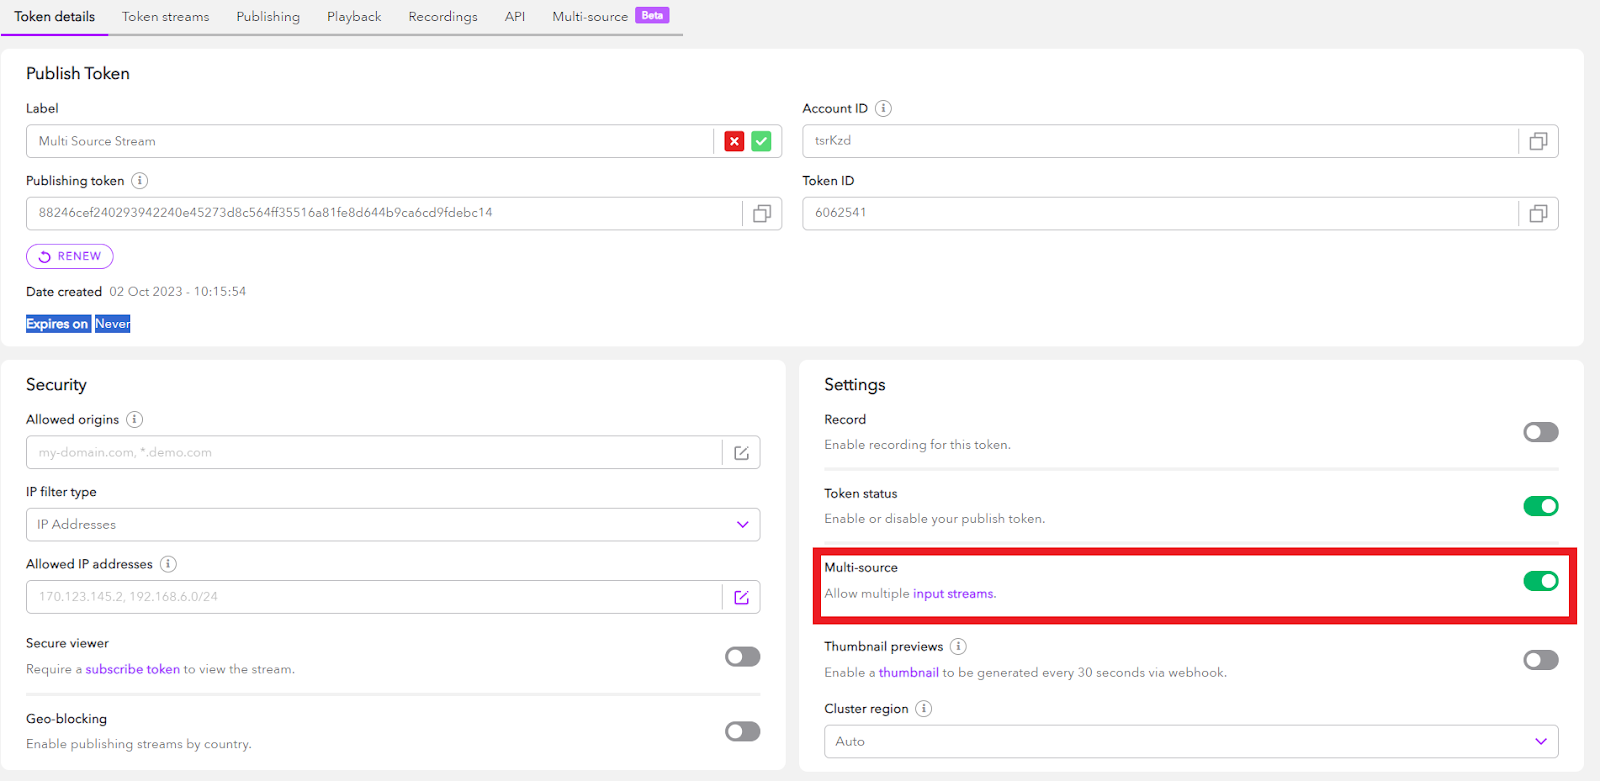
Part #1: Creating a Multisource stream
Normally, a Publishing token can only ingest (and hence egress) one audio and video stream. To get started building a few-to-many app we first need to make sure we configure our Publishing token to ingest and egress multiple streams. This setting is called Multisource, and once enabled it allows the contribution of multiple video and audio tracks, each distinguished by a source ID.
This can be done in the dashboard (as pictured below) or programmatically.
Part #2: Start Publishing a Feed to Dolby.io
With a multisource Publishing token created, we can begin publishing multiple streams. To do this, create an HTML file called host.html and include:
- The Millicast SDK either via a CDN or via Node.
- Some basic HTML structure for your page.
- A “Participate” button hosts can click to begin the stream.
- A script section of the HTML file where you can add your Dolby.io
streamName,AccountID,publishing Token, and a custom name that will serve as thesourceIDfor the broadcast. - A function, which we’ll define in a JavaScript file later called
startPublishingthat takes in yourpublishToken, streamName,andparticipantName. - A function, which we’ll define in a JavaScript file later called
startListeningthat takes in yourstreamAccountId, streamName, and participantName.
Below is an example of a host.html file with the above features included:
<html>
  <head>
    <title>Dolby.io Real-time Streaming - Webinar</title>
    <script src="https://cdn.jsdelivr.net/npm/@millicast/sdk/dist/millicast.umd.min.js"></script>
    <link
      href="https://cdn.jsdelivr.net/npm/[email protected]/dist/css/bootstrap.min.css"
      rel="stylesheet"
      integrity=""
      crossorigin="anonymous"
    />
    <script src="https://cdn.jsdelivr.net/npm/[email protected]/jsrender.min.js"></script>
    <script src="shared.js"></script>
  </head>
  <body>
    <div class="bg-dark text-white px-4 py-4">
      <h1>Dolby.io Real-time Streaming - Webinar</h1>
    </div>
    <div class="px-4 mt-4">
      <div class="mt-3">
        <div class="shadow p-3 mb-5 bg-body rounded text-center">
          <button onclick="participate(this)" style="height: 50px; width: 150px">
            Participate
          </button>
          <ul id="participants" class="list-group"></ul>
        </div>
      </div>
    </div>

    <script>
	  const urlParams = new URLSearchParams(window.location.search);

	  // Your Dolby.io stream credentials
      const streamAccountId = "ACCOUNT_ID";
      const streamName = "STREAM_NAME";
      const publishToken = "PUBLISH_TOKEN";
	  const participantName = urlParams.get('name') ?? "";

      async function participate(button) {
        button.remove();

        await startPublishing(publishToken, streamName, participantName);
        await startListening(streamAccountId, streamName, participantName);
      }
    </script>
  </body>
</html>
With the HTML file created, let’s create a JavaScript file called shared.js. Inside of shared.js we create an async function called startPublishing which uses our multisource publishing token, streamName, and a user-defined “participant name” that will serve as the sourceID for the stream, to create a broadcast.
Using the Millicast JavaScript SDK we can use these parameters to start a broadcast and create a media stream.
The function below is an example of how you might implement startPublishing:
async function startPublishing(publishToken, streamName, participantName) {
  console.log("Start publishing");

  const tokenGenerator = () =>
    millicast.Director.getPublisher({
      token: publishToken,
      streamName: streamName,
    });

  const millicastPublish = new millicast.Publish(streamName, tokenGenerator);

  const mediaStream = await navigator.mediaDevices.getUserMedia({
    audio: true,
    video: {
      height: { max: 360 },
      width: { max: 480 },
    },
  });

  await millicastPublish.connect({
    mediaStream: mediaStream,
    sourceId: participantName,
  });

  const template = jsrender.templates(`
    <li id="local-participant" class="list-group-item">
      <video id="local-video" controls="false" autoplay="true"></video><br />
      <span class="participant-name">${participantName} (<i>me</i>)</span>
    </li>
  `);
  const rendering = template.render();

  const participantsDiv = document.getElementById("participants");
  participantsDiv.insertAdjacentHTML("afterend", rendering);

  const videoElement = document.getElementById("local-video");
  const stream = new MediaStream(mediaStream.getVideoTracks());
  videoElement.srcObject = stream;
  videoElement.play();
}
Part #3: Start Listening for a Broadcast
Once a broadcast is live, you can start “listening” for it. A viewer may want to listen for a broadcast so they know when a stream is live and can begin viewing it. In the case of building a multi-publisher webinar app, we also want the publisher to listen for streams as those will be the co-presenters.
Because of how the Dolby.io service works, we must make sure we don’t accidentally “listen” for our own stream, distinguished by the sourceID (participateName) specified above. Hence, we include a excludeSourceId field that we can pass to the Millicast SDK to prevent us from listening to our stream.
Using the Millicast SDK, along with a streamName, a streamAccountID, and a sourceID to exclude, we can begin listening for a stream to view.
async function startListening(streamAccountId, streamName, excludedSourceId) {
  console.log("Start listening");

  const tokenGenerator = () => millicast.Director.getSubscriber({
    streamName: streamName,
    streamAccountId: streamAccountId,
  });

  const viewer = new millicast.View(streamName, tokenGenerator);

  const excludedSourceIds = excludedSourceId ? [excludedSourceId] : null;

  do {
    try {
      await viewer.connect({
        events: ["active"],
        excludedSourceIds: excludedSourceIds,
      });

      return;
    } catch (error) {
      if (error.message === "stream not being published") {
        await sleep(3);
      } else {
        console.error(error);
        return;
      }
    }
  } while (true);
}
Our listening function above is still incomplete, however, as we have no functionality once a stream is actually detected. This is where Broadcast Events come in. A broadcast event is essentially whenever a stream becomes active or inactive and can be listened for and controlled by the Millicast SDK. In the above code, once the viewer object is created, we can add a broadcastEvent listener which will trigger a function called OnBroadcastEvent:
viewer.on("broadcastEvent", (event) => onBroadcastEvent(event, viewer));OnBroadcastEvent takes the event and, if active, creates a media stream with the feed and adds it to a video object:
async function onBroadcastEvent(event, viewer) {
    console.log("broadcastEvent", event);

    if (event.name === "active") {

        const sourceId = event.data.sourceId;
        console.log('Source ID', sourceId);

        const mediaStream = new MediaStream();

        let audioMediaId, videoMediaId;
        let audioTrackId, videoTrackId;

        const trackAudio = event.data.tracks?.find(({ media }) => media === 'audio');
        if (trackAudio) {
            const audioTransceiver = await viewer.addRemoteTrack('audio', [mediaStream]);
            audioMediaId = audioTransceiver?.mid ?? undefined;
            audioTrackId = trackAudio.trackId;
        }

        const trackVideo = event.data.tracks?.find(({ media }) => media === 'video');
        if (trackVideo) {
            const videoTransceiver = await viewer.addRemoteTrack('video', [mediaStream]);
            videoMediaId = videoTransceiver?.mid ?? undefined;
            videoTrackId = trackVideo.trackId;
        }

        const mapping = [];
        if (audioMediaId) {
            mapping.push({
                media: 'audio',
                trackId: audioTrackId,
                mediaId: audioMediaId,
            });
        }
        if (videoMediaId) {
            mapping.push({
                media: 'video',
                trackId: videoTrackId,
                mediaId: videoMediaId,
            });
        }

        const template = jsrender.templates(`
            <li id="participant-${sourceId}" data-media-ids="${mapping.map(m => m.mediaId).join(",")}" class="list-group-item">
                <video id="video-${sourceId}" controls="false" autoplay="true"></video><br />
                <span class="participant-name"> ${sourceId} </span>
            </li>
        `);
        const rendering = template.render();

        const participantsDiv = document.getElementById("participants");
        participantsDiv.insertAdjacentHTML('afterend', rendering);

        const videoElement = document.getElementById(`video-${sourceId}`);
        videoElement.srcObject = mediaStream;
        videoElement.width = 480;
        videoElement.height = 360;
        videoElement.play();

        console.log('About to project Source ID:', sourceId, '-> Track ID:', audioTrackId, videoTrackId);
        await viewer.project(sourceId, mapping);
        console.log('Projected');

    }
}
At this stage, your app should create a stream and listen for other streams created on the same token. If another stream is created on the token it should add it to a video player on host.html for you to interact with.
Part #4: Building the Viewer Experience
With the foundation laid down in shared.js building a viewer experience is straightforward. Like host.html you must include:
- The Millicast SDK either via a CDN or via Node.
- Some basic HTML structure for your page.
- A “Listen” button viewer can click to begin the stream.
- A script section of the HTML file where you can add your Dolby.io
streamName,andAccountID. - A function, which we’ll define in a JavaScript file later called
startListeningthat takes in yourstreamAccountIdandstreamName.
Whereas the publisher experience requires a user to publish and listen, the viewer experience requires a viewer to just listen. Hence let’s create a file, viewer.html, and include everything mentioned:
<html>
  <head>
    <title>Dolby.io Real-time Streaming - Webinar</title>
    <script src="https://cdn.jsdelivr.net/npm/@millicast/sdk/dist/millicast.umd.min.js"></script>
    <link
      href="https://cdn.jsdelivr.net/npm/[email protected]/dist/css/bootstrap.min.css"
      rel="stylesheet"
      integrity=""
      crossorigin="anonymous"
    />
    <script src="https://cdn.jsdelivr.net/npm/[email protected]/jsrender.min.js"></script>
    <script src="shared.js"></script>
  </head>
  <body>
    <div class="bg-dark text-white px-4 py-4">
      <h1>Dolby.io Real-time Streaming - Webinar</h1>
    </div>
    <div class="px-4 mt-4">
      <div class="mt-3">
        <div class="shadow p-3 mb-5 bg-body rounded text-center">
          <button onclick="listen(this)" style="height: 50px; width: 150px">
            Listen
          </button>
          <ul id="participants" class="list-group"></ul>
        </div>
      </div>
    </div>

    <script>
      // Your Dolby.io stream information
      const streamAccountId = "ACCOUNT_ID";
      const streamName = "STREAM_NAME";

      async function listen(button) {
        button.remove();
        await startListening(streamAccountId, streamName);
      }
    </script>
  </body>
</html>
With the file created, you should be able to listen for a stream. If you’d like to test out this file you can set accountID to “k9Mwad” and streamName to “multiview”.
If you’re still having trouble getting the app to work check out this GitHub repo here.
Final Thoughts on Migrating to Dolby.io
This guide gives an introductory overview of how you can build multi-participate webinar experiences using the Dolby.io platform. As Twilio retires video API, Dolby.io offers a solution for those looking for a one-to-many or few-to-many WebRTC streaming solution. To learn more about Dolby.io check out our Documentation, Blogs, and feel free to chat with the team to learn more about the platform and how we can help enable you to build a high-quality video experience.


")