


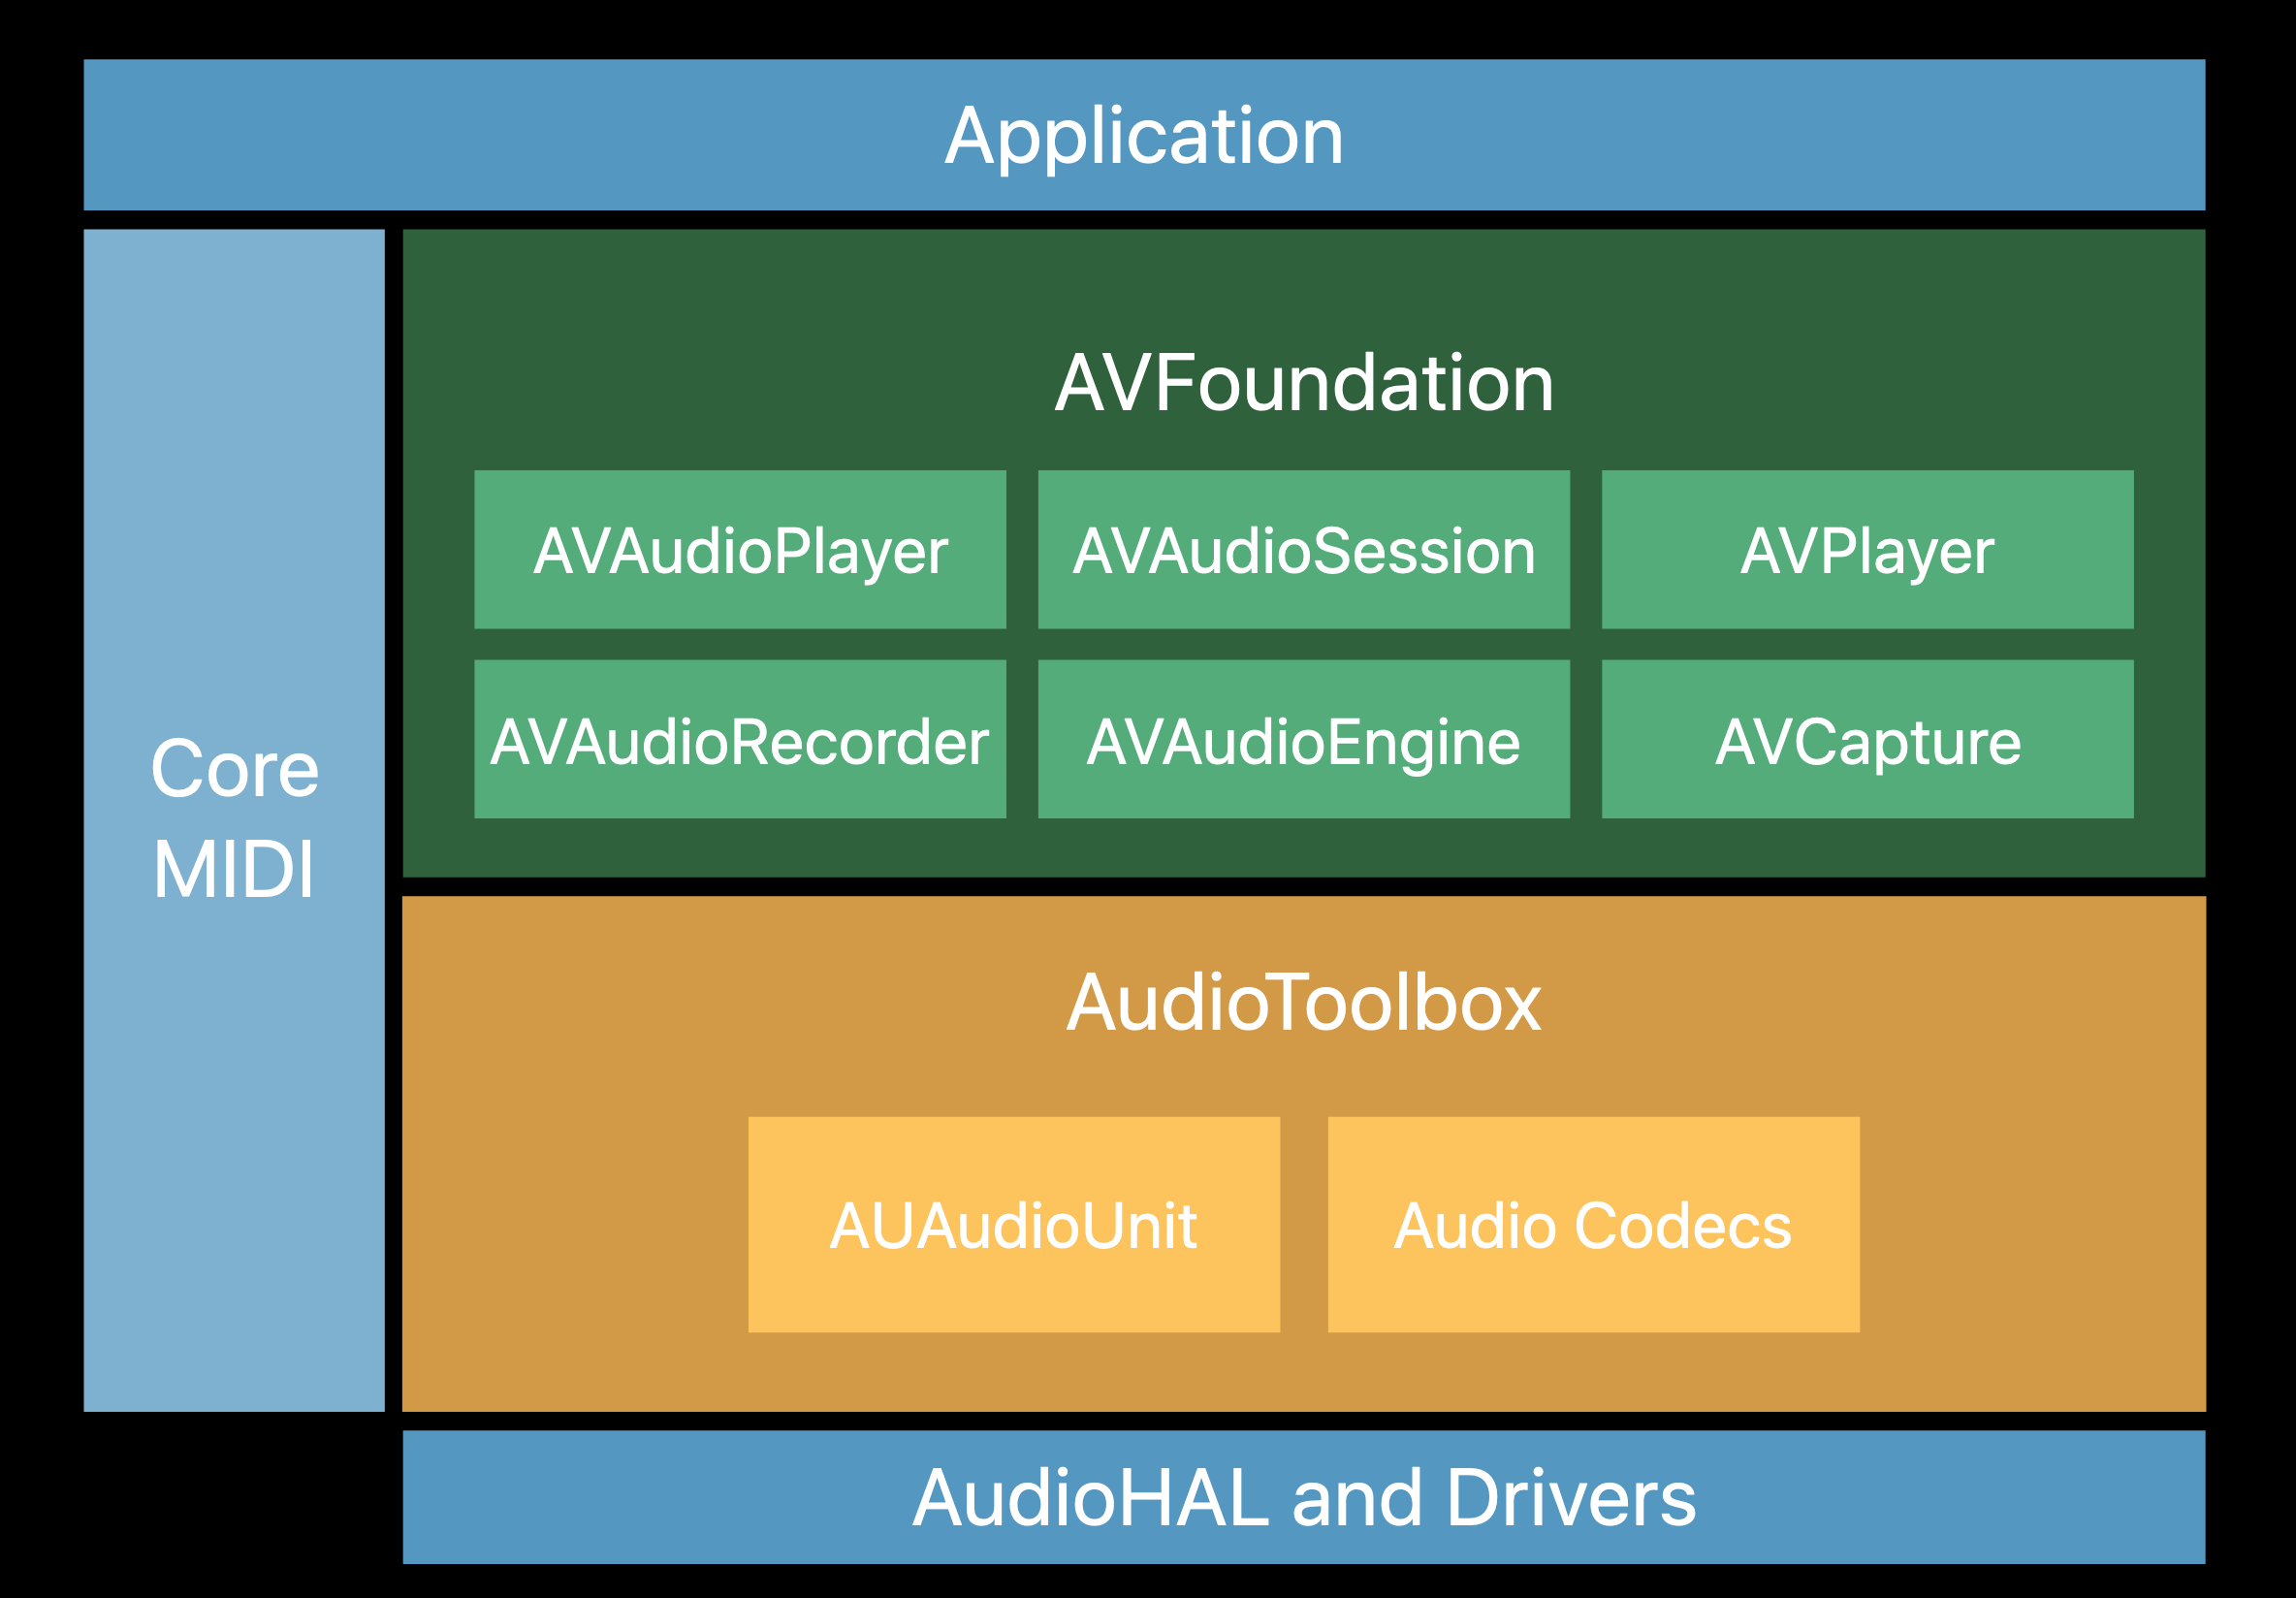
There are a few different sets of iOS libraries that provide audio recording functionality. It can be confusing to a beginner which API to use. This article briefly shows the purpose of each of these APIs and their pros and cons.
- AVAudioRecorder
- AVCapture
- AVAudioEngine
- AudioToolbox
AVAudioRecorder
AVAudioRecorder is the simplest audio recording API in iOS. You basically tell iOS the path where you want to record to and any audio format settings, such as stereo/mono and AAC/WAV. You then can start and stop the recording at the time when you want.
The disadvantage of it is, it doesn’t provide you any audio sample buffer when it does the recording. That means you can’t analyze or process the audio before it writes to the target file. In addition, it also doesn’t support video recording.
AVAudioRecorder Example
This example startRecording(), needs to decide where to save the audio, and configure the recording settings before starting recording.
We also need to add a way to finishRecording(). We stop the recording then nullify the recording instance.
let filename = URL(string: "out.m4a")!
let settings = [AVEncoderBitRatePerChannelKey: 96000]

func startRecording()
    // This needs to decide where to save the audio,
    configure the recording settings, then start
    recording.

    do {
        // See Apple API reference for details of settings
        audioRecorder = try AVAudioRecorder(url: filename, settings: settings)
        audioRecorder.delegate = self
        audioRecorder.record()
    } catch {
        finishRecording()
    }
}

func finishRecording() {
    audioRecorder.stop()
    audioRecorder = nil
}
We assign self to be the delegate of the audio recorder. This means you need to conform your class to the AVAudioRecorderDelegate protocol to handle callbacks from AVAudioRecorder.
func audioRecorderDidFinishRecording(_ recorder: AVAudioRecorder, successfully flag: Bool) {
    // Show in UI the audio recording has stopped
    audioRecordingStopped(successfully: flag)
}

func audioRecorderEncodeErrorDidOccur(AVAudioRecorder, error: Error?) {
    // Show in UI, error happened in audio recording
    audioReocrding(with error: error)
}
AVCapture
AVCapture consists of AVCaptureDevice, AVCaptureDeviceInput, AVCaptureSession, and AVCaptureOutput. It provides a simple degree of input, output node graph like processing architecture. You’re able to intercept the sample buffer and do certain analysis and processing over it. It also provides the ability to do video capture.
However, it is still not designed for any serious signal analysis and processing. It is missing some desirable configurations.
AVCaptureSession Example
We need to prepare an AVCaptureSession for the audio input device. This example only shows audio capture.
self.captureSession = AVCaptureSession()

let queue = DispatchQueue(label: "AudioSessionQueue", attributes: [])
let captureDevice = AVCaptureDevice.default(for: AVMediaType.audio)
var audioInput : AVCaptureDeviceInput? = nil

do {
    try captureDevice?.lockForConfiguration()
    audioInput = try AVCaptureDeviceInput(device: captureDevice!)
    captureDevice?.unlockForConfiguration()
} catch {
    // Handle capture devices could not be set
}
We can then add input to the session.
// Add audio input
if captureSession.canAddInput(audioInput!) {
    captureSession.addInput(audioInput!)
} else {
    // throw inputsAreInvalid
}
We also need to prepare session output. In this example, we use AVCaptureAudioFileOutput, so the output is written to a file. We could also use AVCaptureAudioDataOutput, if we wanted to intercept the input audio sample buffer. The intercepted data can be used for any processing needs.
audioOutput = AVCaptureAudioFileOutput()
if captureSession.canAddOutput(audioOutput!) {
    captureSession.addOutput(audioOutput!)
} else {
    // throw outputIsInvalid
}
captureSession.startRunning()
With the capture session running, we can call functions to start and stop recording.
We assign our class as the recording delegate. This implements our class to the AVCaptureFileOutputRecordingDelegate protocol to handle the callback from AVCaptureAudioFileOutput.
func startRecording() {
    guard let captureSession = self.captureSession, captureSession.isRunning else {
        // Error, capture session is not yet ready
        return
    }
    let paths = FileManager.default.urls(for: .documentDirectory, in: .userDomainMask)
    let fileUrl = paths[0].appendingPathComponent("output.m4a")
    try? FileManager.default.removeItem(at: fileUrl)
    audioOutput!.startRecording(to: fileUrl, outputFileType: .m4a, recordingDelegate: self)
}

func stopRecording() {
    guard let captureSession = self.captureSession, captureSession.isRunning else {
        // Error, capture session is not yet ready
        return
    }
    audioOutput?.stopRecording()
}
AVAudioEngine
AVAudioEngine is a wrapper of the Audio Unit, a low-level software audio module in iOS/macOS. It provides a framework to manage the starting of an audio capture/recording or playback. It is highly recommended by Apple.
You dynamically create an audio graph and processing chain. You then use TAP to get a peek of the audio buffer and can analyze them. To do audio processing, you need to add a processing node to the graph. This library can also be used as an AudioUnit App Extension and act as an audio processing plug-in to other audio apps. It is highly configurable and there are some default processing nodes that are ready to be used.
The disadvantage of it is it doesn’t support video capture natively. It also requires more effort to implement and requires a deeper knowledge of audio engineering with buffer management.
AVAudioEngine Example
We need to prepare an AVAudioEngine instance and the corresponding AVAudioFile for output.
var engine = AVAudioEngine()
var file: AVAudioFile?
var player = AVAudioPlayerNode() // Optional

func prepareAudioOutputFile(for outputURL: URL) {
    file = AVAudioFile(forWriting: outputURL, settings: engine.inputNode.inputFormatForBus(0).settings, error: nil)
    engine.attachNode(player)
    engine.connect(player, to: engine.mainMixerNode, format: engine.mainMixerNode.outputFormatForBus(0)) //configure graph
    engine.startAndReturnError(nil)
}
We may startRecording() as the following . In this way, you may process the buffer before writing it to the output.
func startRecording() {
    engine.inputNode.installTapOnBus(0, bufferSize: 1024, format: engine.mainMixerNode.outputFormatForBus(0)) { (buffer, time) -> Void in
        file?.writeFromBuffer(buffer, error: nil)
        return
    }
}
To stopRecording() when complete you remove the input node.
func stopRecording() {
    engine.inputNode.removeTapOnBus(0)
}
Audio Toolbox
Audio Toolbox is a low-level, C programming interface in iOS/macOS. With it you can do recording, playback, and stream parsing.
It is highly configurable but can be difficult to use. It is missing the ability to manage input, output, and processing nodes. The Audio Unit Processing Graph Services are deprecated. In addition, it doesn’t support native video capture.
It doesn’t seem to be a framework that is promoted by Apple for most use cases.
Summary
If you only need to do an audio-only recording and the real-time audio analysis or processing is not necessary, then AVAudioRecorder is your best choice.
If you need some real-time audio capture analysis, but not significant processing, the AVCapture may be the best fit for audio and video.
If you need serious real-time audio capture analysis and processing. the AVAudioEngine is highly extensible and configurable.
| Sample Buffer Access | Video | Effort | |
|---|---|---|---|
| AVAudioRecorder | No | No | Low |
| AVCapture | Yes | Yes | Mid |
| AVAudioEngine | Yes | No | High |
| Audio Toolbox | Yes | No | Very High |


")