


Today’s audio workflows can involve massive amounts of audio and video content coming from many sources which contain both user generated and professionally produced content.
Take a typical podcast workflow for example. There might be reporters capturing interviews with professional audio equipment, sourcing interviews over video conference calls, pulling audio and video from sources off social media and the internet. Many formats and sources adds to the complexity.
Most organizations use file sharing tools like Dropbox, Box, and Google Drive to organize, collect and store the various audio and video recordings.
Once collected the next step in the workflow is both time intensive and expensive.
- The reporter has to log and transcribe the raw content
- If it’s a video podcast, the video production team ingests the audio and video content into video production software like premiere, avid or final cut, if the audio requires processing, a limited amount may be done in the video software, or more using plugin or alternatively using external audio tools and a Digital Audio Workstation (DAW)
- Within those audio tools an extensive time is spent listening and tweaking the audio settings to filter, enhance and cleanup poor audio.
- Time is then spent re-linking and syncing back the audio to the original video clips
- Similarlly if it’s an audio podcast, the same steps to sweeten and enhance the audio will apply.
In a traditional A/V workflow this is a lot of hands-on work that must be managed by staff that has experience with improving the quality of audio.
But what if is possible to remove the expensive, time intensive parts of the production workflow? Is that even possible?
The short answer is YES! Most audio problems have a signature making them easy to identify and the solution is a series of steps that break down the problem into distinct audio processing tasks. Sit in with an audio engineer and watch them work. They carefully listen and instinctively know what filters and processes to apply. The work is iterative and repetitive.
The engineering team at Dolby have been doing this work for decades and applying those efforts into their algorithms. Dolby.io was created to extend their efforts and make the algorithms available into an accessible API.
One of the great things about Dolby.io’s API approach to audio processing is the basic simplicity of moving the process of managing audio workflows to the cloud.
Doing so enables the ability to create more efficient and faster workflow that can handle complex audio processing tasks. Tasks normally handled by the best audio engineers in the world can now be replicated in the cloud with Dolby’s technology.
No doubt an audio engineer can produce amazing results, but that comes at the real cost of both time and expertise. For a fraction of those costs, Dolby.io’s suite of media API can solve a variety of audio issues.
The catch is, Dolby.io is an API, and let’s face it, not everyone who requires great audio is a software developer.
So then, do I need to be a software developer to integrate Dolby.io into my audio processing workflow?
Absolutely not! Today we have many no code solutions to allow non-developers to build rich integrations with our API. To that end-we just integrated our product into the ever-popular Zapier platform.
Let’s build a simple workflow together that will take audio and video files uploaded to a Dropbox folder and process them with the Dolby.io Enhance API.
Requirements
We’ll build an integration workflow with these services.
Download our Audio Sample File
Tip: Make sure you’re signed in before you start.
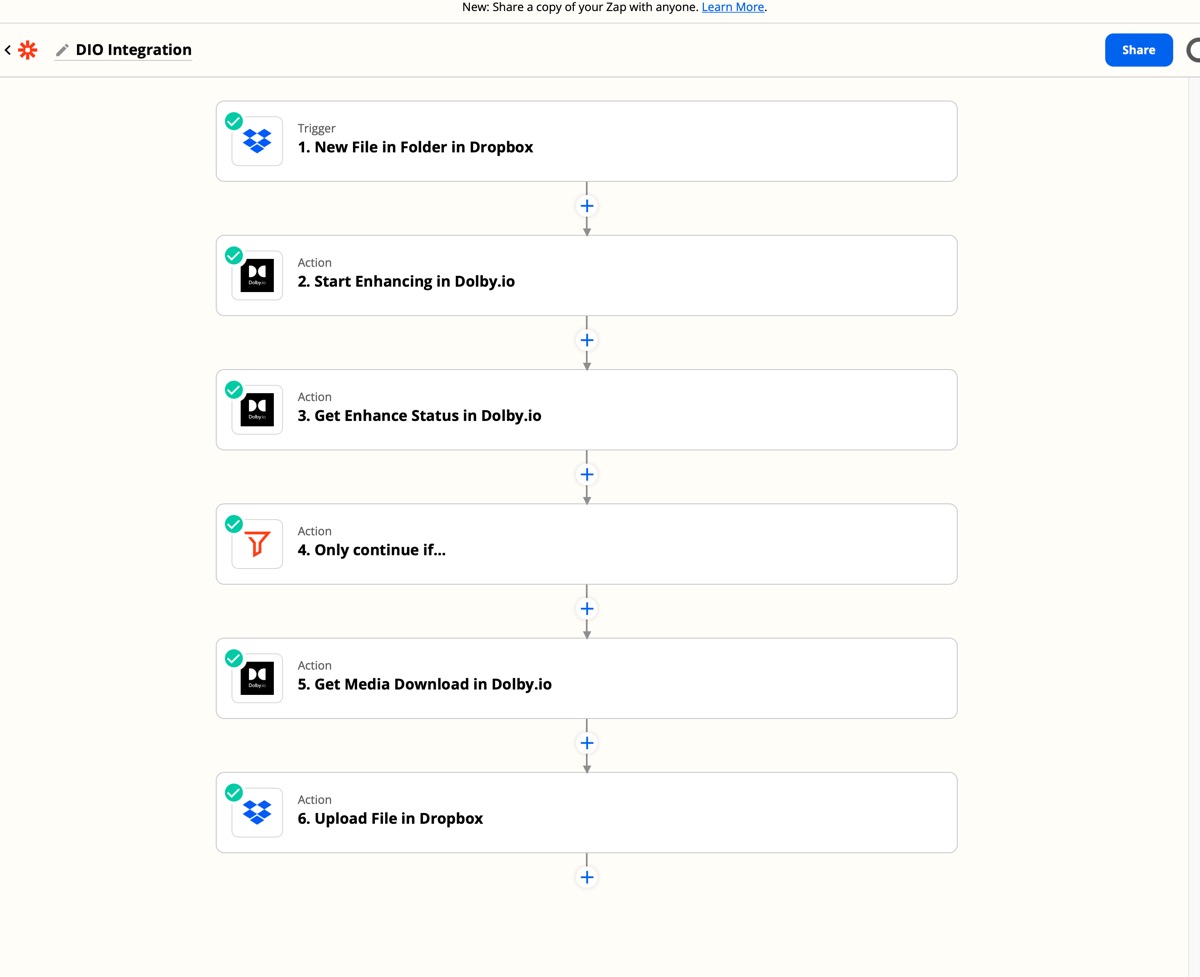
Overview of the steps we’ll build
We begin the integration with a trigger that runs the Zap when a new file is added to Dropbox. Next the following action steps will run.
Note: For this tutorial we’ll be using dropbox. If you choose an alternate file storage platform such as One Drive, the pattern and steps will be similar.
Steps
- Trigger: New file arrives in folder within Dropbox
- Action: Start Enhancing in Dolby.io
- Action: Get Enhance Status in Dolby.io
- Action: Only Continue if
- Action: Get media Download in Dolby.io
- Action: Upload Enhanced File to Dropbox
When we complete our Zap integration will look something like this.
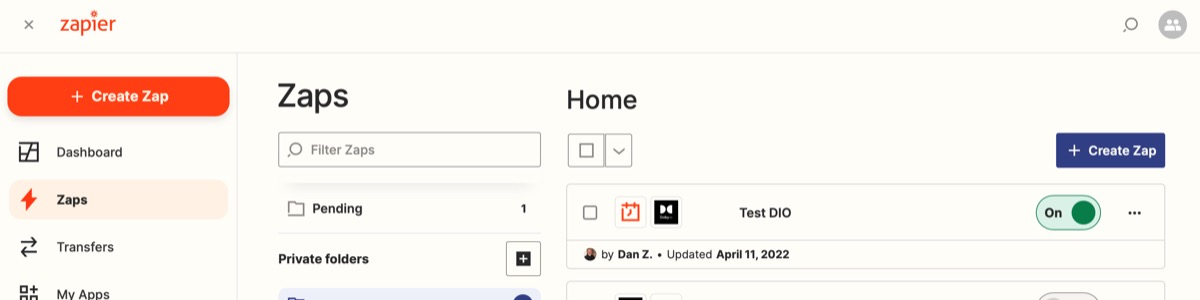
Create a Zap
Begin in Zapier by creating a new Zap. Select Zaps from the menu and click create Zap button.
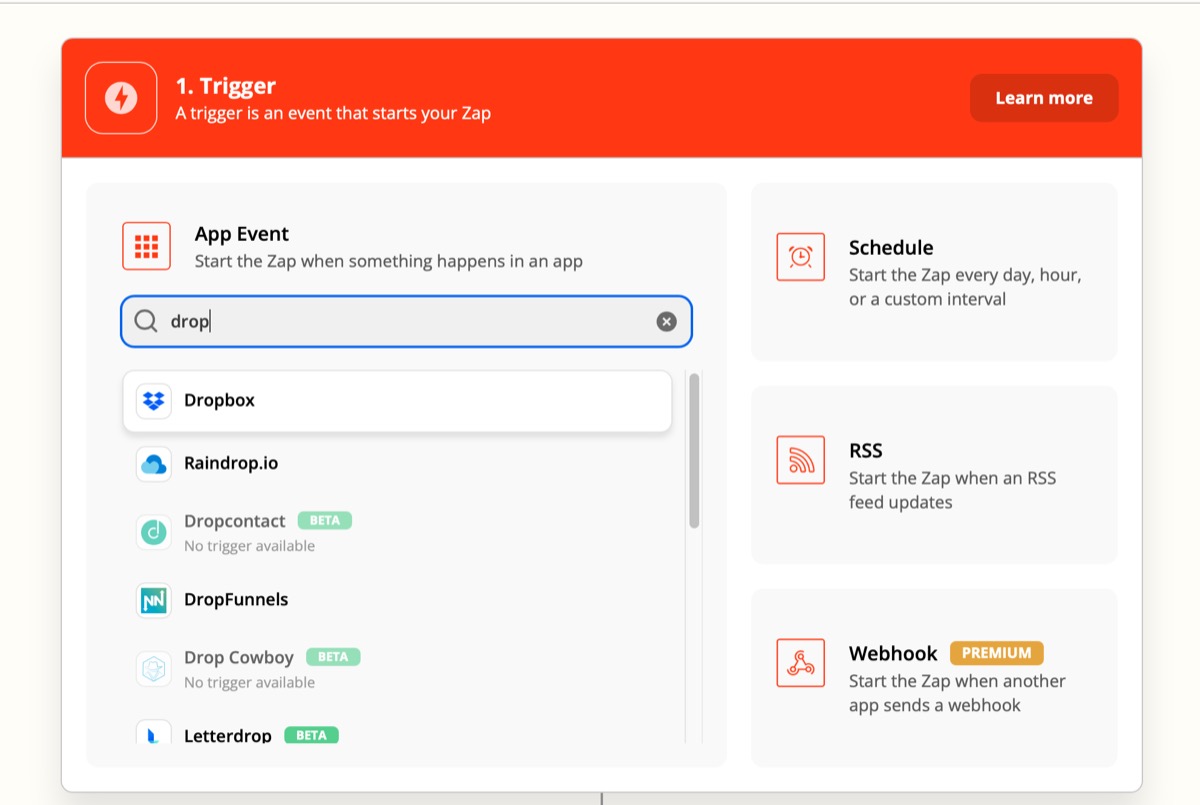
Add a File Upload Trigger
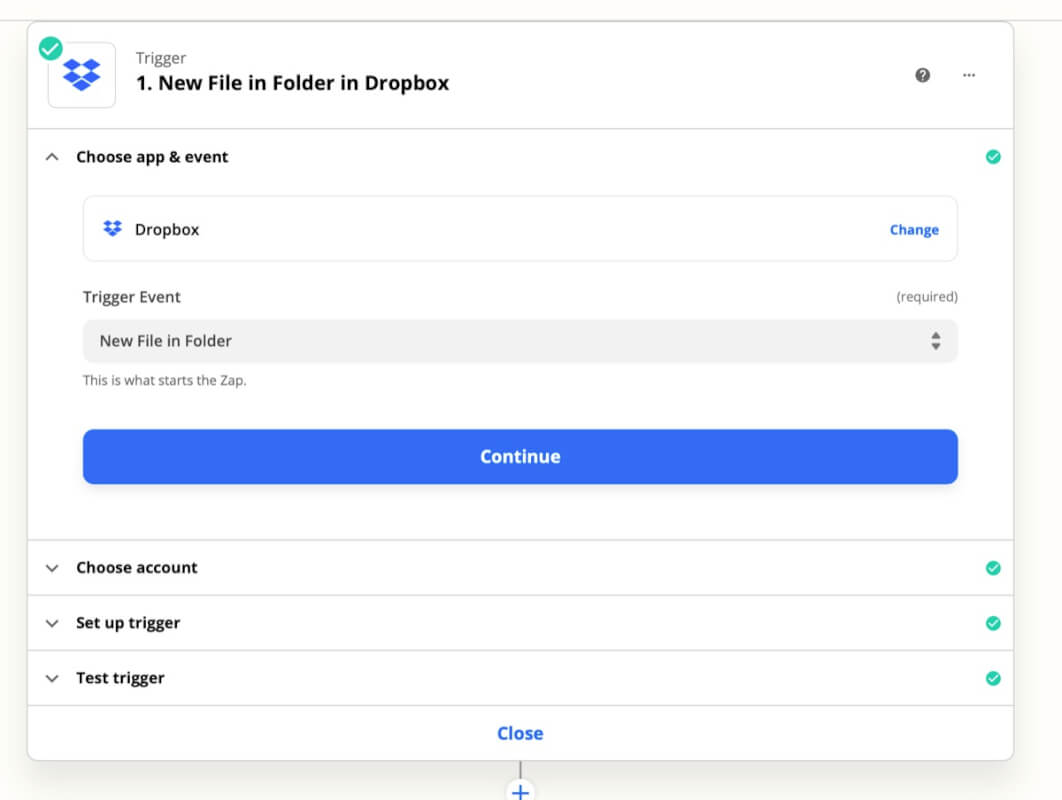
Search for the Dropbox app and select that as our trigger in the first step.
Step 1: Configure Dropbox Step
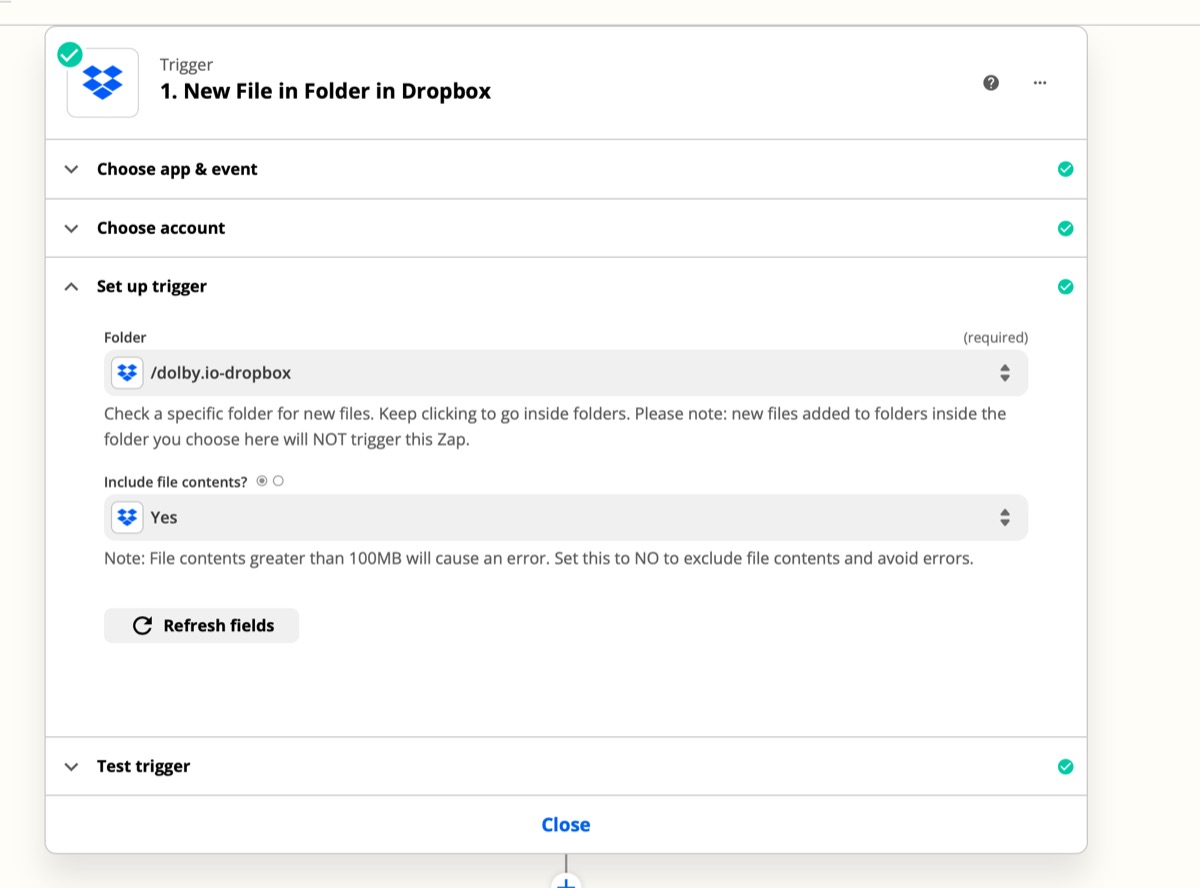
1. Open up Dropbox in another browser tab and create or select a folder to handle and store the content uploads and processing. Remember this folder location.
2. In Zapier’s Dropbox step 1: Set the trigger event type to “New File in Folder“.
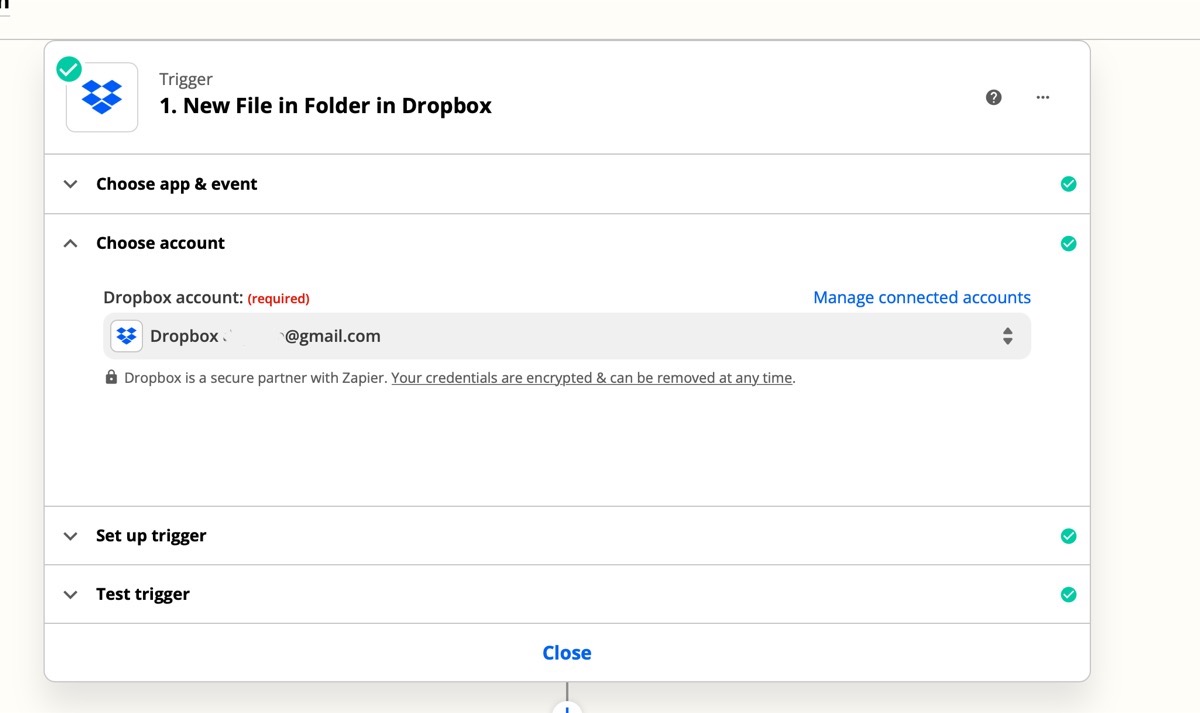
3. Follow the instructions provided to Link to your Dropbox account.
4. Link the step to your folder, and include the content by setting up the trigger.
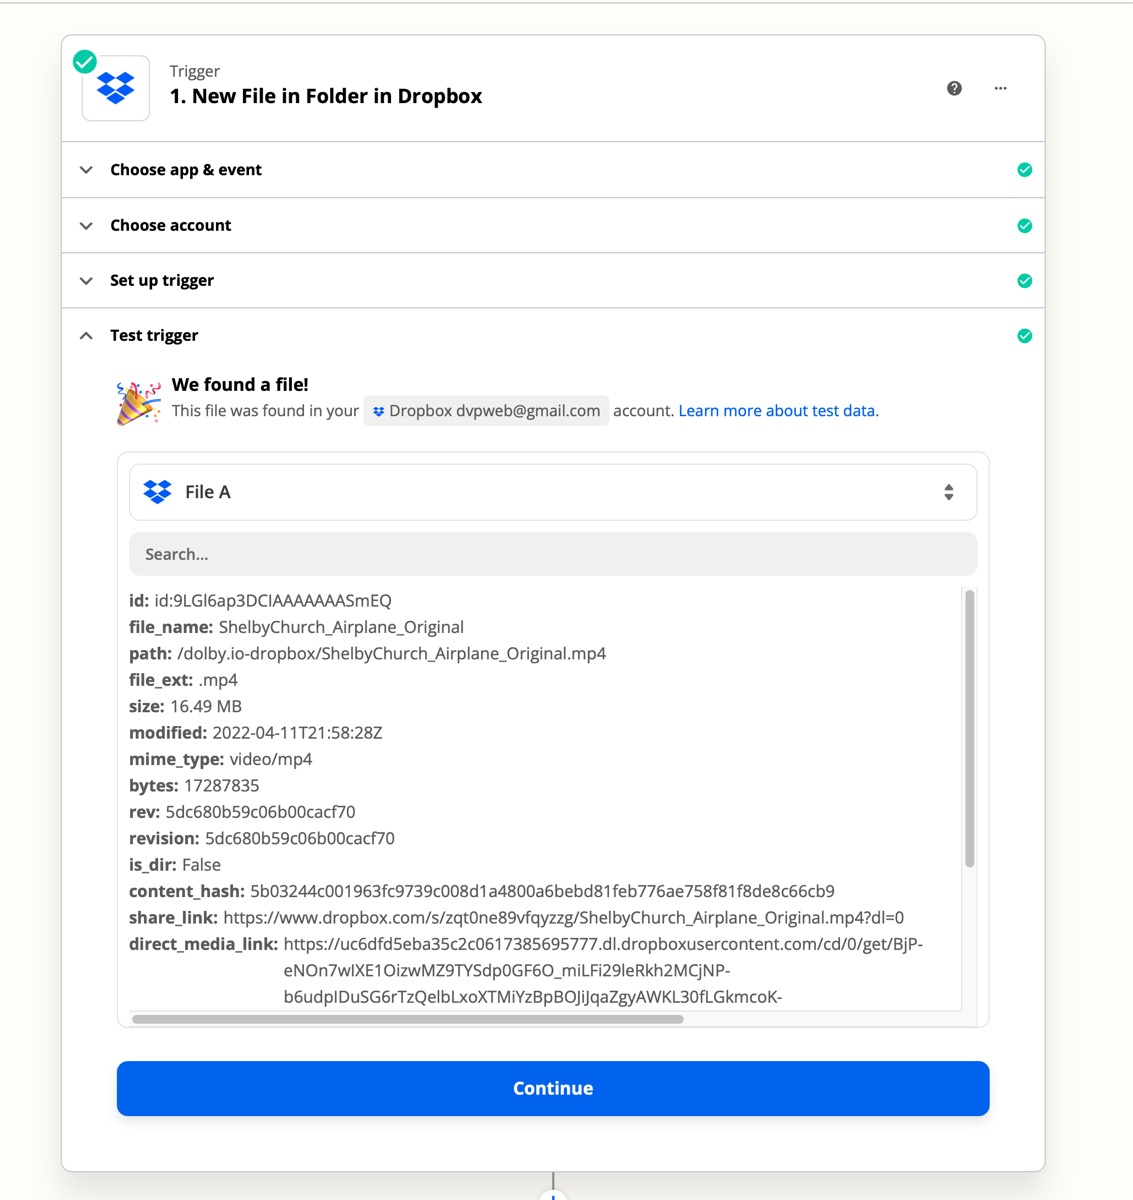
Note: At the end of each step, Zapier will prompt you to test and continue. It’s a good practice to test each step, since it also provides the data to be used by the next step.
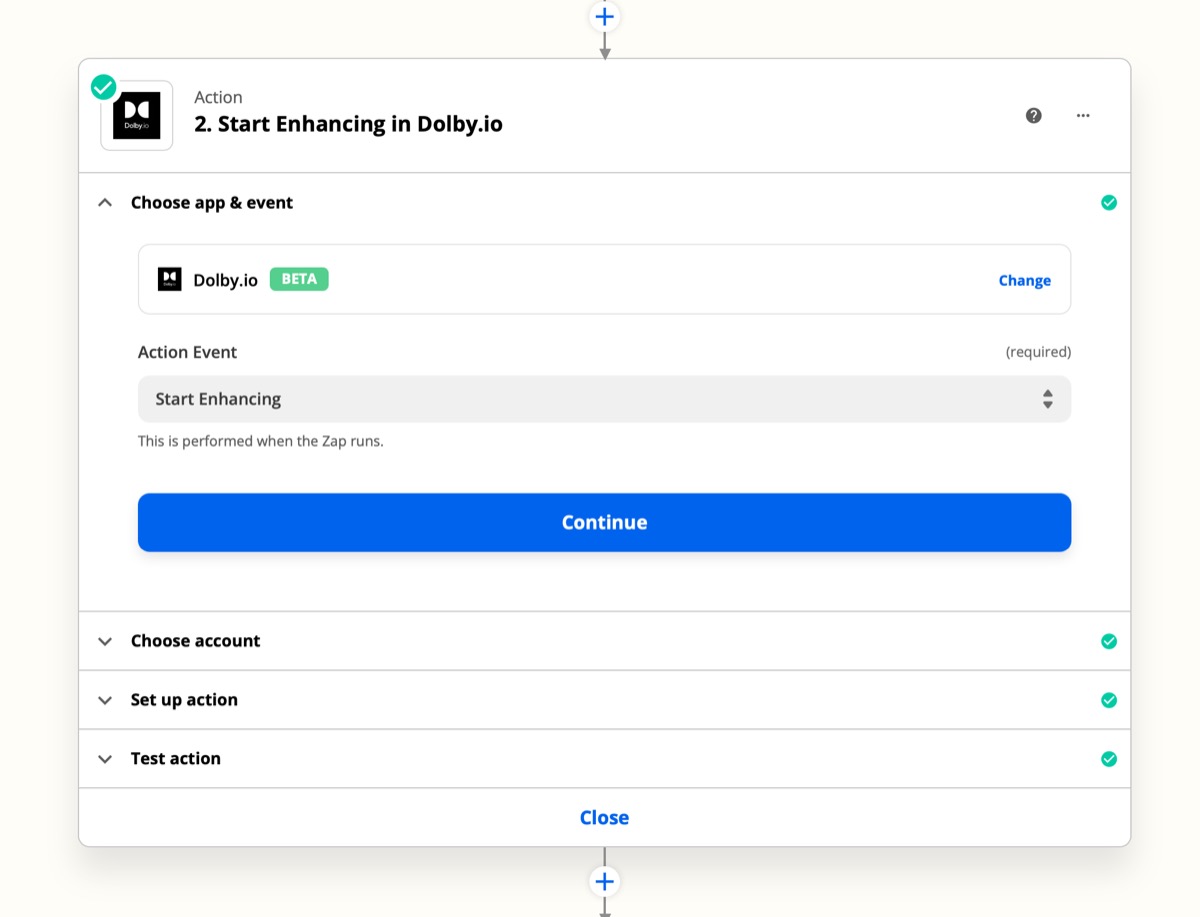
Step 2: Configure Start Enhancing in Dolby.io Step
Click the “+” button, then
Search and add the Dolby.io app as your second step.
1. Select Start Enhancing as the Action Event and continue.
2. Next open up dashboard.dolby.io in another browser tab and create a new application and click the “keys” icon link to locate your application’s key and secret.
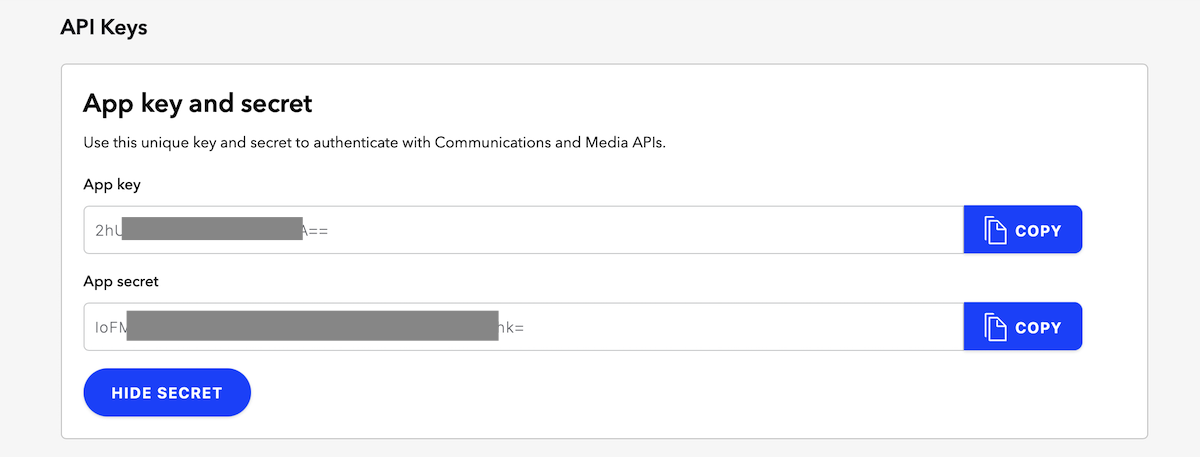
You’ll want to copy that key and secret pair for use in the next step when presented this Auth form in the next step.
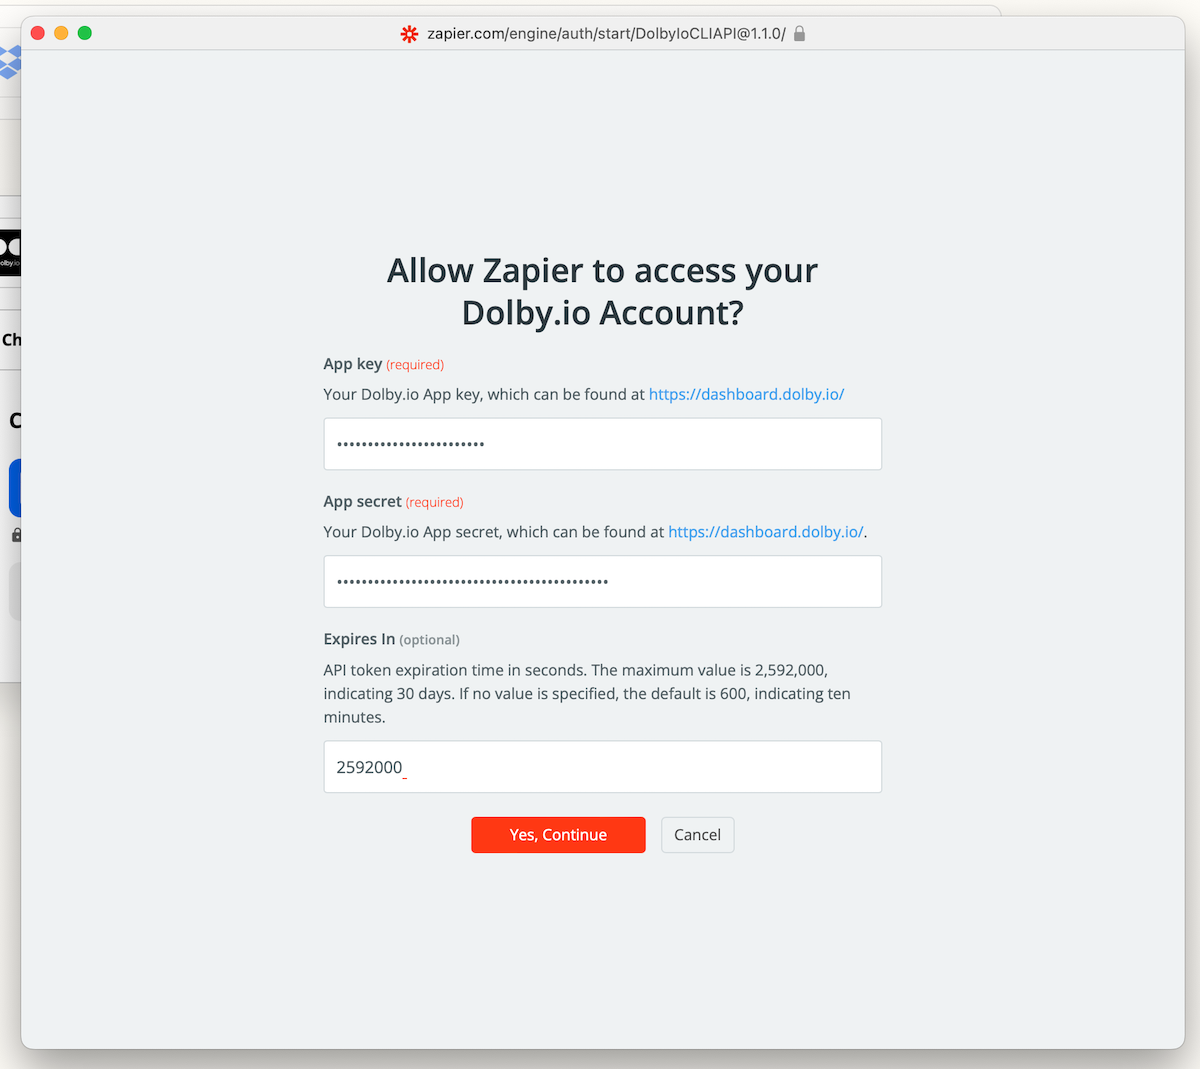
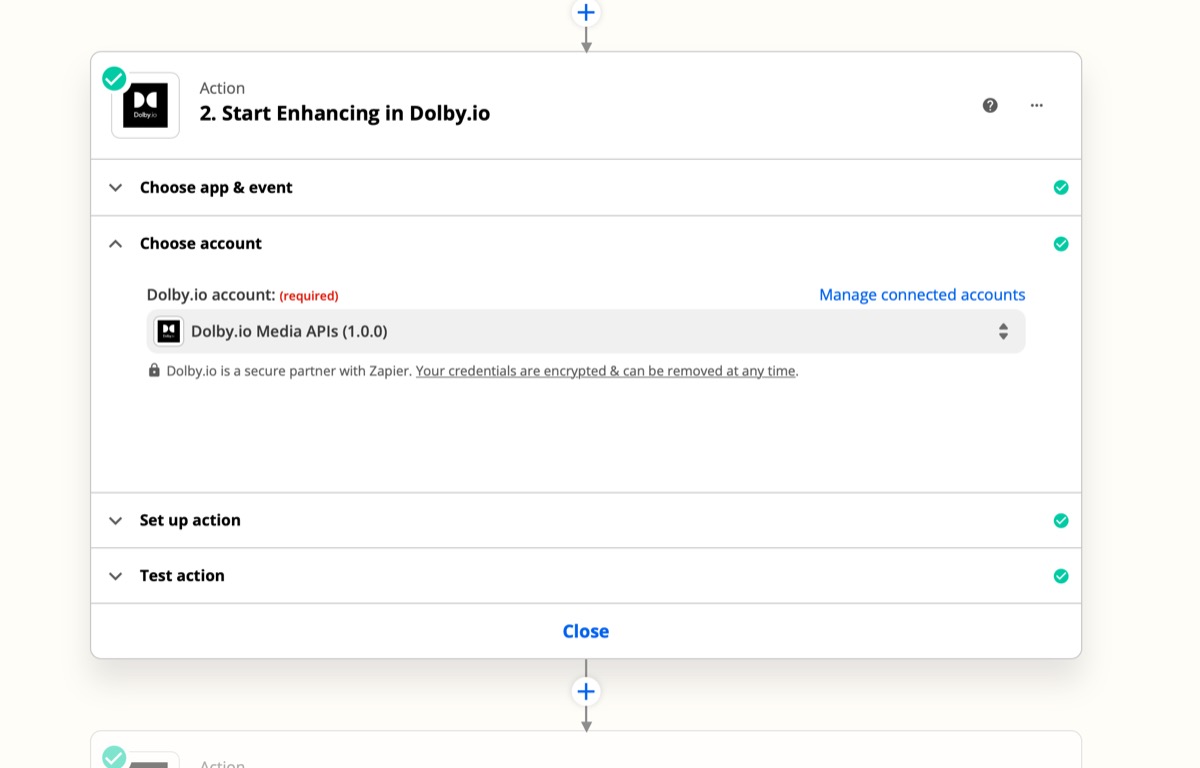
3. Link your Dolby.io account and paste in your media API key in this step.
4. Configure the input URL; This is the URL that was returned in Step 1 from dropbox. In our case, select Dropbox’s Direct Media Link field as the source field for the input URL.
Tip: This can be any media link that is publicly available. Please note, If using Box or another provider, the name of that link may be different.
5. Configure the output URL using the Dolby’s temporary storage that is included with the API. The URL format is dlb://< path >/< name of the file > – for this use case we will set the name manually as dlb://zapier/shelby.mp4, in practice you’d simply pull in the file name from dropbox in the previous step.
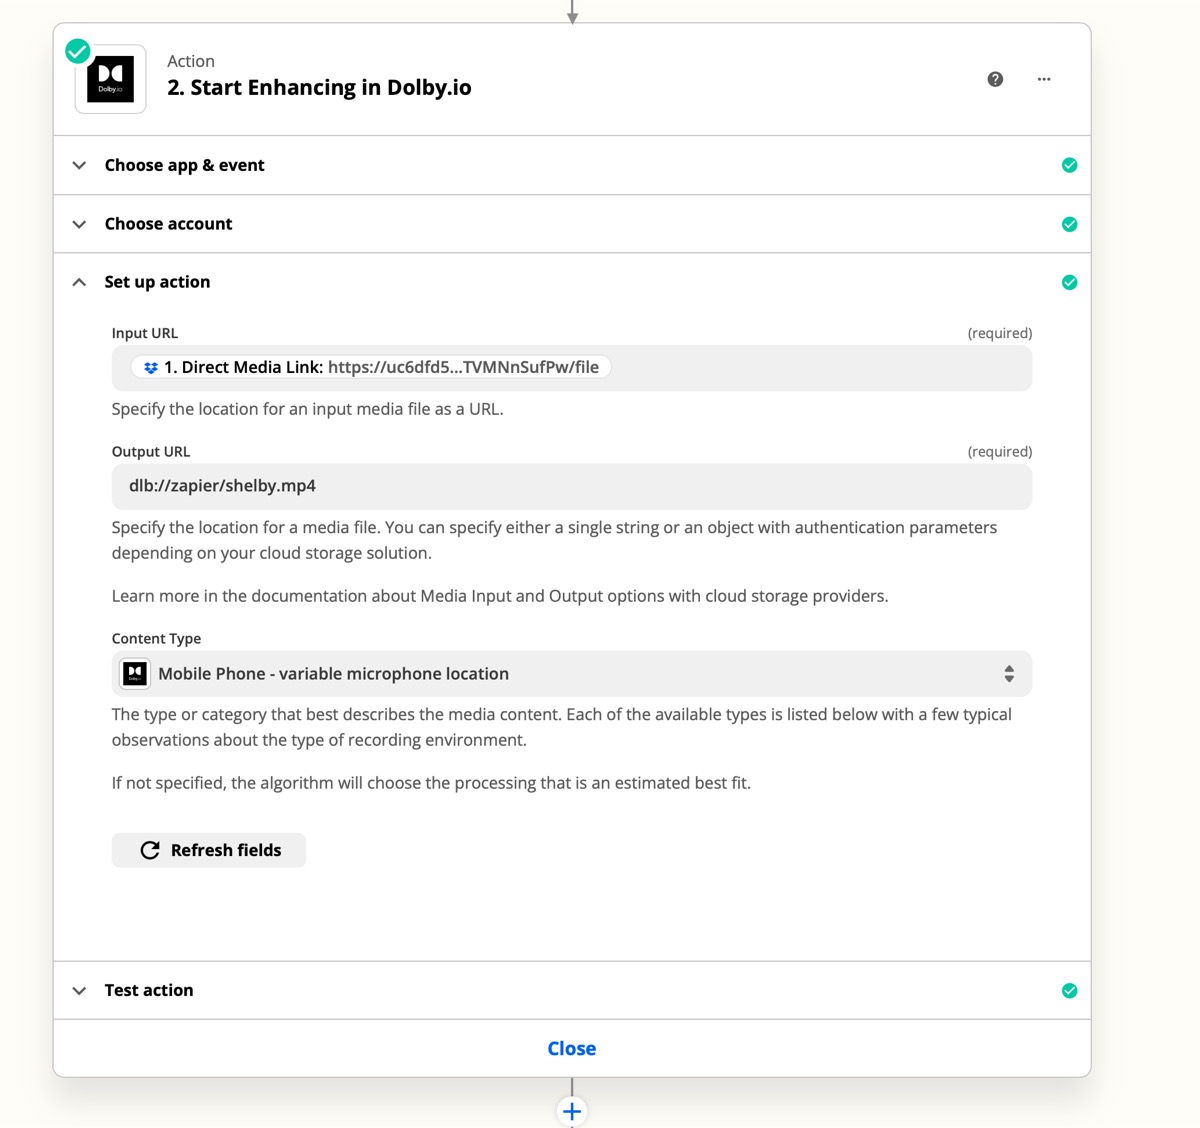
6. Finally, select the type of audio processing enhancement you want to process with. For our use case we setup a folder to capture videos recorded on a Mobile Phone microphone. You can select other types of recorded content within this dropdown.
The type or category that best describes the media content. Each of the available types is listed below with a few typical observations about the type of recording environment.
- conference – speech content, microphone far from talker
- interview – speech content, microphone close to talker
- lecture – speech content, microphone far from talker, large room
- meeting – speech content, microphone close to talker
- mobile_phone – variable microphone location
- music – musical rather than speech
- podcast – mixture of close mic’d speech and some musical content
- studio – close mic’d speech content with limited background noise
- voice_over or voice_recording – close mic’d speech
Learn more about content types, and check out our complete Media API documentation for details about how each API works.
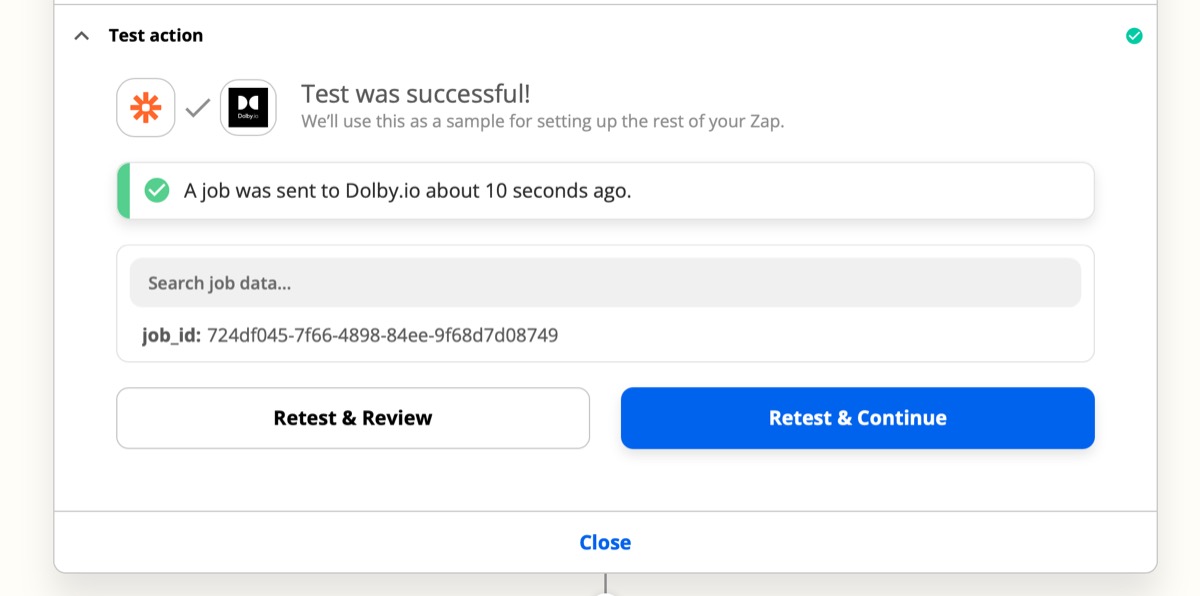
7. As with each Zapier Step, test and continue to make sure the step logic works. Here we see the success and a job_id which we will use in the next step.
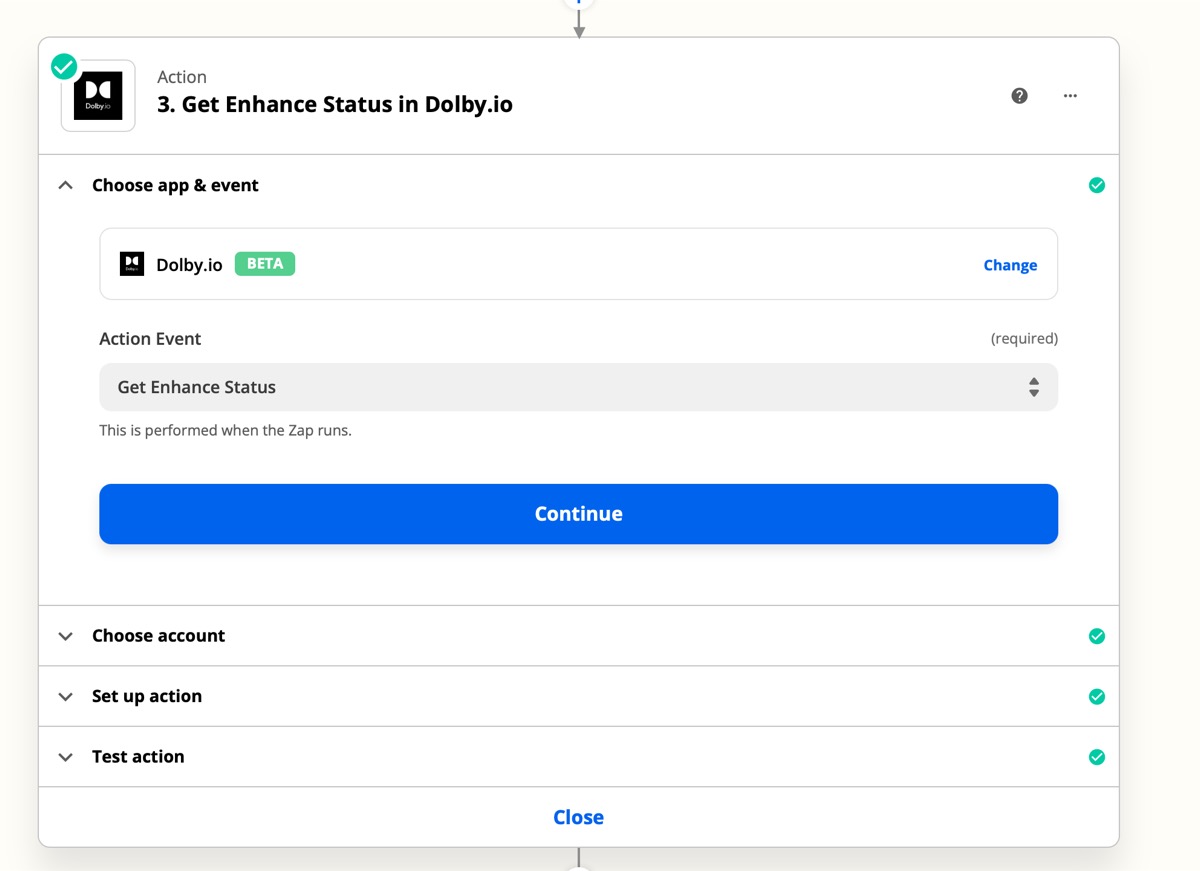
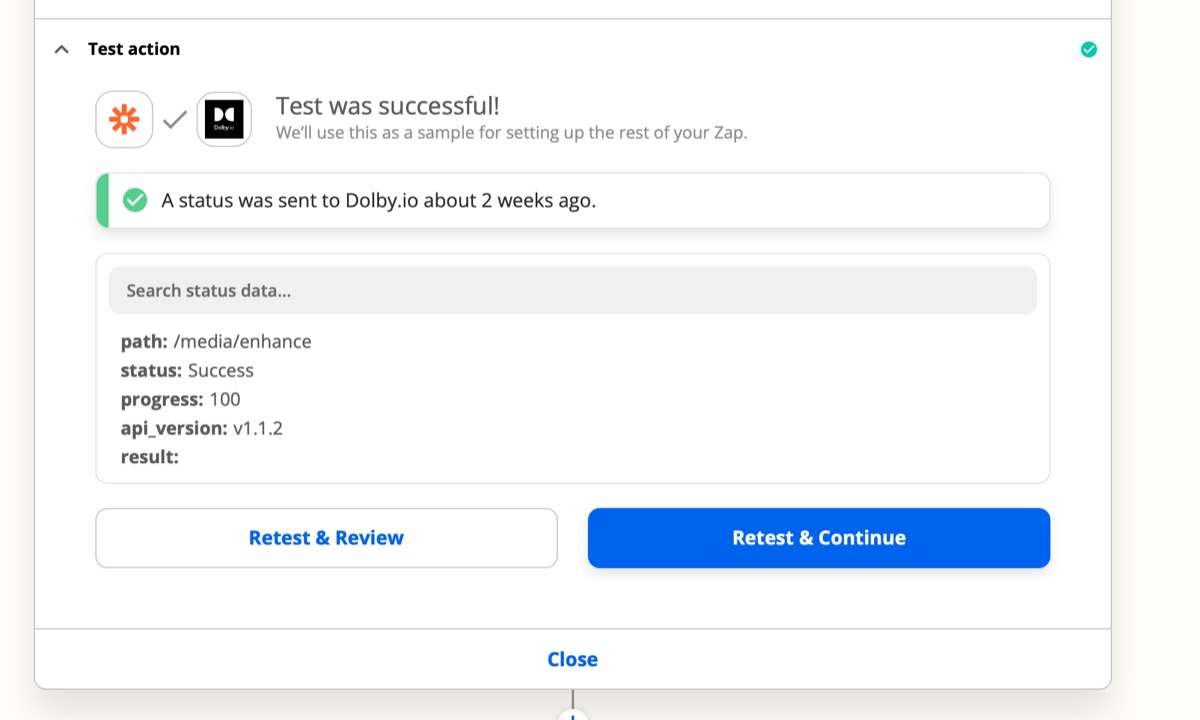
Step 3: Configure Get Enhance Status in Dolby.io Step
Since our API’s are asynchronous, meaning they take a few moments to process, we process the API calls in job queues. So we need to add a step to check the status of the job_id in the processing queue from the previous step.
1. Click the plus and add the Enhance Status step to your Zap workflow. You’ll need select the Get Enhance Status event and continue.

2. Link your account
3. Setup the action choosing job_id as the source field.
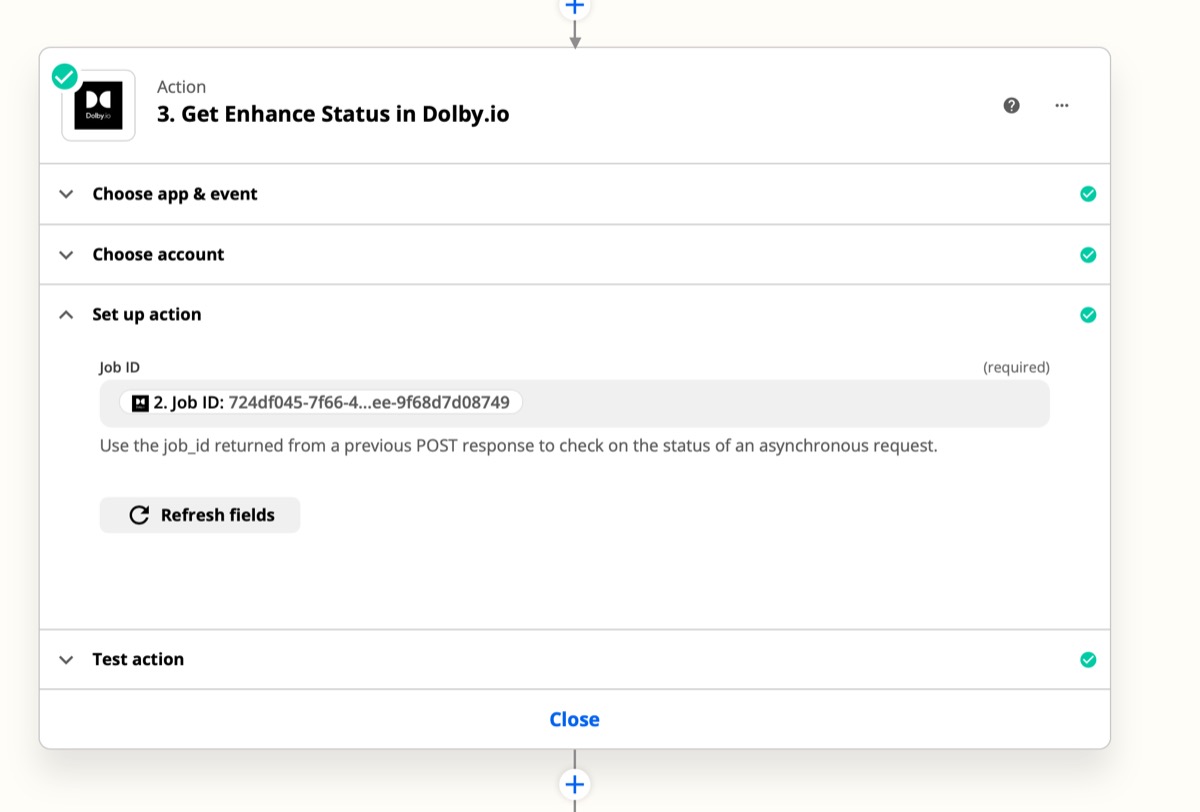
4. Finally Retest and continue. You should see a Success in the API response
Step 4: Configure “Only if (Filter)” Step
If all goes well, the API should return Success each time it runs. We want to capture any failures and handle them before moving on to the final two steps.
1. Click the plus and add Filter by Zapier.
2. Set the Action to Only Continue If…

3. Set the Filter setup and testing to use the previous step’s status response and test if the (text) exactly Matches the word “Success”.
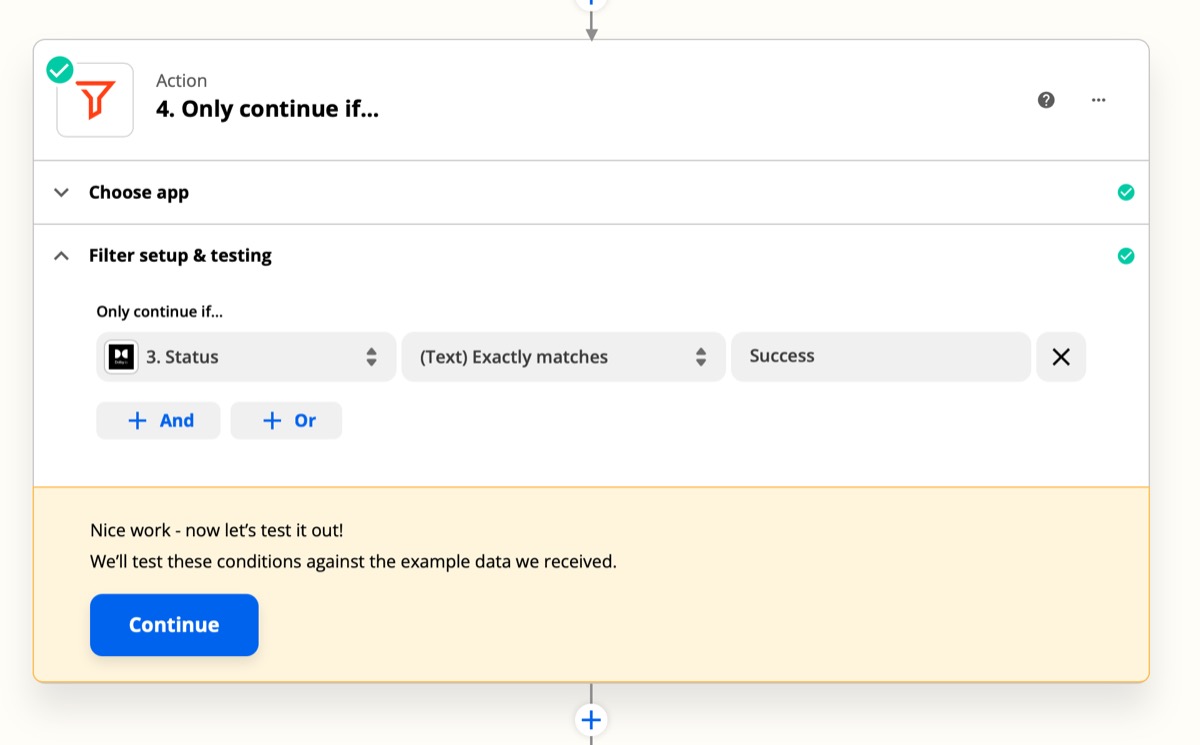
Note: If the previous step failed the Zap will end and log the error. Typical causes for failure include file corruption or wrong type, internet connections failing.
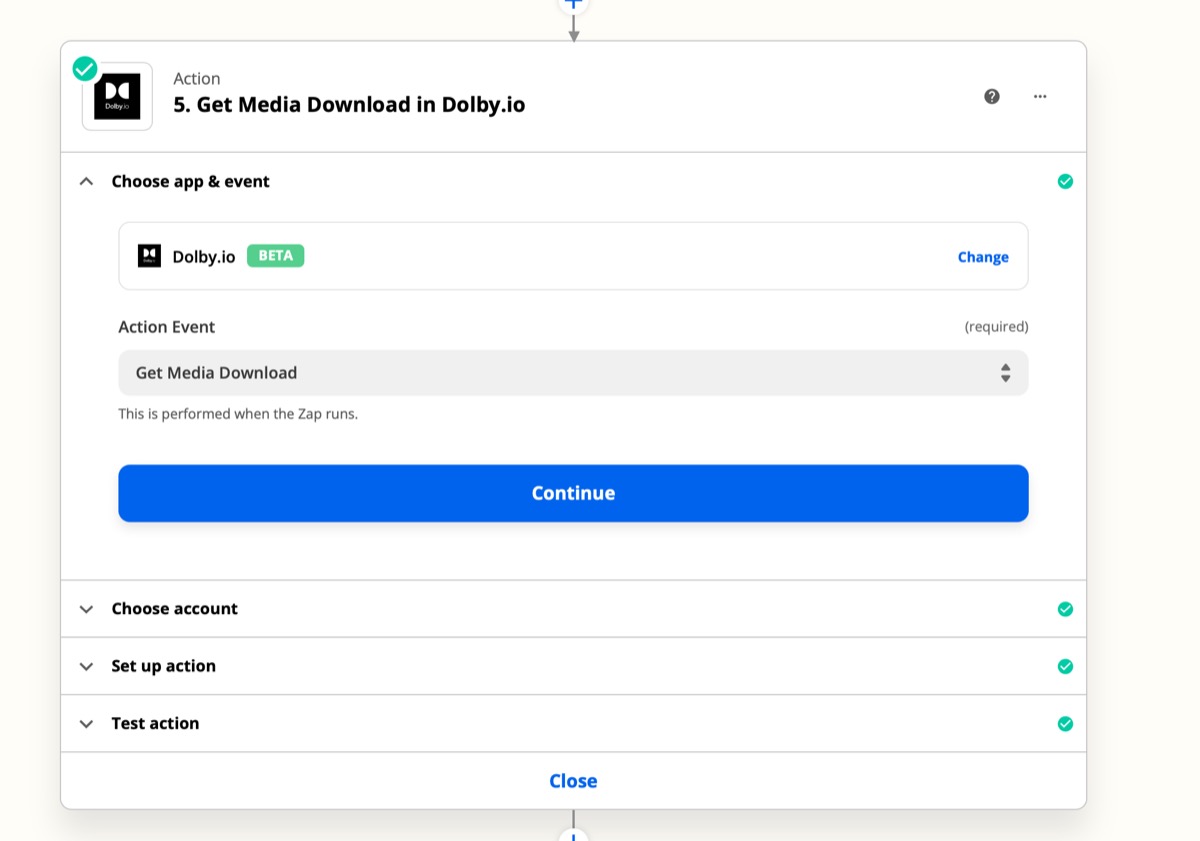
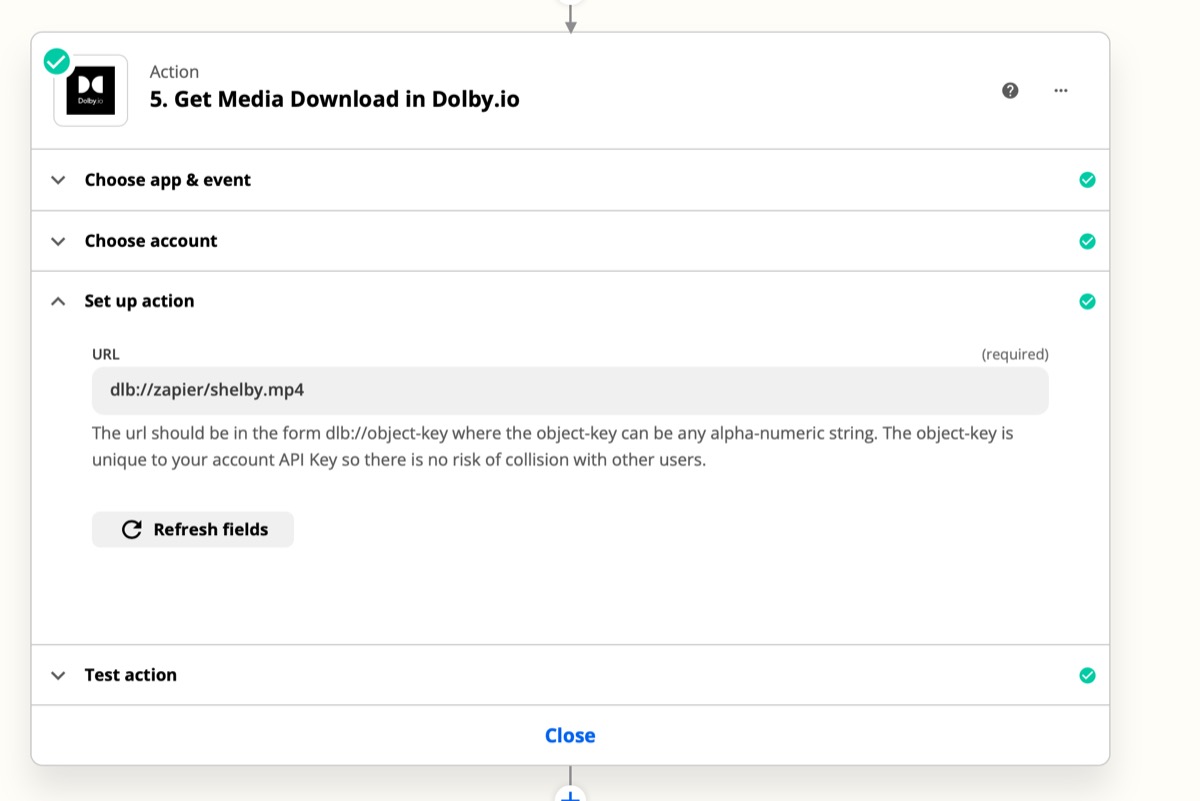
Step 5: Configure Get Media Download in Dolby.io Step
Once we’ve have a Status of success, we know the media processing is complete. The next step will call the API and return the url of the media file, which we will hand off to Dropbox in the final step.
1. Click the plus and choose the Dolby.io app and set the Action Event to “Get Media Download.
2. Verify the account link.
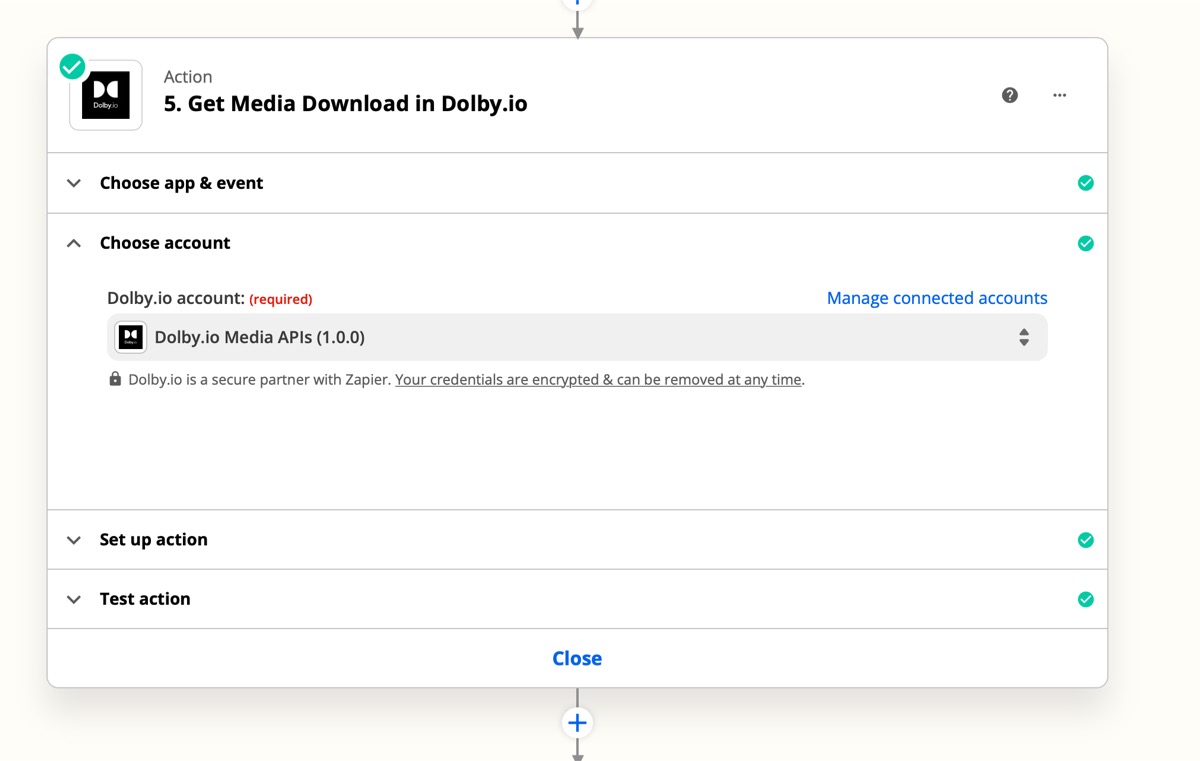
3. Set the Action’s URL to the same Dolby.io temporary storage URL as we setup in step two. dlb://zapier/shelby.mp4
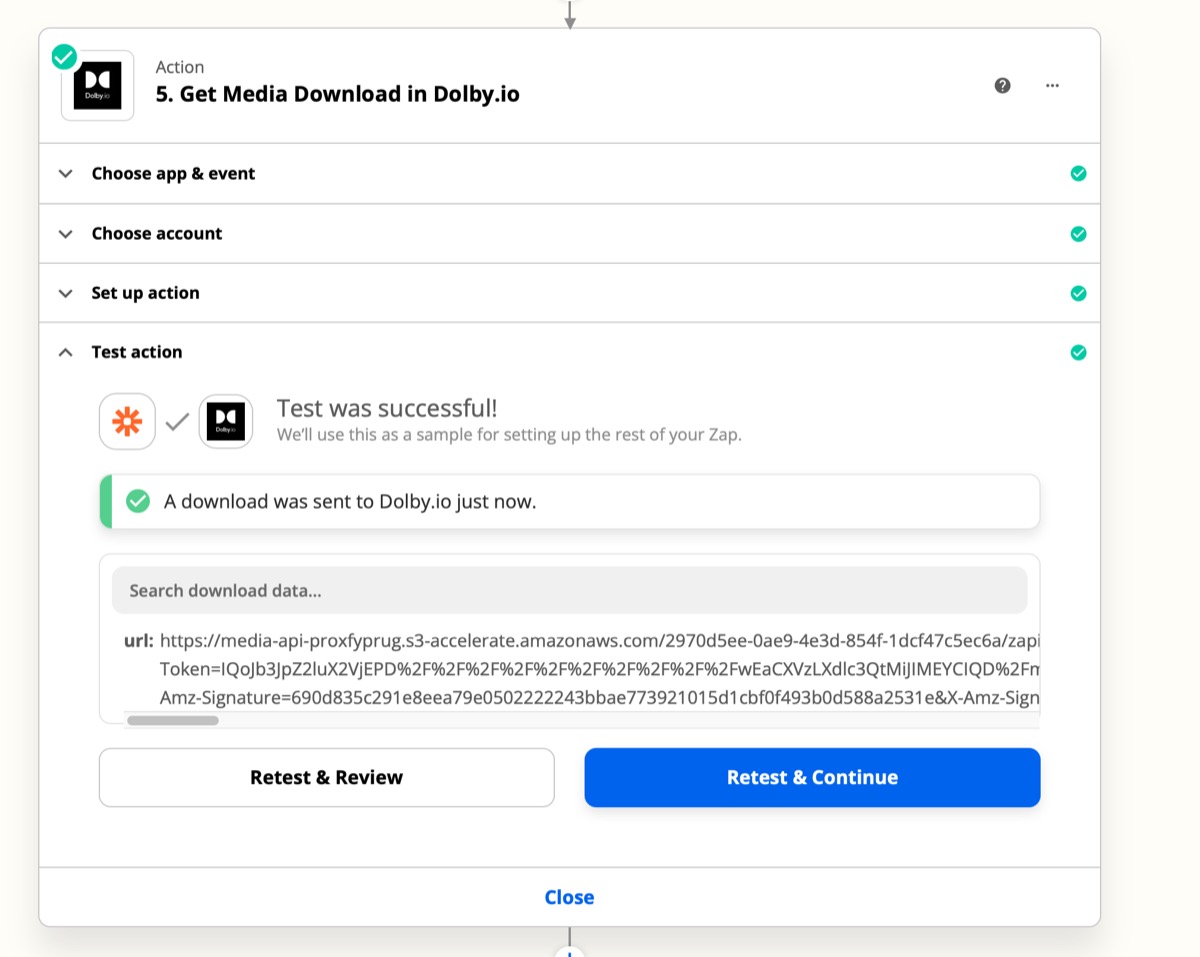
4. Test and Continue. Note the url returned will be a signed url from the temporary storage provided by Dolby.io. We will pass this along in the next step. This storage is ephemeral and not guaranteed to be available beyond a short period of time; Therefore we must immediately deliver the file to a more permanent storage location in the next step via Dropbox.
Step 6: Configure Upload File in Dropbox Step
1. Click the “+” and add the final Step to Upload File to Dropbox
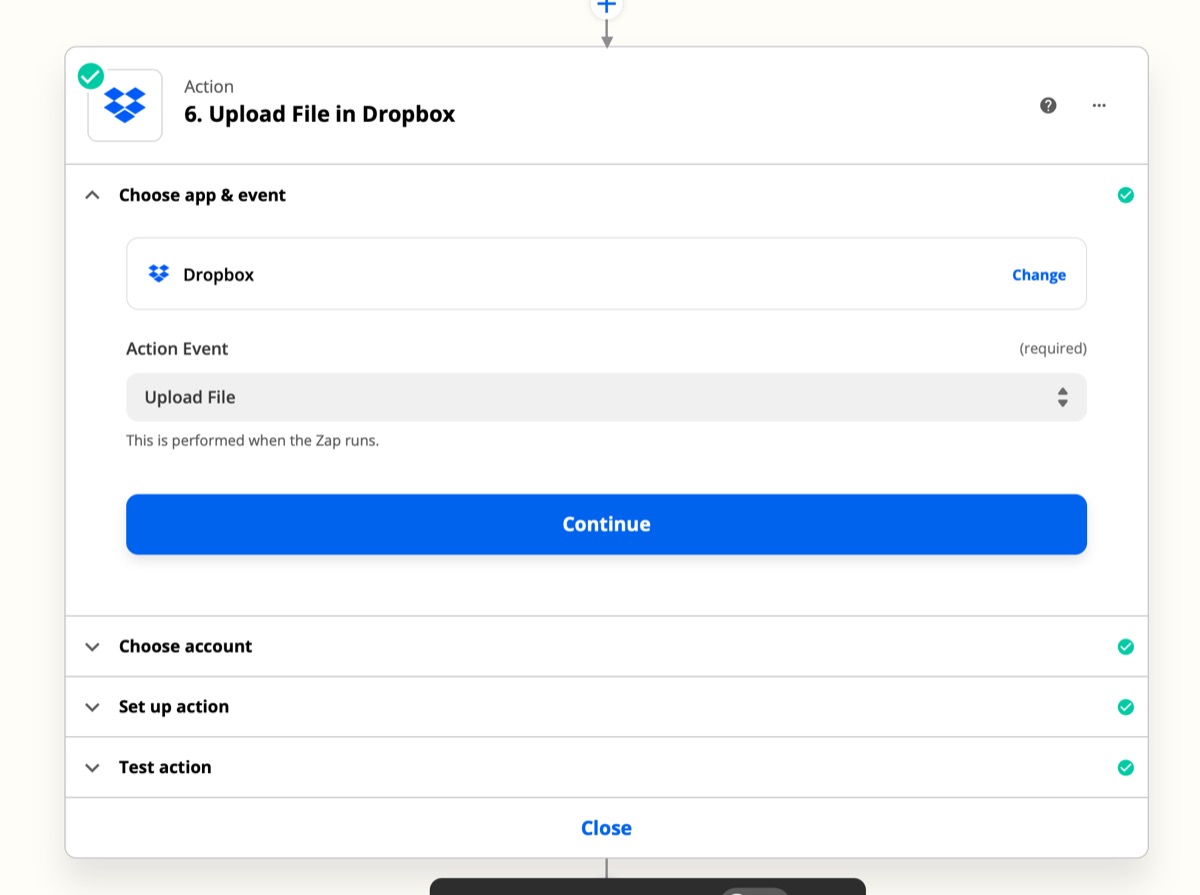
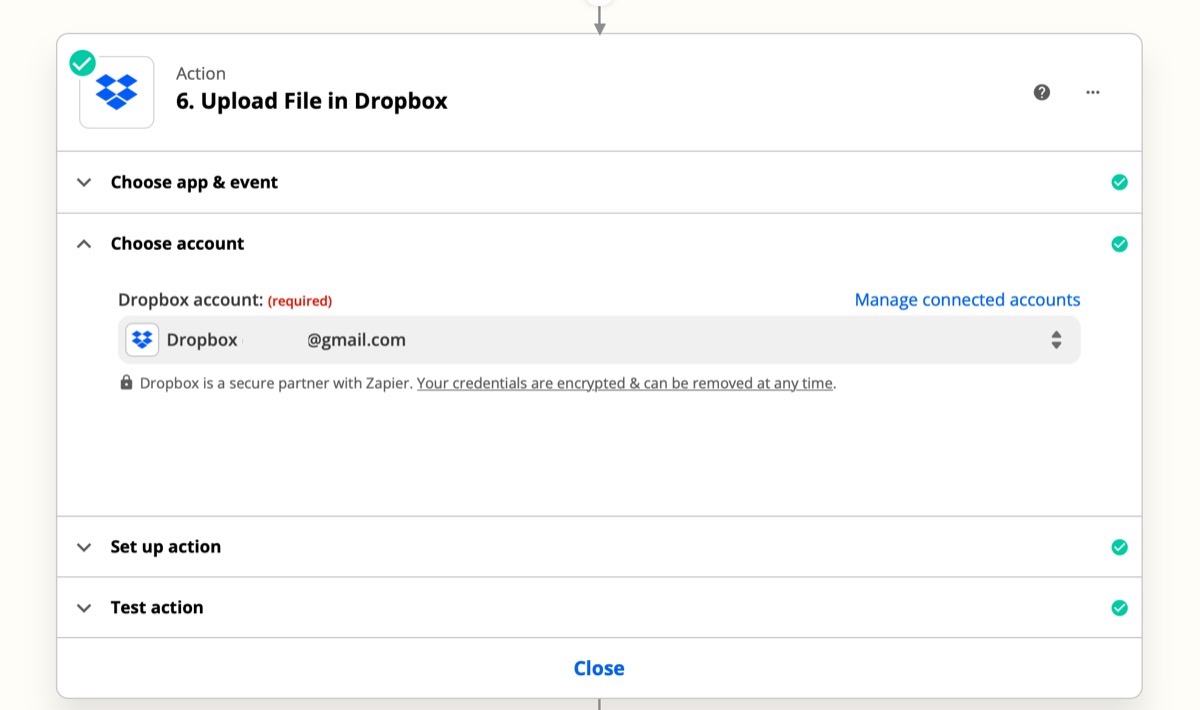
2. Link your account.
3. Set up the Action by selecting a folder in Dropbox.
4. Select the URL field from the previous step.
5. We’ll also set the overwrite to No.
6. Finally, set the file name and extension.
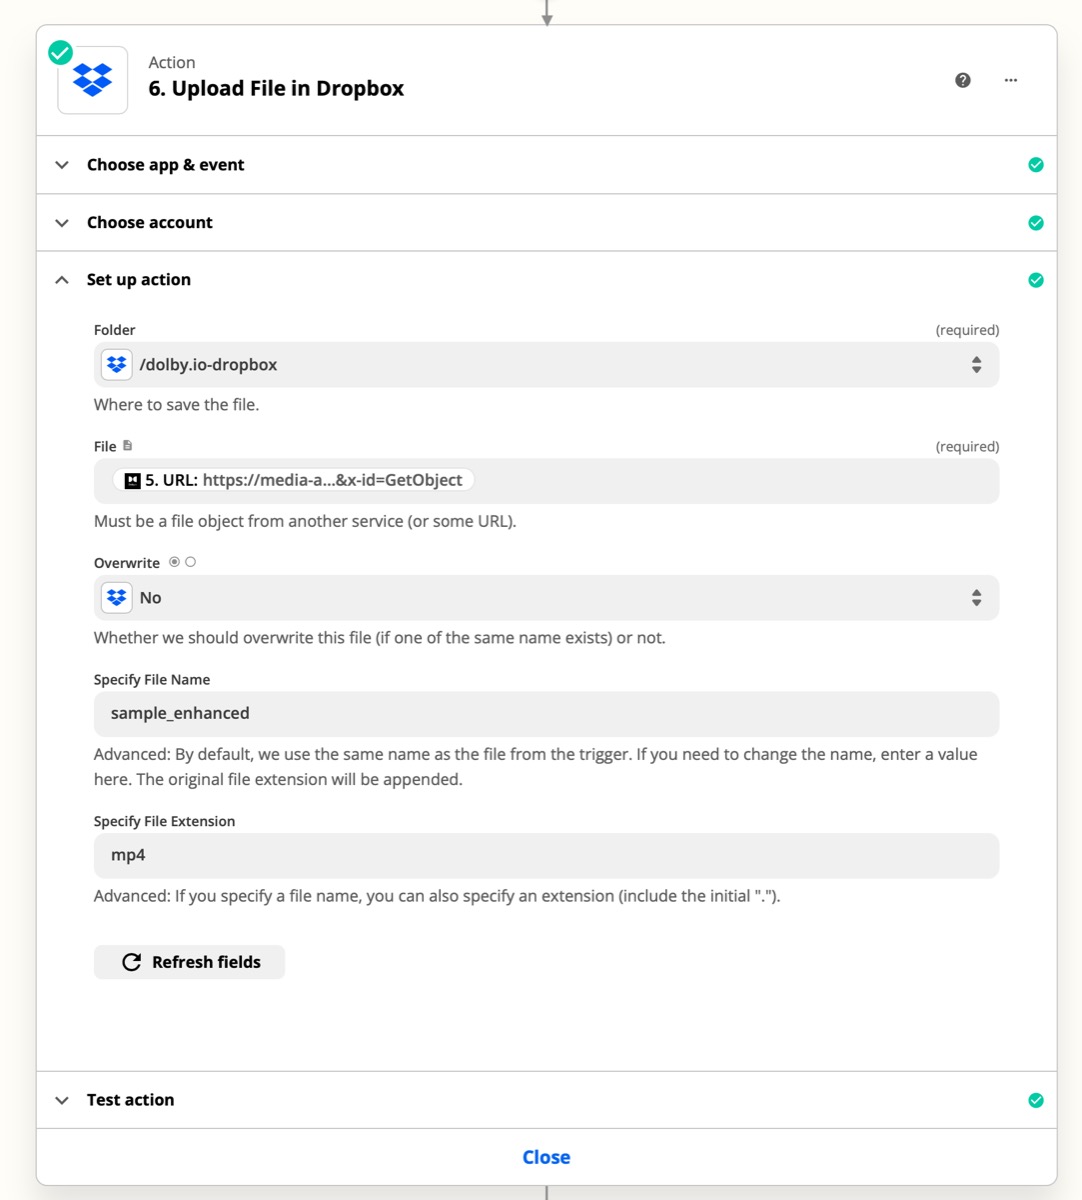
6. Test and continue.
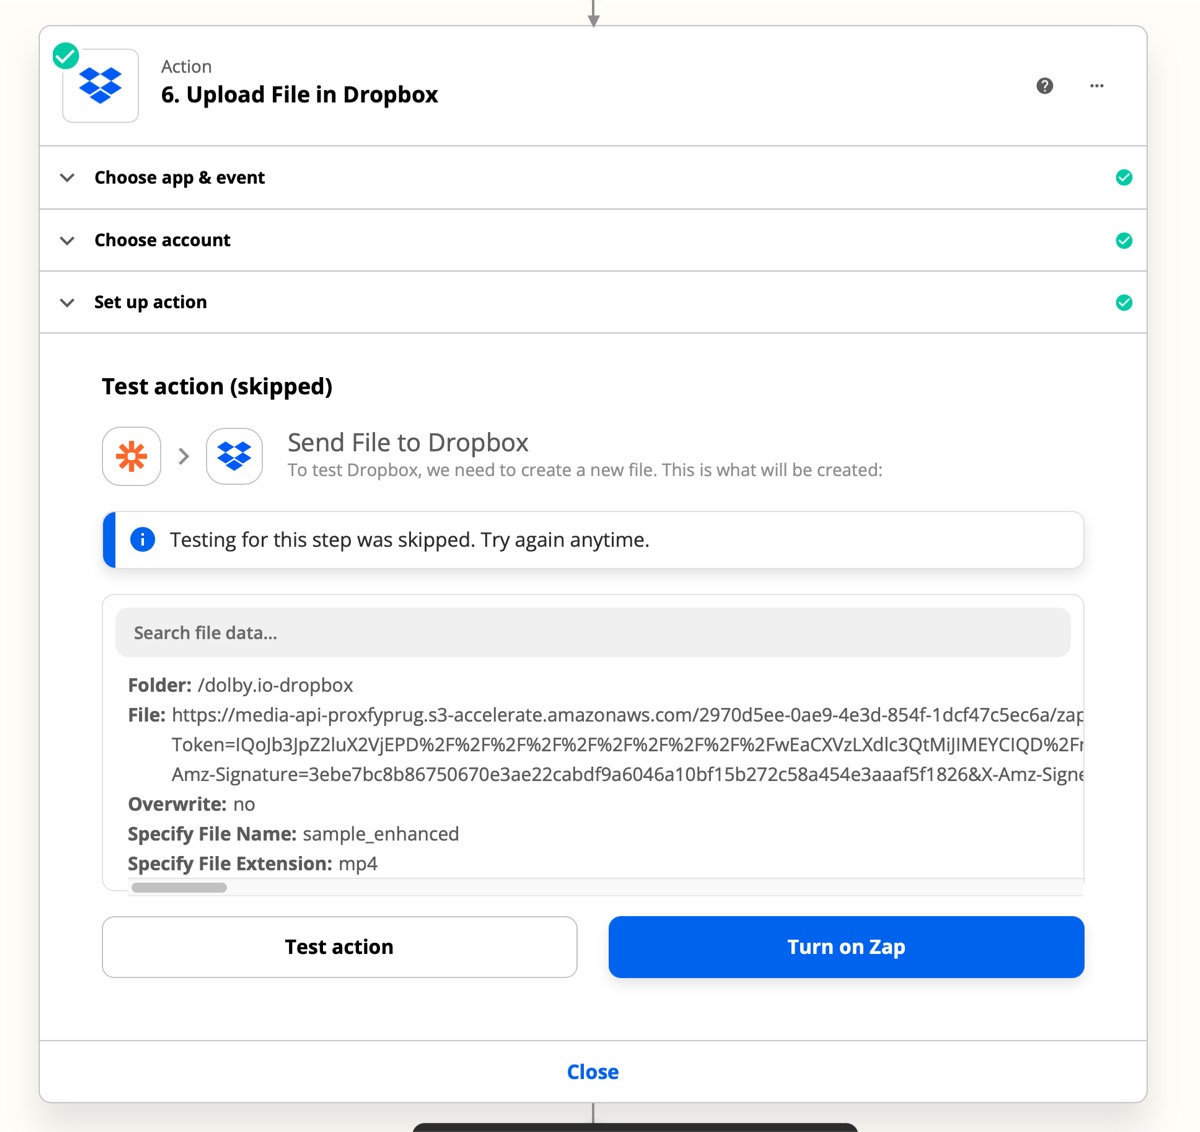
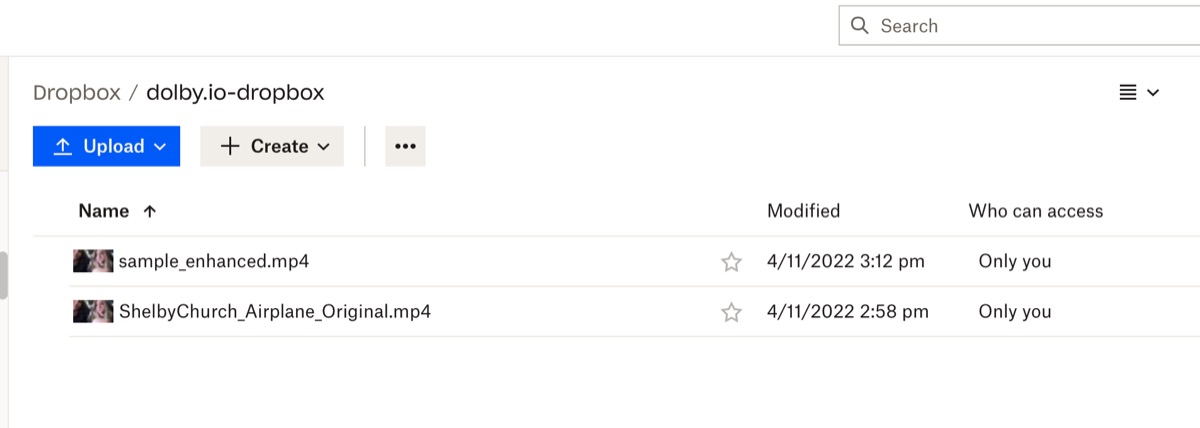
Turn on your Zap and begin testing your new workflow.
With your newly minted Zap turned on, open up the Dropbox folder you assigned to the workflow and upload a file there. Within a few minutes you should see the enhanced version of your file. Congratulations you’ve successfully created a workflow to enhance your audio without writing any code!
Next Steps
Now that you’ve mastered the basics of setting up the Dolby.io Enhance Media workflow in Zapier.
The key to adopting this new workflow is to breakdown your current processes into small chunks that you can inject this no code integration into your workflows.
Consider how this simple workflow could be extended to your real-world production use case with some additional input from other Zapier app services:
- Logging the content type and file name in a spreadsheet and then use that sheet to drive the selection of the appropriate enhance content type.
- Using a Database to drive the file content types and file naming
- Sending media clips to specific production folders
- This list is only limited to your imagination!
Dolby.io Media APIs provide a variety of cloud-based processing services beyond enhancing difficult audio. Dolby.io provides APIs that analyze and diagnose audio problems, transcode, analyze speech for understanding who’s speaking and improving audio prior to transcribing the content.
Learn more about Dolby.io complete suite of Media Processing APIs.

")