


Transcribing media is a resource-intensive process that is dependent on the quality of the audio and background noise, meaning it can often produce inconsistent results as a product of the media quality. Depending on the scale of the media you are transcribing this process can be both computationally and monetarily expensive, being a costly endeavor especially if the results end up being inaccurate and noisy. To alleviate some of the risks of transcribing audio that might be low quality, we can instead turn our transcription tool into a workflow that gauges the quality of the audio and only transcribes it if the audio is high enough quality to produce accurate results. Furthermore, because media data can vary dramatically in size we can develop this workflow on the cloud to ensure our processing requirements are dynamically adjusted, and avoid storing large quantities of data among other things.
Part #1: Getting your environment ready for Serverless development.
To get started we first need to set up our development environment. For users unfamiliar with Azure services it is worth noting that Azure has a pay-as-you-go policy with some resources costing more than others, so we recommend that you check out the pricing guide here before leveraging any of their services. Follow the steps below to get the appropriate credentials and environment set up:
- Create a free Dolby.io account here.
- Additionally, you’ll need to create a free Azure account
- To get your Azure environment set up, Microsoft has a handy guide for building your first project. Make sure you are using Python 3.9 and Azure Functions Core Tools 3.x.
With the environment correctly set up, you can now clone our sample project from GitHub. The sample project, presented at the 2021 Azure Serverless Conference, is a basic example of an asynchronous and fully serverless media to transcription workflow. To best understand how serverless media workflows work we will use this sample project as a template.
Part #2: Why Azure Serverless?
Before we dive into the workflow let’s briefly outline what Azure Serverless Functions are. Serverless functions are a service provided by Azure that allows for event-triggered code to be run without the need for personal servers or infrastructure. Instead, users can develop code such as a media workflow and allow it to run on the cloud in response to an event. These events are referred to as Triggers which are the starting line for any Serverless process. The most basic trigger to imagine is an HTTP trigger, which would kickstart a Serverless event if a user navigated to a specific URL from their local machine.
Serverless functions are perfect for building a media workflow as they can be developed to function asynchronously, meaning multiple jobs can be run at once, with the associated costs scaling according to usage. This means you can build a workflow that you only use once a month or a thousand times a day, only paying for what you use.
Part #3: Understanding media workflows with Azure Serverless.
Now that we understand the basics of Azure Serverless Functions let’s take a look at the sample project we cloned from GitHub. What does this workflow look like?
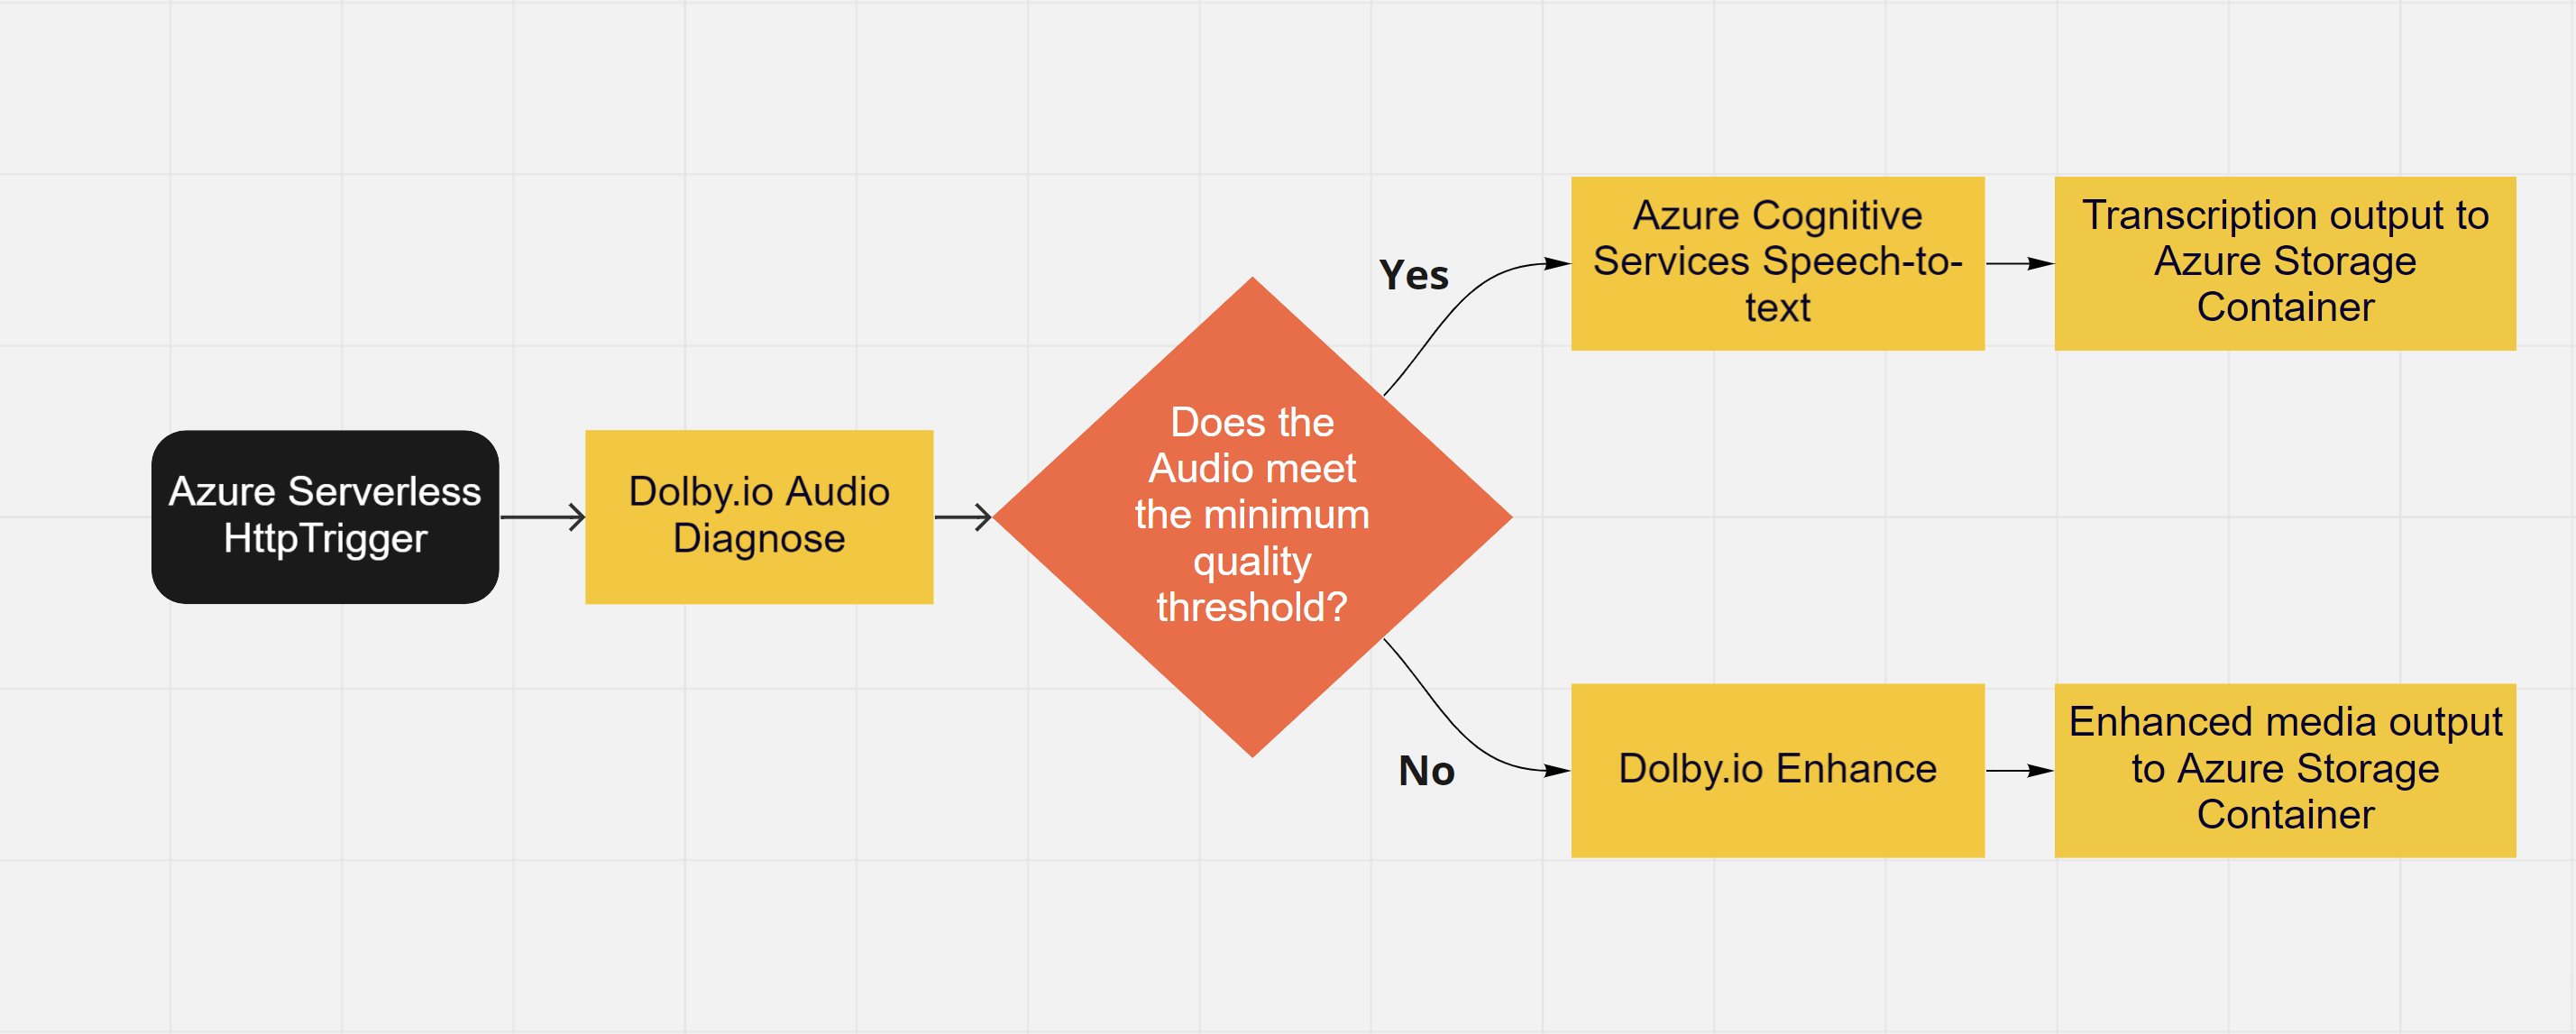
As outlined above our workflow must begin with a trigger, in this case, it is a basic HTTP trigger. There are two main paths the workflow follows dependent on the quality of the audio in the media provided. In this example, there are three main tools that the workflow relies on to ensure that the media will produce a sufficiently accurate transcription. In the event that the media will not produce an accurate transcription, the audio for the media is cleaned and returned to allow for manual review.
- Dolby.io Audio Diagnose: A lightweight audio analysis tool that can return information relating to the audio such as its quality or audio defects.
- Azure Cognitive Services Speech-to-Text: A transcription tool that converts spoken audio to text.
- Dolby.io Enhance: An audio enhancement tool that can help reduce noise and level speakers.
Before we test out the sample project let’s briefly discuss how we connect each tool together in a serverless fashion.
Part #4: Making things asynchronous.
One of the challenges of developing a Serverless media workflow is planning for asynchronous deployment, meaning developing in a way that allows multiple instances of the workflow to run without them interfering or slowing each other down. We already discussed triggers which are great for starting the workflow but what are some other useful tricks we can include to keep things running smoothly. One useful trick is including callbacks in our API calls. Because we are using REST APIs, the actual processing is done on a different server. In the case of the Dolby.io APIs, this processing is done on the Dolby.io Servers, whereas the Speech-to-Text processing is done on the Azure Cognitive Services server. When we send the job to these servers we can include a callback parameter that signals where the API should send a request once the job is done. Since we are using HTTP triggers, we can specify that the callback directs to the trigger. We don’t want the workflow to begin at the start, so when we callback to the HTTP trigger we include a job= tag in the request destination. An example of this process for diagnosis looks can be seen below:
import requests                               #Python module for making http requests
url = "https://api.dolby.com/media/diagnose"  #Location to send the request

body = {"input" : presignedURL,
    'on_complete': {'url': httpTriggerURL + "?job=diagnose_success", "headers": ["x-job-id"]}
}

headers = {"x-api-key":API_KEY,"Content-Type": "application/json","Accept": "application/json", "x-job-id":"True"}
response = requests.post(url, json=body, headers=headers)
response.raise_for_status()
Included in the body of the call is an on_complete tag which includes the URL location of the trigger, plus a tag informing the function that the next step it should take is evaluating the results of diagnose. This process allows the function to be freed up as soon as it submits a diagnose job, sitting idle until it has to start another diagnose job or until that diagnose job completes. Structured like this the function is able to handle many requests sending media through the workflow.
The second trick for keeping things asynchronous and efficient is by not moving the media. This means we don’t have to change where files are stored, rather we can keep them stored on the Azure cloud in the blob storage and pass directions to each of our tools so they can access where the files are stored. This is done through the use of the pre-signed URLs a useful concept that you can read about in more detail here. Pre-signed URLs allow the appropriate credentials and access to be passed in one simple URL which the Dolby.io server or the Cognitive Services server can use to find the media. An example of creating this URL can be seen below:
from datetime import datetime, timedelta
from azure.storage.blob import generate_blob_sas, BlobSasPermissions

input_sas_blob = generate_blob_sas(account_name= AZURE_ACCOUNT_NAME,
                                    container_name= AZURE_CONTAINER,
                                    blob_name= AZURE_BLOB_INPUT_NAME,
                                    account_key= AZURE_PRIMARY_KEY,

                                    #Since we aren't editing the file read access is sufficient
                                    permission=BlobSasPermissions(read=True),
                                    expiry=datetime.utcnow() + timedelta(hours=5)) #SAS will expire in 5 hours


input_url = 'https://'+AZURE_ACC_NAME+'.blob.core.windows.net/'+AZURE_CONTAINER+'/'+AZURE_BLOB_INPUT_NAME+'?'+input_sas_blob
The generate_blob_sas function creates a Shared Access Signature, which when formatted correctly into a URL, creates a direct path to the media.
The three tools briefly mentioned earlier each are connected to create our workflow.
- Dolby.io Audio Diagnose: A lightweight audio analysis tool that can return information relating to the audio such as its quality or audio defects.
- Azure Cognitive Services Speech-to-Text: A transcription tool that converts spoken audio to text.
- Dolby.io Enhance: An audio enhancement tool that can help reduce noise and level speakers.
We start with diagnose, which using the pre-signed URL can access the file stored on the cloud to evaluate its audio quality. It then returns via a callback a score out of 10 with 1 being low-quality audio and 10 being high-quality audio. If the score is at or above our threshold of 7 we will transcribe it, otherwise, we will clean up the audio with enhance for manual review. We settled on this threshold of 7 after some testing as audio that scores above this threshold usually performs the best with Speech-to-Text.
Now that we understand the workflow, and the pieces that connect to make it work, let’s test out the sample project.
Part #5: Testing out the workflow.
With the workflow set up, we can now test it out one of two ways. We recommend testing locally before deploying it with Serverless as when developing locally you can make simple and fast changes to your code without having to worry about uploading it to the Azure servers. Additionally, when developing locally you don’t run the risk of exposing API keys. When deploying to the Azure cloud make sure you review the Authentication Guide to be sure you are following best practices and protecting your keys.
Locally:
- To test locally we need to create a HTTP tunnel to port forward to localhost. There are many options available, for this example I used a free ngrok account. In my case my local function was deployed on 7071, so I initialized ngrok to port forward on LocalHost:7071.
- Once you have launched your HTTP tunnel its time to update the params.json file. Include the correct API keys along with the appropriate names for your Azure account and container want to search for the file in. Additionally you can adjust the score threshold and the output suffix. With our HTTP tunnel launched we also need to update the tunneling URL with the appropriate Forwarding address.
- In Visual Studio Code, press F5 to launch the project and navigate to: https://localhost:”YOUR_SERVER”/api/MediaProcessingWorkflow?input_file=”YOUR_INPUT_FILE“
You can monitor your console in Visual Studio for output logs and your container on the Azure portal for the transcribed results.
Serverless:
Deploying the functions to an Azure Server is a great choice once the code has been fully debugged and tested, just remember to protect your API keys with the appropriate authentication strategy.
- Adjust the params.json file, this time set the tunneling parameter to https://”YOUR_FUNCTION_APP_NAME”.azurewebsites.net/api/”YOUR_FUNCTION_NAME“
- Next deploy the function app through the Azure extension.
- Once successfully deployed you can test your function by navigating to: https://”YOUR_FUNCTION_APP_NAME”.azurewebsites.net/api/”YOUR_FUNCTION_NAME”?input_file=”YOUR_INPUT_FILE“
Part #6 Building your own workflow.
With the function successfully deployed our transcription workflow tool is complete.

To review, our media follows a two-step workflow. From the Azure container, the file is diagnosed to return an audio quality score. If the audio scores below a quality threshold of 7 we opt not to transcribe the audio and instead enhance the audio. If the media scores at or above that threshold we then pass the file onto the next stage for transcription. Once the transcription is complete the file is then deposited on the container.
This example serves as an introduction to building a Serverless media workflow on Azure. By using the tips described above it is possible to add any number of extra steps into the workflow including APIs that check for profanity or APIs that translate foreign languages, the possibilities are endless. If you are interested in learning more about the workflow outlined above to check out the team’s presentation at the 2021 Azure Serverless Conference where we go into more detail otherwise feel free to explore some of our other great projects over at the Dolby.io Samples Github.


")