


Often times when trying to work with media, we only care about a select subset of the content we are working with. Whether this is to determine which enhance parameters are optimal (like speech, dynamics, and clipping) while getting results faster than processing the entire work, removing excess data when recordings are all in one take, preventing sensitive information from leaving your device, or something else, there are many reasons why one would want to reduce the amount of content being sent for post-processing. Other times, we want the entire file, but want to test how different transformations affect the output quickly, and using less resources than if you were to perform similar operations multiple times on the same long piece of media. Thankfully, Dolby.io Media APIs have a baked in solution to do this for you called “region”.
Configuring Your API Calls to Sample
When configuring your API call’s input parameter, often we only input a single string, the url of the content we are processing, such as:
"input": "dlb://in/example.mp3"However, the parameter actually accepts objects with further configuration as well. The above line is essentially an alias of the proper input object that would translate to:
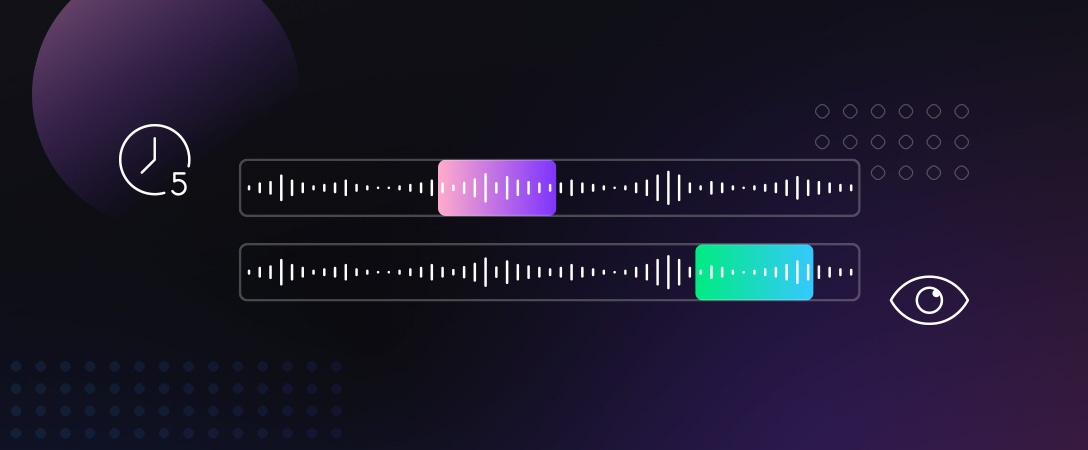
"input": {"url": "dlb://in/example.mp3"}Which leads to further options, such as authentication, or in the case of this article, region, the parameter that tells our servers where in the file to begin and end processing. This is defined by region.start and region.end, both taking in an integer as a parameter defining the number in seconds that you would like the function to begin and end processing respectively. For example, if we wanted to take our previous file, but only process (and thereby output) the first five seconds of the file, the input parameter would look like this:
"input": {
    "url": "dlb://in/example.mp3",
    "region": {
        "start": 0,
        "end": 5
    }
}
To reiterate, the proceeding downloaded file would only be five seconds long, only the processed parts of the file are sent to the output. This allows you to mix and match as many sections of your files you want with the proper Enhance, Analyze, Diagnose, etc. parameters you would like! This makes the job take significantly less time to complete than the entire file would, allowing for quick and iterative jobs to be performed in reviewed in a matter of seconds.
Sampling Media Code Example
Let’s put this all into practice with a real world example. Let’s say we have an audio file that has not been tuned at all, and we want to see how Dolby.io’s Enhance API can improve it best. The easiest way to customize Enhance’s results is to change the Content Type to one of the nine preset options. To briefly go over what each type and what they do, we have:
conference,interview, andlecturewhich are tuned to have maximum dynamics to even out speech levels and medium noise reduction to reduce background noise.meeting and mobile_phone, which are like the above three but with more of a focus on low plosive reduction due to greater mic distance.music, which turns off the majority of processing tuned for voice work while focusing on musical content enhancers.podcastfocuses on max dynamics, but lower speech isolation due to a typically better controlled environment, as well as music detection to prevent songs from being affected.studiouses low noise detection and low speech isolation due to the controlled studio environment. This does give more leeway to let plosive reduction and click reduction get enabled and set to high due to a close mic placement and a silent environment.voice_overhas music detection enabled to prevent speech processing from altering music content, such as in advertisements and commercials.
However, it isn’t always obvious which one will work best for your specific audio file, so you might want to test them all and see which sounds the best. We can do this easily by sampling the first five seconds to get a good idea of how it might work using the example audio file below:
Here we want to iterate over all nine content type options, but not use the entire file, as the longer a file gets, the longer it will take to process the entire dialog. Here we are sampling the first five seconds, represented by start “0” and end “5”, though you could determine that you want to choose a piece in the middle, the end, and so on. We can express this set of API calls in Python with the following code:
import requests

# Creating a list of each supported Media content type
# https://docs.dolby.io/media-apis/docs/how-to-improve-audio-by-content-type
content_types = ["conference", "interview", "lecture", "meeting", "mobile_phone", "music", "podcast", "studio", "voice_over"]

# Create a job for each content type with a for loop
for type in content_types:
  body = {
    "input": {
      "url": "dlb://in/sample-audio.m4a",            # Replace this with the location of your audio file you wish to test with
      "region": {
        "start": 0,
        "end": 5
      }
    },
    "output" : f"dlb://out/{type}-sample.m4a",       # Change the output URL to be specific to the type
    "content": {"type": type}                        # Define the content type
  }
  url = "https://api.dolby.com/media/enhance"
  headers = {
    "x-api-key": os.environ["DOLBYIO_MEDIA_APIKEY"], # Input your Dolby.io Media API Key here
    "Content-Type": "application/json",
    "Accept": "application/json"
  }

  response = requests.post(url, json=body, headers=headers)
  response.raise_for_status()
  json = response.json()
  print(f"Sample {type} uploaded successfully with the job id: {json['job_id']}") # Modify this print statement as desired
When run, the code will send nine jobs to Dolby.io to be processed, and print out all of their job ids for you to review. This is likely not necessary however, as the jobs will be performed in parallel, and be completed in a matter of seconds due to the brevity of the file length. What we need to do now is download the completed files back to our machine, which can be done with the following Python script:
import shutil
import requests

# List out each content type for looping
content_types = ["conference", "interview", "lecture", "meeting", "mobile_phone", "music", "podcast", "studio", "voice_over"]

# Collect each file after a few seconds have passed to ensure all jobs are done with another for loop
for type in content_types:
    output_path = f"{type}-sample.m4a".                  # Distinguish each file name

    url = "https://api.dolby.com/media/output"
    headers = {
        "x-api-key": os.environ["DOLBYIO_MEDIA_APIKEY"], # Input your Dolby.io Media API Key here
        "Content-Type": "application/json",
        "Accept": "application/json",
    }

    args = {
        "url": f"dlb://out/{type}-sample.m4a",           # Get each URL
    }

    with requests.get(url, params=args, headers=headers, stream=True) as response:
        response.raise_for_status()
        response.raw.decode_content = True
        print("Downloading from {0} into {1}".format(response.url, output_path)). # Modify this print statement as desired
        with open(output_path, "wb") as output_file:
            shutil.copyfileobj(response.raw, output_file)
Now you should have something resembling the following nine files downloaded to the same location as the script above:
When listening to these files, the differences are subtle, but small differences appear when you begin to nit-pick, such as how much background noise is present. I personally like how “lecture” and “studio” sound for this specific audio file, so I would try those two out first with the entire file, narrowing down the number of full length processing jobs I need to make from nine to two, cutting down the time spent by over four times. This exemplifies how powerful it can be to use region to play with API parameters to get the best results for your needs, while saving time and money.
Next Steps with Dolby.io Media Sampling
Now that we know how to use the region parameter, try using it in your workflows! Have a file that is too large for you to want to get enhanced? Use region test out a few different parameters like content, and more specific ones such as noise, clipping and loudness to get an amazing result for your file at a fraction of the time. Have a podcast with a guest who is only on for part of the duration you want analytics on? Use our Speech API to only analyze that section of the audio file. This tool gives you even finer control of how you control your media using Dolby.io and see the results much faster. To read more, see our documentation, and check out this post on how enhance parameters affect the output.


")