


What is noise and how do you get rid of it? Given not all media can be created in a perfectly controlled professional studio environment it is common to pick up sounds that were not part of what the creator intended to create.
Noise is defined as unwanted sound, but what is unwanted can vary depending on context. To help you deliver the best media experience you can for the audience of your application or platform, our Media Processing APIs analyze the content and decide which of several different noise reduction algorithms to apply and by what amount to get the best sound. We refer to these as noise reduction and speech isolation. We’re going to look at different types of noise and explore how to use the Media Processing APIs to automate detection and removal of noise by making HTTP requests with different parameters from Python.
Types of Noise
Stationary or static noise is typical when there is a low volume background sound present in an audio signal. This noise is typically consistent across the entirety of a piece of media because the source of the sound doesn’t change.
There are a number of things that could cause a stationary sound:
- the audio equipment itself, such as a microphone hiss or electric hum of a power-line frequency
- a computer fan running in the background
- a heating or air conditioning unit circulating air
Detecting this type of noise reduction can be done through an analysis of the sound characteristics such as variations in frequencies over time for any hums, buzzes, and other white noise that distracts from the high-value content. There are different techniques for this type of digital signal processing to remove or subtract this type of noise.
Non-Stationary or non-static noise comes from less common sounds that appear infrequently or at a cyclical time.
The examples of non-stationary sounds is considerably more varied:
- a dog barking
- birds chirping
- keyboard clicking
- an ambulance driving by
- book falling off a desk
These sounds are unwanted, but not easy to detect from the sound profile itself. Another way to think of it is the inverse of how to look at stationary sounds. Instead of detecting noise, we use machine learning algorithms that know how to elevate the sounds desired through speech isolation of spoken words in certain types of media.
Getting Started
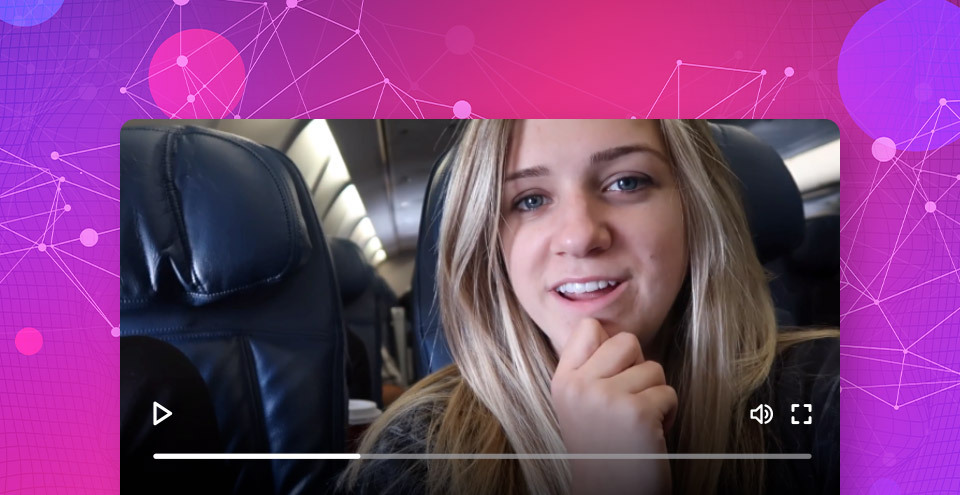
Depending on what type of noise your media has may change how you want to tune some of the parameters to the Media Processing APIs. If you saw the Media Processing Product Page you may have listened to a demo video of two women on a flight to Amsterdam. This is a good example of stationary noise that comes from the hum of airplane engines while on a flight.
Let’s get started by building a media processing workflow with Python to enhance a piece of media like this.
Presigned URLs
The Dolby.io Media Processing APIs support many ways of reading and writing to cloud storage so check out the Media Input and Output guide for a run down of some of these options. For this project we’re going to use AWS Simple Storage Service (S3) to read and write media.
I stored the original unedited copy in a private S3 bucket. If you want to follow along with this example, you can access the original file here: https://dolbyio.s3-us-west-1.amazonaws.com/public/shelby/airplane.original.mp4
In order to process it, I need to make it available for the Media Processing APIs to read it. I can grant temporary access with what is known as a presigned url. It encodes my rights and privileges for accessing the file into a temporary signature that can be given to another person or service to act on my behalf. This is a convenient way to keep your credentials private but share them with Dolby.io APIs fo temporary read and write access.
The boto3 Python package has functionality for generating a presigned url. You can find out more about how to install and configure this library from the boto3 documentation if you haven’t used it before.
import boto3
from botocore.exceptions import ClientError

def create_presigned_url(bucket_name, object_name, expiration=3600, method='get_object'):
    client = boto3.client('s3')
    try:
        return client.generate_presigned_url(method,
            Params={ 'Bucket': bucket_name, 'Key': object_name },
            ExpiresIn=expiration
            )
    except ClientError as e:
        print(e)
We’ll come back to how to use this in a moment.
API Key
If you haven’t already, sign-up for a developer account to get access to your API Key. We’ll need that to make use of the Media Processing APIs. I generally recommend storing these as environment variables that you can read so that you don’t store it with your source code.
You’ll need to review documentation for your shell environment for how to properly set environment variables.
import os

# Read API Key from runtime environment
api_key = os.environ['DOLBYIO_API_KEY']
Requests
For this project we’ll also use the popular Python requests library. Check out the Hitchhiker’s Guide to Python if you need help setting up your local environment. Since we’ll also be calling a few Media Processing APIs it can be useful to setup a few reusable methods like this:
import requests

# Construct URL from path
def get_url(url_path):
    return "https://api.dolby.com/" + url_path


# Return headers needed when calling Media Processing
# APIs with the api key embedded
def get_headers(api_key):
    return {
        "x-api-key": api_key,
        "Content-Type": "application/json",
        "Accept": "application/json",
Measuring Noise
How much noise is in this media file? Let’s use the Media Analyze API to find out. As described in the documentation this is an asynchronous API. That means we’ll need to make an HTTP POST request to begin processing and a separate GET request to retrieve the result.
This method will start running a job when given your API Key and a presigned url like we generated previously.
def post_media_analyze(api_key, input_url):
    url = get_url("/media/analyze")
    headers = get_headers(api_key)

    # Input required, otherwise use defaults
    body = {
        "input": input_url
    }

    response = requests.post(url, json=body, headers=headers)
    response.raise_for_status()
    return response.json()["job_id"]
When called, this returns us a unique job_id. We need that value in order to check the status of media processing. To do that, we make a separate GET request to the same endpoint. Depending on the size of the media it can take some time to complete, wo we just use time.sleep() to wait a few seconds before making a recursive call to try again.
import time

def get_media_analyze(api_key, job_id, wait=5):
    url = get_url("/media/analyze")
    headers = get_headers(api_key)

    params = {
        "job_id": job_id
    }

    response = requests.get(url, params=params, headers=headers)
    response.raise_for_status()

    data = response.json()
    if data["status"] not in ["Pending", "Running"]:
        return data

    # Keep trying until job is complete
    time.sleep(wait)
    return get_media_analyze(api_key, job_id, wait=wait)
Putting this all together we can print the results JSON for inspection.
    import json

    presigned_url = create_presigned_url('dolbyio', 'public/PlaneOriginal.mp4')
    job_id = post_media_analyze(api_key, presigned_url)
    results = get_media_analyze(api_key, job_id)
    print(json.dumps(results, indent=4, sort_keys=True))
The detected average noise level and signal to noise ratio of the original file is reported as -42.38 and 30.83 respectively.
    "noise": {
        "level_average": -42.38,
        "snr_average": 30.83
    }
Noise Management
The Media Enhance API uses an intelligent approach to noise management. There are two elements to the algorithm: noise reduction and speech isolation. Through noise reduction stationary background noises are suppressed. With speech isolation, the presence of dialog is brought forward to make it more pronounced. Using only the default parameters the result tries to balance between these two approaches while also identifying other prominent impurities such as sibilance while improving tonal balance, leveling, and improved dynamics.
Enhance Media
Building upon our workflow we can add a method to initiate the enhancement process. This works mostly the same way but requires both input and output parameters. That means we’ll need to generate a second presigned URL for writing the output.
def post_media_enhance(api_key, input_url, output_url):
    url = get_url('/media/enhance')
    headers = get_headers(api_key)
    # input/output required, otherwise use defaults
    body = {
        "input": input_url,
        "output": output_url
    }

    response = requests.post(url, json=body, headers=headers)
    response.raise_for_status()

    return response.json()["job_id"]
As before, we get a job_id which we’ll use as input to check the status. A job will progress through a few stages so we can terminate processing if we get an error or successful result.
def get_media_enhance(api_key, job_id, wait=5):
    url = get_url("/media/enhance")
    headers = get_headers(api_key)

    params = {
        "job_id": job_id
    }

    response = requests.get(url, params=params, headers=headers)
    response.raise_for_status()
    data = response.json()
    if data["status"] not in ["Pending", "Running"]:
        return data

    # Keep trying until complete
    time.sleep(wait)
    return get_media_enhance(api_key, job_id, wait=wait)
Putting this all together would look like:
    input_url = create_presigned_url('dolbyio', 'public/PlaneOriginal.mp4')
    # We need a presigned url that grants permission to write
    output_url = create_presigned_url('dolbyio', 'output/PlaneEnhanced.mp4', method='put_object')
    job_id = post_media_enhance(api_key, presigned_url, output_url)
    results = get_media_enhance(api_key, job_id)
When you look at the results you get an indication the job was successful, but you’ll need to grab your file from S3 to inspect the results.
For example, you can do this with the command line or write another method to download the result. More details on using the AWS CLI can be found from the Amazon documentation. Here’s a quick example of how to download media from your bucket to a local filesystem.
aws s3 cp s3://dolbyio/output/PlaneEnhanced.mp4 ./Once downloaded you can begin listening to the results. The default settings should sound great, but depending on the characteristics of the media being processed there may be some additional fine tuning you may want to try.
Tuning Noise Reduction
By default noise reduction will not reach the maximum amount unless you specify that you want that behavior. This can be helpful for particularly noisy content.
This following example illustrates how to use the max amount of noise reduction while disabling speech isolation to hear the impact of noise reduction alone.
def max_noise_reduction(api_key, input_url, output_url):
    url = get_url("/media/enhance")
    headers = get_headers(api_key)

    body = {
        "input": input_url,
        "output": output_url,
        "audio": {
            "noise": {
                "reduction":  {
                    "amount": "max"
                }
            },
            "speech": {
                "isolation": {
                    "enable": False
                }
            }
        }
    }

    response = requests.post(url, json=body, headers=headers)
    response.raise_for_status()

    return response.json()["job_id"]
The noise reduction amount can be set to values of low, medium, high, or max. If you find the default auto-adjustments produce artifacts, ghosting, or constrained vocal tones you can dial the noise reduction amount to be more or less aggressive to fit your needs and preferred sound. You can find a bit more about this from the API Reference documentation
Tuning Speech Isolation
Similar to tuning for noise reduction, you can increase the amount of speech isolation. This puts the emphasis entirely on dialog so other audio such as what is identified as music may be removed.
Here’s how that looks:
def max_speech_isolation(api_key, input_url, output_url):
    url = get_url('/media/enhance')
    headers = get_headers(api_key)

    body = {
        'input': input_url,
        'output': output_url,
        'audio': {
            'noise': {
                'reduction':  {
                    'enable': False
                }
            },
            'speech': {
                'isolation': {
                    'amount': 100
                }
            }
        }
    }

    response = requests.post(url, json=body, headers=headers)
    response.raise_for_status()

    return response.json()["job_id"]
Speech isolation ranges from 0 to 100 and by default will be automatically tuned within the 20-80% range. If you have content where only speech matters and you want voice preservation, increasing the isolation amount may improve the results you get out of media processing.
Conversely, if you are running media processing and notice noise pumping as a result of gating, you may want to tune this value down to a lower value.
Summary
The Media Processing APIs make every effort to intelligently manage the noise and speech in your media so that you don’t have to think about it. There are limitations though as noise gating algorithms don’t think about sound creatively for what inspired the content creation process. This is one area where the Media Enhance API differentiates itself from other audio processing tools, but to get the absolute best sound for your media as you intended you can tune the amount of noise reduction and speech isolation to achieve sonic clarity.
To learn more about the Enhance API, check out the API Reference documentation. We’ve also provided code examples such as those found in this post in a GitHub repository. Check out media-api-samples if you need help getting started building your own media workflow with Python, JavaScript, cURL, etc.


")