Ever since the inception of cinema, Scores, the musical composition within a film, have become synonymous with the medium and a crucial staple in the experience of enjoying film or TV. As the industry has grown and matured so too has the score, with many productions having hundreds of tracks spanning many genres and artists. These artists can be anyone from an orchestra drummer all the way up to a sellout pop star sensation, each composing, producing, or performing a variety of tracks. The challenge with this growing score complexity is ensuring that every artist is paid for their fair share and contribution to the overall film.
The industry presently tackles this challenge with a tool known as a “Cue Sheet“, a spreadsheet that identifies exactly where a track is played and for how long. The issue with Cue Sheets is that their creation and validation is an immensely manual process, constituting hundreds of hours spent confirming that every artist is accounted for and compensations are awarded accordingly. It was this inefficiency that attracted Dolby.io to help support the Cue Sheet Palooza Hackathon, a Toronto-based event that challenged musicians and software engineers to work and innovate together to reduce the time spent creating Cue Sheets. The event was sponsored by the Society of Composers, Authors and Music Publishers of Canada or SOCAN for short, which is an organization that helps ensure Composers, Authors, and Music Publishers are correctly compensated for their work.
Many of the hackers utilized the Dolby.io Analyze Media API to help detect loudness and music within an audio file and timestamp exactly where music is included. In this guide, we will highlight how you can build your own tool for analyzing music content in media, just like the SOCAN hackathon participants.
So what is the Analyze Media API?
Before we explained how hackers used the API we need to explain what Analyze Media is and what it does. The Dolby.io Analyze Media API generates insight based on the underlying signal in audio for creating data such as loudness, content classification, noise, and musical instruments or genre classification. This makes the API useful for detecting in what section music occurs in a video file and some qualities of the music at that instance.
The Analyze Media API adheres to the Representational state transfer (REST) protocol meaning that it is language-agnostic and can be built into an existing framework that includes tools to interact with a server. This is useful as it means the API can adapt depending on the use case. In the Cue Sheet example many teams wanted to build a web application as that was what was most accessible to the SOCAN community, and hence relied heavily on HTML, CSS, and JavaScript to build out the tool.
In this guide, we will be highlighting how the participants implemented the API and why it proved useful for video media. If you want to follow along you can sign up for a free Dolby.io account which includes plenty of trial credits for experimenting with the Analyze Media API.
A QuickStart with the Analyze Media API in JavaScript:
There are four steps to using the Analyze Media API on video:
- Store the media on the cloud.
- Start an Analyze Media job.
- Monitor the status of that job.
- Retrieve the result of a completed job.
The first step, storing media on the cloud depends on your use case for the Analyze Media API. If your media/video is already stored on the cloud (Azure AWS, GCP) you can instead move on to step 2. However, if your video file is stored locally you will first have to upload it to a cloud environment. For this step, we upload the file to the Dolby.io Media Cloud Storage using the local file and our Dolby.io Media API key.
async function uploadFile() {
    //Uploads the file to the Dolby.io server
    let fileType = YOUR_FILE_TYPE;
    let audioFile = YOUR_LOCAL_MEDIA_FILE;
    let mAPIKey = YOUR_DOLBYIO_MEDIA_API_KEY;

    let formData = new FormData();
    var xhr = new XMLHttpRequest();
    formData.append(fileType, audioFile);

    const options = {
        method: "POST",
        headers: {
            Accept: "application/json",
            "Content-Type": "application/json",
            "x-api-key": mAPIKey,
        },
        // url is where the file will be stored on the Dolby.io servers.
        body: JSON.stringify({ url: "dlb://file_input.".concat(fileType) }),
    };

    let resp = await fetch("https://api.dolby.com/media/input", options)
        .then((response) => response.json())
        .catch((err) => console.error(err));

    xhr.open("PUT", resp.url, true);
    xhr.setRequestHeader("Content-Type", fileType);
    xhr.onload = () => {
        if (xhr.status === 200) {
            console.log("File Upload Success");
        }
    };
    xhr.onerror = () => {
        console.log("error");
    };
    xhr.send(formData);
    let rs = xhr.readyState;

    //Check that the job completes
    while (rs != 4) {
        rs = xhr.readyState;
    }
}
For this file upload, we have chosen to use XMLHttpRequest for handling our client-side file upload, although packages like Axios are available. This was a deliberate choice as in our Web App we add functionality for progress tracking and timeouts during our video upload.
With our video file uploaded and stored on the cloud we can start an Analyze Media API job which is done using the location of our cloud-stored media file. If your file is stored on a cloud storage provider such as AWS you can use the pre-signed URL for the file as the input. In this example, we are using the file stored on Dolby.io Media Cloud Storage from step 1.
async function startJob() {
    //Starts an Analyze Media Job on the Dolby.io servers
    let mAPIKey = YOUR_DOLBYIO_MEDIA_API_KEY;
    //fileLocation can either be a pre-signed URL to a cloud storage provider or the URL created in step 1.
    let fileLocation = YOUR_CLOUD_STORED_MEDIA_FILE;

    const options = {
        method: "POST",
        headers: {
            Accept: "application/json",
            "Content-Type": "application/json",
            "x-api-key": mAPIKey,
        },
        body: JSON.stringify({
            content: { silence: { threshold: -60, duration: 2 } },
            input: fileLocation,
            output: "dlb://file_output.json", //This is the location we'll grab the result from.
        }),
    };

    let resp = await fetch("https://api.dolby.com/media/analyze", options)
        .then((response) => response.json())
        .catch((err) => console.error(err));
    console.log(resp.job_id); //We can use this jobID to check the status of the job
}
When startJob resolves we should see a job_id returned.
{"job_id":"b49955b4-9b64-4d8b-a4c6-2e3550472a33"}Now that we’ve started an Analyze Media job we need to wait for the job to resolve. Depending on the size of the file the job could take a few minutes to complete and hence requires some kind of progress tracking. We can capture the progress of the job using the JobID created in step 2, along with our Media API key to track the progress of the job.
async function checkJobStatus() {
    //Checks the status of the created job using the jobID
    let mAPIKey = YOUR_DOLBYIO_MEDIA_API_KEY;
    let jobID = ANALYZE_JOB_ID; //This job ID is output in the previous step when a job is created.

    const options = {
        method: "GET",
        headers: { Accept: "application/json", "x-api-key": mAPIKey },
    };

    let result = await fetch("https://api.dolby.com/media/analyze?job_id=".concat(jobID), options)
        .then((response) => response.json());
    console.log(result);
}
The checkJobStatus function may need to be run multiple times depending on how long it takes for the Analyze Media job to resolve. Each time you query the status you should get results where progress ranges from 0 to 100.
{
  "path": "/media/analyze",
  "status": "Running",
  "progress": 42
}
Once we know the job is complete we can download the resulting JSON which contains all the data and insight generated regarding the input media.
async function getResults() {
    //Gets and displays the results of the Analyze job
    let mAPIKey = YOUR_DOLBYIO_MEDIA_API_KEY;

    const options = {
        method: "GET",
        headers: { Accept: "application/octet-stream", "x-api-key": mAPIKey },
    };

    //Fetch from the output.json URL we specified in step 2.
    let json_results = await fetch("https://api.dolby.com/media/output?url=dlb://file_output.json", options)
        .then((response) => response.json())
        .catch((err) => console.error(err));

    console.log(json_results)
}
The resulting output JSON includes music data which breaks down by section. These sections contain an assortment of useful data points:
- Start (seconds): The starting point of this section.
- Duration (seconds): The duration of the segment.
- Loudness (decibels): The intensity of the segment at the threshold of hearing.
- Beats per minute (bpm): The number of beats per minute and an indicator of tempo.
- Key: The pitch/scale of the music segment along with a confidence interval of 0.0-1.0.
- Genre: The distribution of genres including confidence intervals of 0.0-1.0.
- Instrument: The distribution of instruments including confidence intervals of 0.0-1.0.
Depending on the complexity of the video file there can sometimes be 100s of music segments.
"music": {
    "percentage": 34.79,
    "num_sections": 35,
    "sections": [
        {
            "section_id": "mu_1",
            "start": 0.0,
            "duration": 13.44,
            "loudness": -16.56,
            "bpm": 222.22,
            "key": [
                [
                    "Ab major",
                    0.72
                ]
            ],
            "genre": [
                [
                    "hip-hop",
                    0.17
                ],
                [
                    "rock",
                    0.15
                ],
                [
                    "punk",
                    0.13
                ]
            ],
            "instrument": [
                [
                    "vocals",
                    0.17
                ],
                [
                    "guitar",
                    0.2
                ],
                [
                    "drums",
                    0.05
                ],
                [
                    "piano",
                    0.04
                ]
            ]
        },
This snippet of the output only shows the results as they relate to the Cue Sheet use case, the API generates even more data including audio defects, loudness, and content classification. I recommend reading this guide that explains in-depth the content of the output JSON.
With the final step resolved we successfully used the Analyze Media API and gained insight into the content of the video file. In the context of the Cue Sheet Palooza Hackathon, the participants were only really interested in the data generated regarding the loudness and music content of the media and hence filtered the JSON to just show the music data similar to the example output.
Building an app for creating Cue Sheets
Of course not every musician or composer knows how to program and hence part of the hackathon was building a user interface for SOCAN members to interact with during the Cue Sheet creation process. The resulting apps used a variety of tools including the Dolby.io API to format the media content data into a formal Cue Sheet. These web apps took a variety of shapes and sizes with different functionality and complexity.
It’s one thing to show how the Analyze Media API works but it’s another thing to highlight how the app might be used in a production environment like for a Cue Sheet. Included in this repo here is an example I built using the Analyze Media API that takes a video and decomposes the signal to highlight what parts of the media contain music.
Here is a picture of the user interface, which takes in your Media API Key and the location of a locally stored media file.

For showcasing the app I used a downloaded copy of a music review podcast where the host samples a range of songs across a variety of genres. The podcast includes 30 tracks which are played over 40% of the 50-minute podcast. If you want to try out the App with a song you can use the public domain version of “Take Me Out to the Ball Game” originally recorded in 1908, which I had used for another project relating to music mastering.
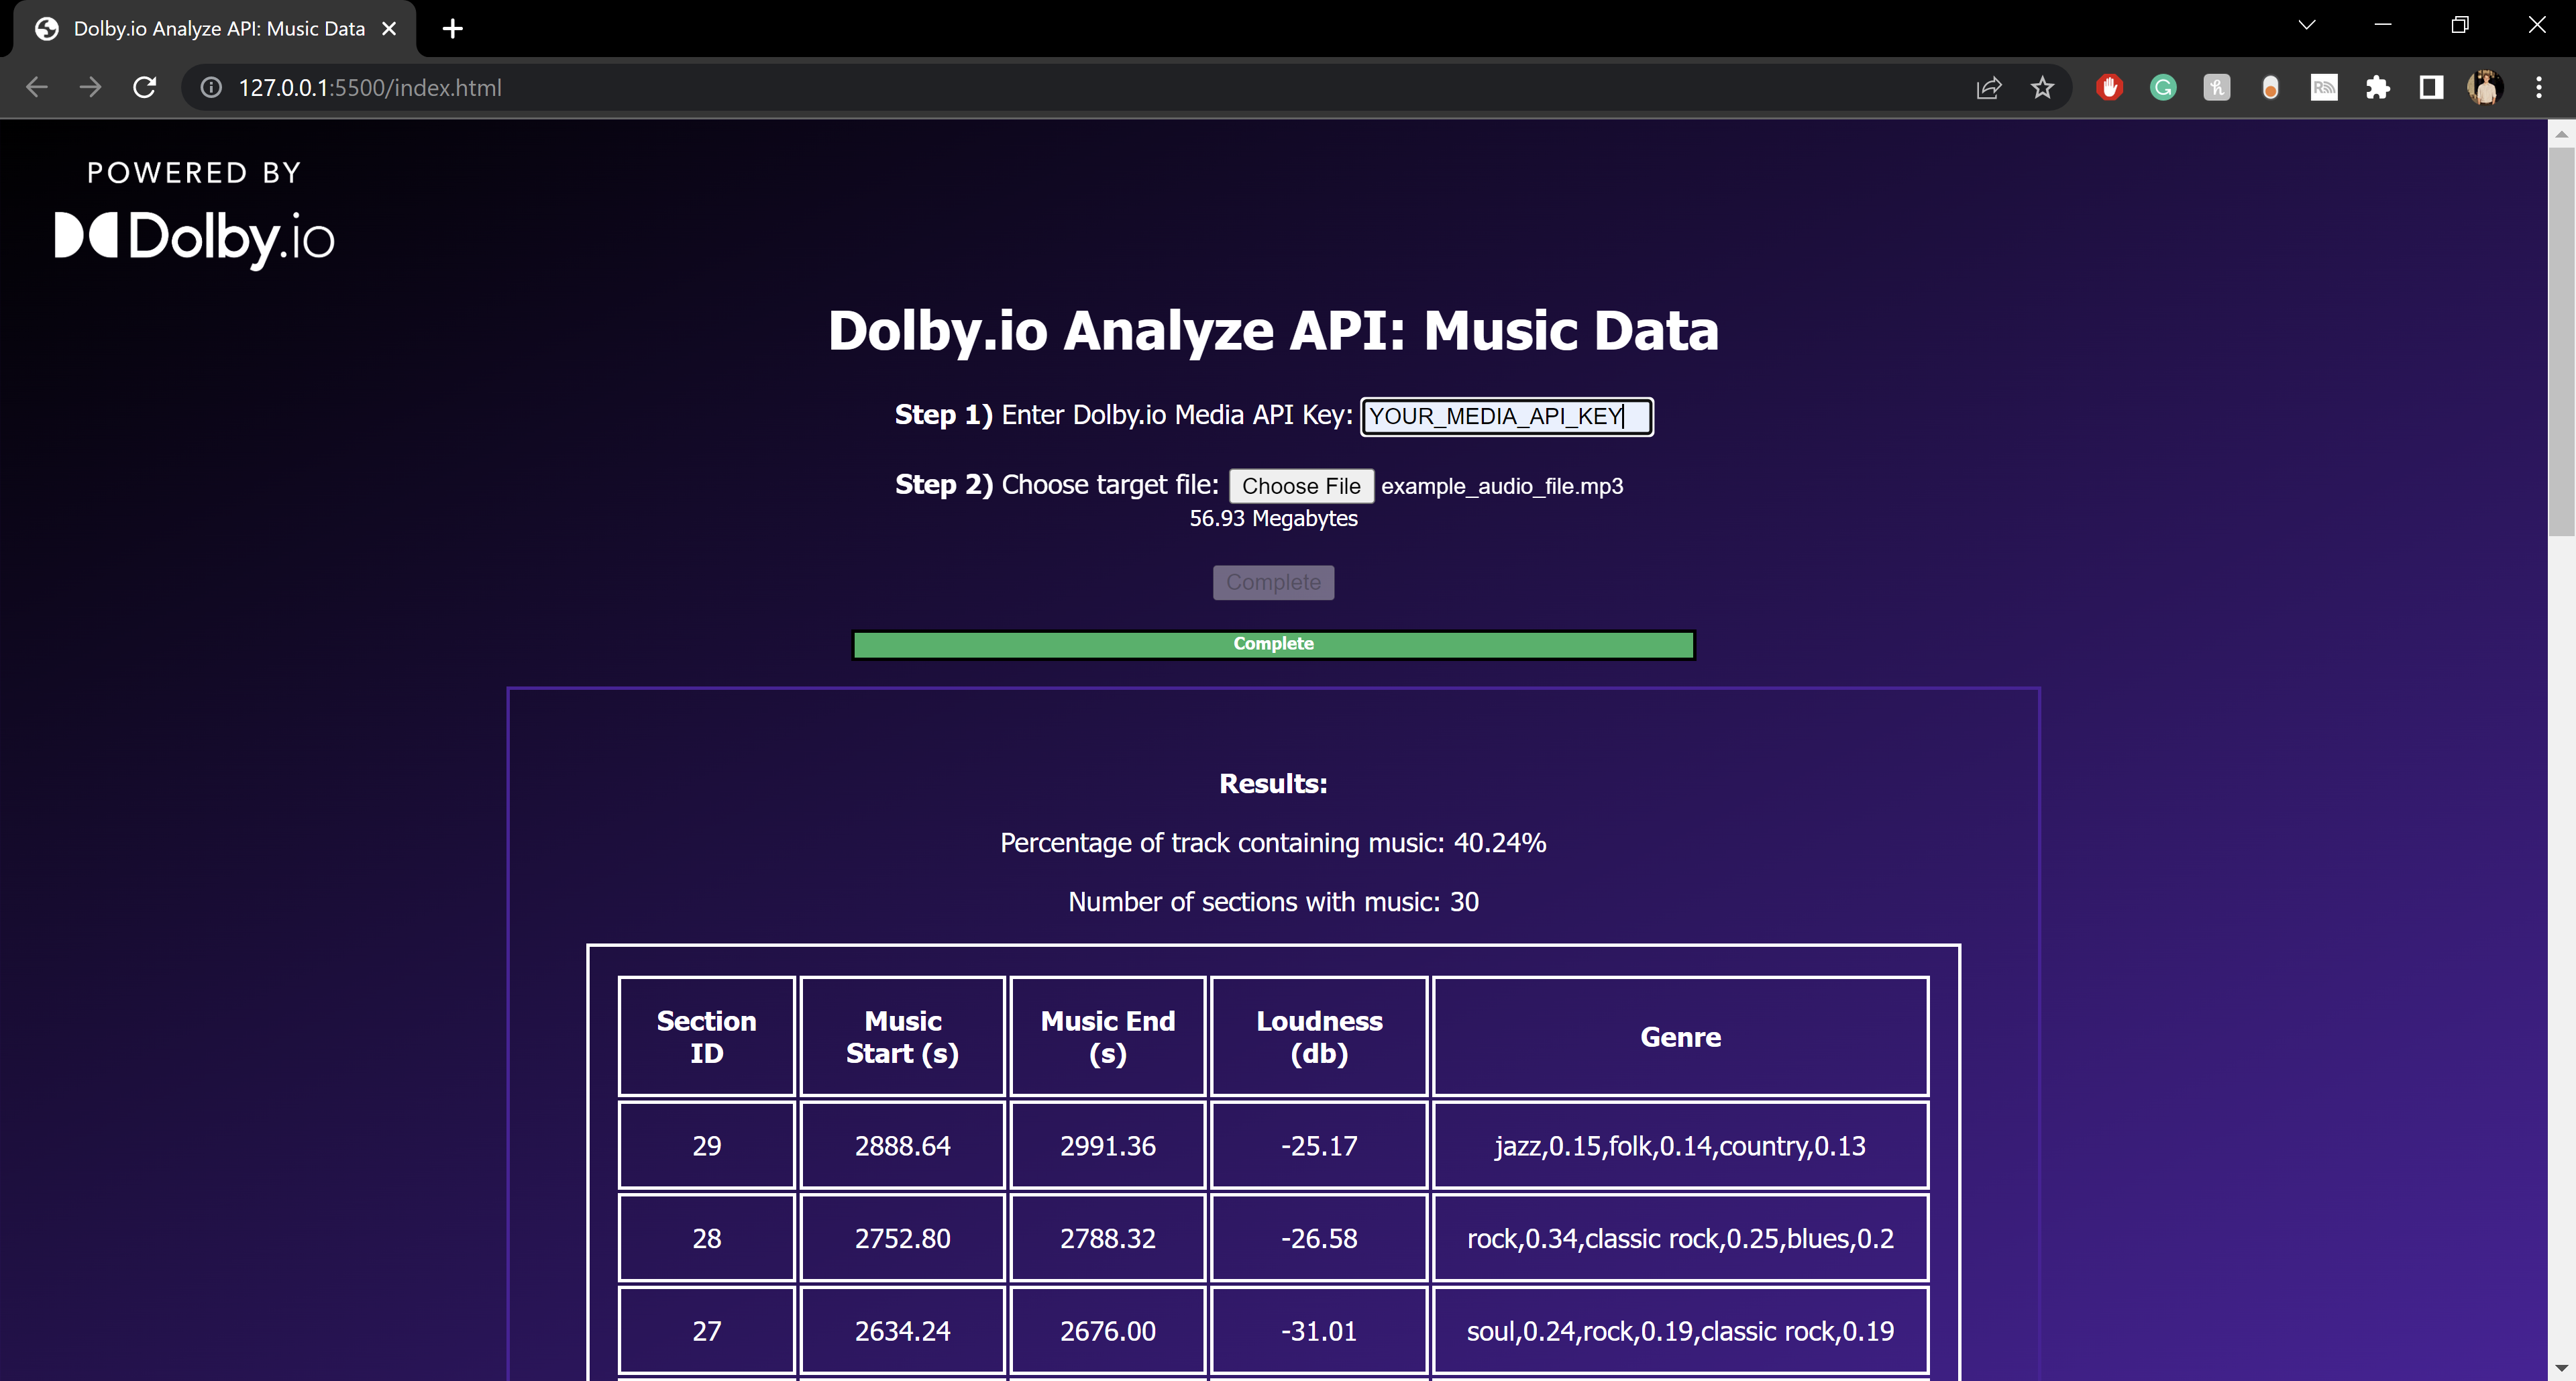
Feel free to clone the repo and play around with the app yourself.
Conclusion:
At the end of the hackathon, participating teams were graded and awarded prizes based on how useful and accessible the Cue Sheet tool would be for SOCAN members. The sample app demoed above represents a very rudimentary version of what many of the hackers built and how they utilized the Analyze Media API. If you are interested in learning more about their projects the winning team included a GitHub repo with their winning entry where you can see how they created a model to recognize music and how they used the Dolby.io Analyze Media API to supplement the Cue Sheet creation process.
If the Dolby.io Analyze Media API is something you’re interested in learning more about check out our documentation or explore our other tools including APIs for Algorithmic Music Mastering, Enhancing Audio, and Transcoding Media.


