Media

Transcoding Files Using Zapier, Google Drive, and Dolby.io

SUMMARY

Transcoding files can be a pain, especially when you’re working with multiple different file types. Through a new integration with Zapier, you can upload many files to a Google Drive folder and quickly get back transcoded files to your specifications, all without writing a single line of code. Keep reading to learn how to start … Read more


Transcoding files can be a pain, especially when you’re working with multiple different file types. Through a new integration with Zapier, you can upload many files to a Google Drive folder and quickly get back transcoded files to your specifications, all without writing a single line of code. Keep reading to learn how to start transcoding files with Zapier!

Setting up Zapier, Google Drive, and Dolby.io to Start Transcoding Files

For this guide, you’ll need a free Google Drive account, a Zapier account, and a Dolby.io account. Both Zapier and Dolby.io have a free trial feature – so you can try them out before deciding to make a purchase.

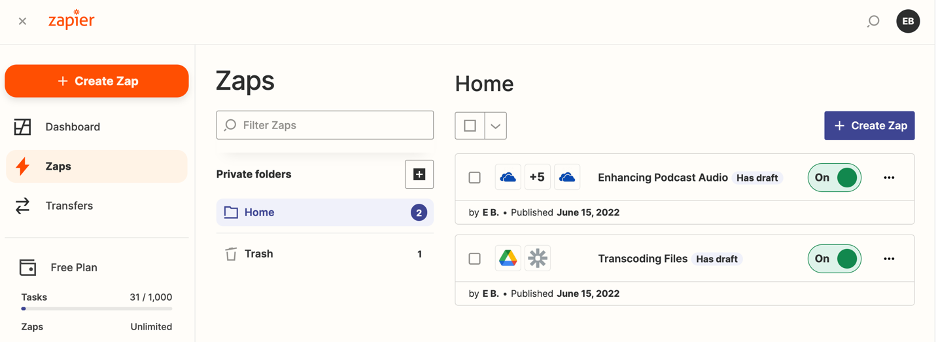
First, navigate to the Zapier website and sign into your account. You should see the following dashboard:

Image shows the Zapier dashboard. to the top left is an orange, rounded off rectangular, button that says ' Create Zap.' This is where users click to begin making a zap.

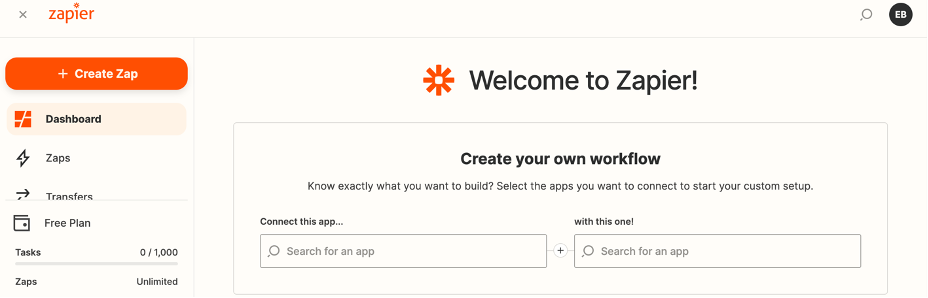
Let’s click ‘Create zap’ to start transcoding files!

Using Google Drive as a Trigger in Zapier

The first block in every zap is called a ‘trigger.’ This trigger reacts to an event and causes all the following steps in your zap to run. We’ll select Google Drive as our trigger for this zap.

This is the zapier trigger app selection menu. Listed are many apps, but in the top left corner, the cursor is hovering over the app 'Google Drive.' The Google Drive logo is a triangle with one side as green, one side as yellow, and one side as blue. Where the sides touch the colours overlap and mix.

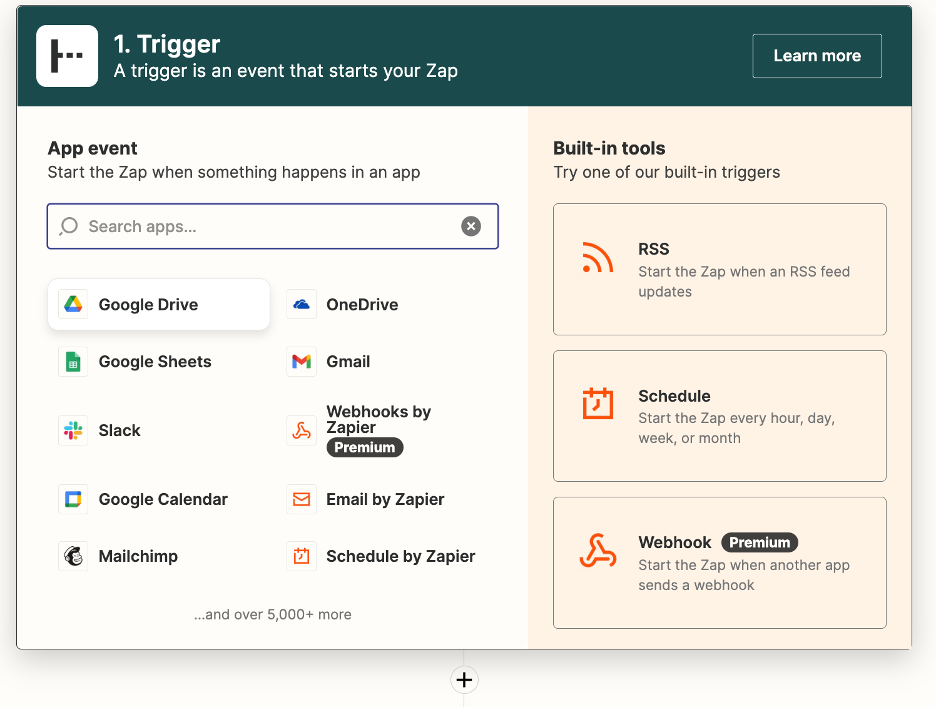
Once you’ve chosen Google Drive, select the event as ‘New File in Folder.’ Now the zap will activate anytime you upload a new file to the folder you specify.

Shown is the menu for the trigger 'New File in Folder in Google Drive.' The event selected is 'New File in Folder.' There is a large, blue, rectangle at the bottom that says 'Continue' for the user to press.

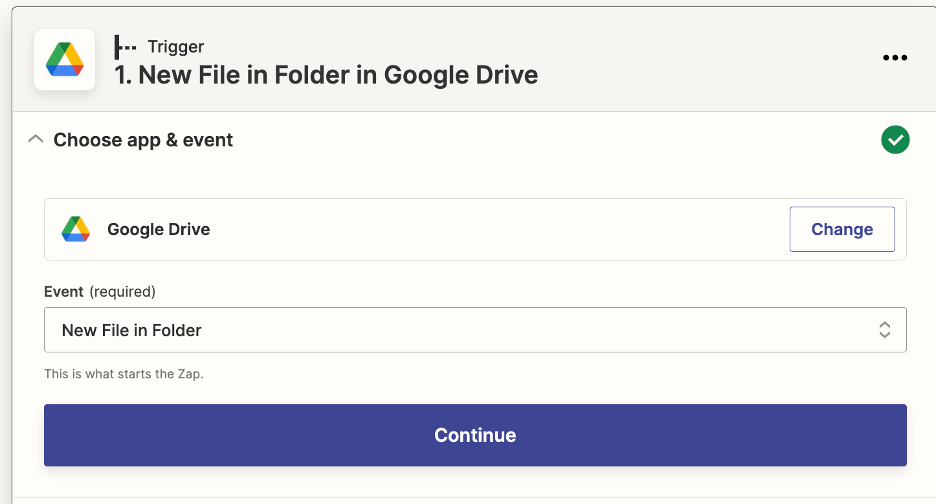
Zapier will now ask you to log into your Google Drive account before continuing. After that, choose the following settings for the rest of the trigger:

This is the event settings menu for the trigger 'New File in Folder in Google Drive.' There are three menus, the first two are collapsed. The third menu is titled 'Set up Trigger.' In this menu, there are two drop down menus available. The first asks for the name of a google Drive and the selection is 'My Google Drive.' The second drop down menu asks for the name of a folder and the selection is 'FIles to Transcode.' These two values will be different user to user.
At the bottom there is a small, blue, rectangle that says 'Continue' for the user to click.

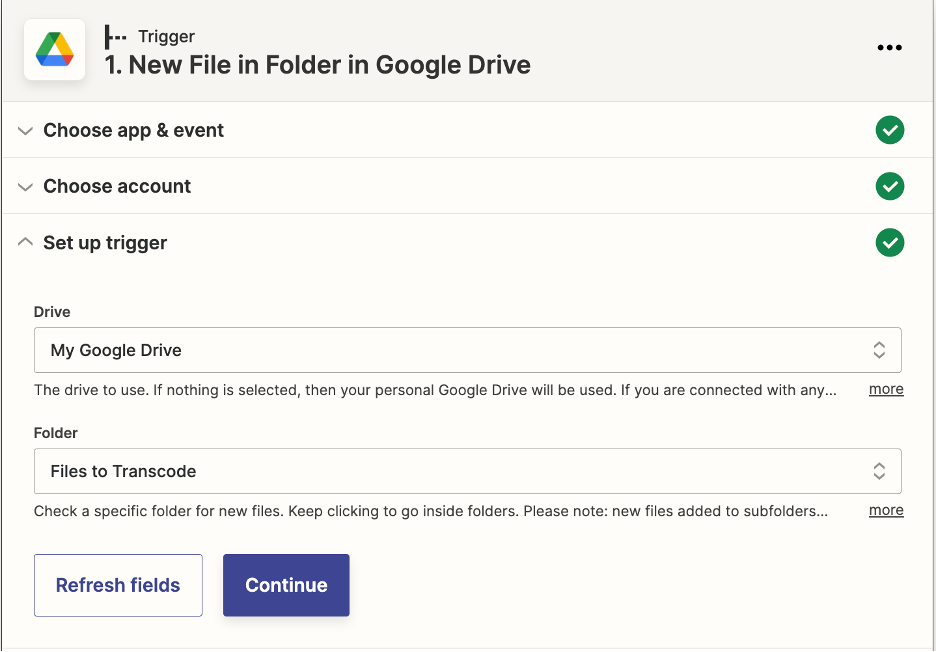
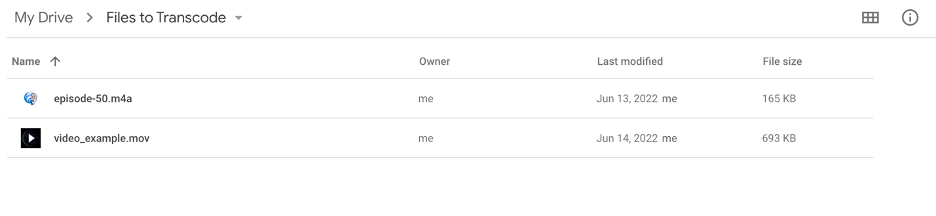
I chose ‘My Google Drive’ as the drive to use and the folder ‘Files to Transcode,’ but choose the drive and folder that is applicable to you.

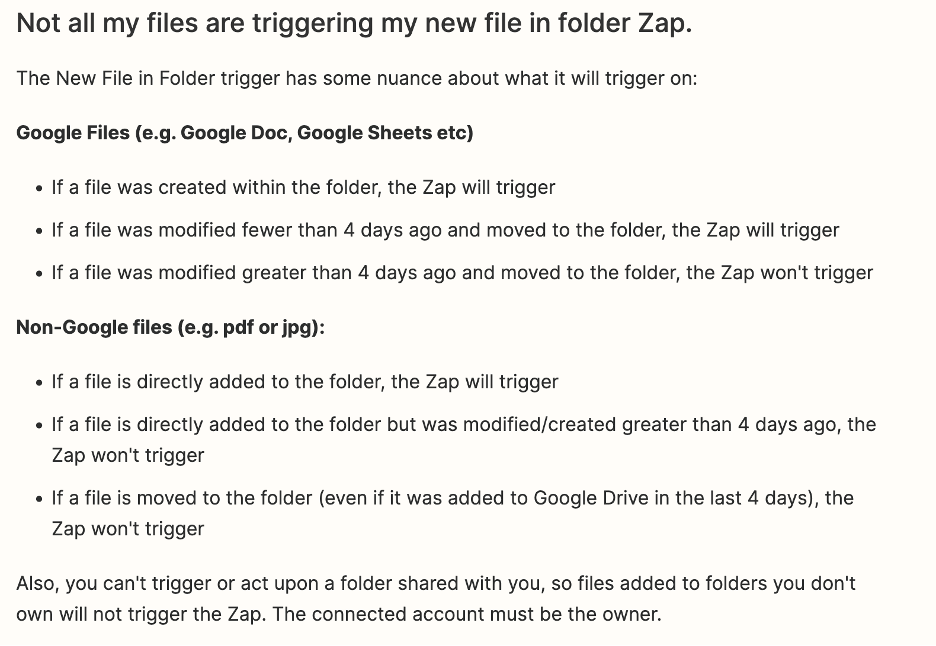
Anytime a file gets uploaded to this folder in the future, the zap will attempt to run. There are some nuances to this when using Google Drive, however. More complete information about how Google Drive is integrated with Zapier can be found here. A common misconception is that the zap will run for every new file uploaded to Google Drive.

In short, the zap determines whether or not to run using a set of rules based on:

  1. Modification date
  2. Where the file originated from
  3. Whether it is a Google file or a non-google file

Be sure to keep this in mind when setting up your zap to trigger with Google Drive!

Listed are some rules about when Google Drive will trigger for new files. This is the text:
'Not all my files are triggering my new file in folder Zap. The New File in Folder trigger has some nuance about what it will trigger on:'
'for Google Files (e.g. Google Doc, Google Sheets, etc.):
If a file was created within the folder, the Zap will trigger. If a file was modified fewer than 4 days ago and moved to the folder, the Zap will trigger. If a file was modified greater than 4 days ahp and moved to the folder, the zap won't trigger.'
'For Non-Google files (e.g. pdf or jpg): If a file is directly added to the folder, the Zap will trigger. If a file is directly added to the folder but was modified/created greater than 4 days ago, the Zap won't trigger. If a file is moved to the folder (even if it was added to Google Drive in the last four days), the Zap won't trigger.'
'Also, you can't trigger or act upon a folder shared with you, so files added to folders you don't own will not trigger the Zap. The connected account must be the owner.'

If you want your zap to run every time a new file is uploaded, regardless of modification date, try using DropBox or OneDrive as the trigger. An example of using DropBox as the trigger can be found in the blog post that introduced the Dolby.io media API Zapier integration.

Another limitation to be aware of is that the Google Drive folder you use for storing must be made public. The Dolby.io platform will attempt to write the transcoded output files directly into the folder you choose. If it is read-only or requires credentials, the integration will not work.

Now we are ready to start transcoding files with Zapier.

Transcoding Different Types of Files Using Paths

Not every file needs to be transcoded the same way. For example, if you are planning on transcoding files that are both audio and video formats using your zap, you wouldn’t want them both to be transcoded to MP3. Instead of making two separate zaps to handle these different file types, you can add a ‘Path’ action. This is a built-in tool provided by Zapier.

Below you can see that there are two different paths set up for this zap. One is for transcoding files with audio formats and one is for transcoding files with video formats.

Action set up menu for the tool 'Paths.' Show is two paths; path A and path B. Path A is titled 'Audio Transcoding' and is described as containing 7 steps. Path B is titled 'Audio+VIdeo Transcoding' and is also described as containing 7 steps. Each path has an edit button to its right. Below, there is a small blue rectangle that says 'Add New Path.'

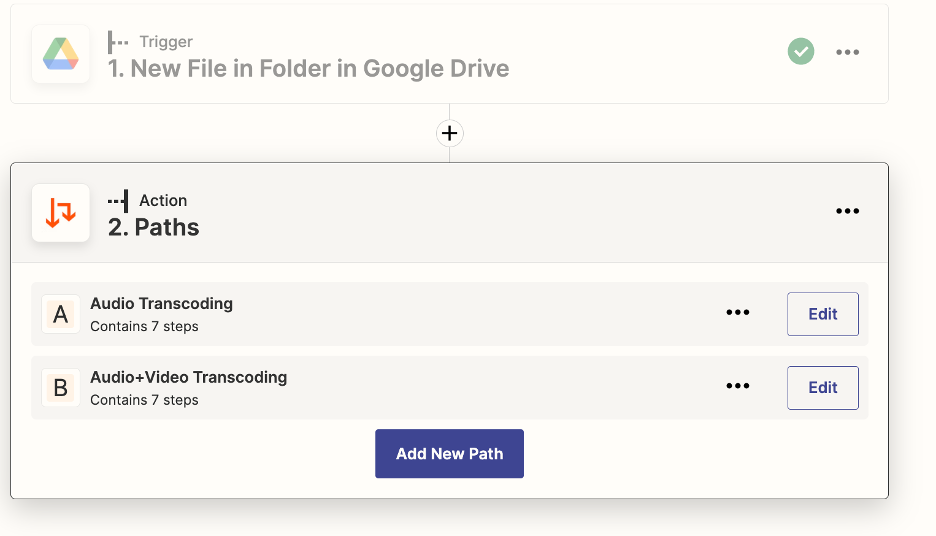
Feel free to add more paths as you need them! In this guide we’ll learn how to set these two paths up.

Transcoding Audio Files with Dolby.io

To set up a path to complete audio transcoding from other formats to MP3, the following steps will be taken:

  1. Setting up Path Rules
  2. Adding the Transcode Action
  3. Giving Dolby.io Time to Transcode Your Files
  4. Testing to Ensure Transcoding was Successful
  5. Preparing Transcoded Files for Download
  6. Uploading Transcoded Files to Google Drive

Step 1 – Setting Up Path Rules

We only want this path to run if the file that has been uploaded is an audio file. To do this, set the following rules:

pictured is the rules setup & testing menu for path A. There are three rules presented that each consist of three different boxes. The first two boxes are drop downs, and the last one allows the user to type anything. The first rule is: '1. Title', '(Text) Contains', and '.wav'
The second rule is: '1. Title', '(Text) Contains', and '.m4a'
The third rule is: '1. Title', '(Text) Contains', and '.aif'.
At the bottom there are two boxes that the user can select to add another rule. One says '+ And' and the other says '+ Or'

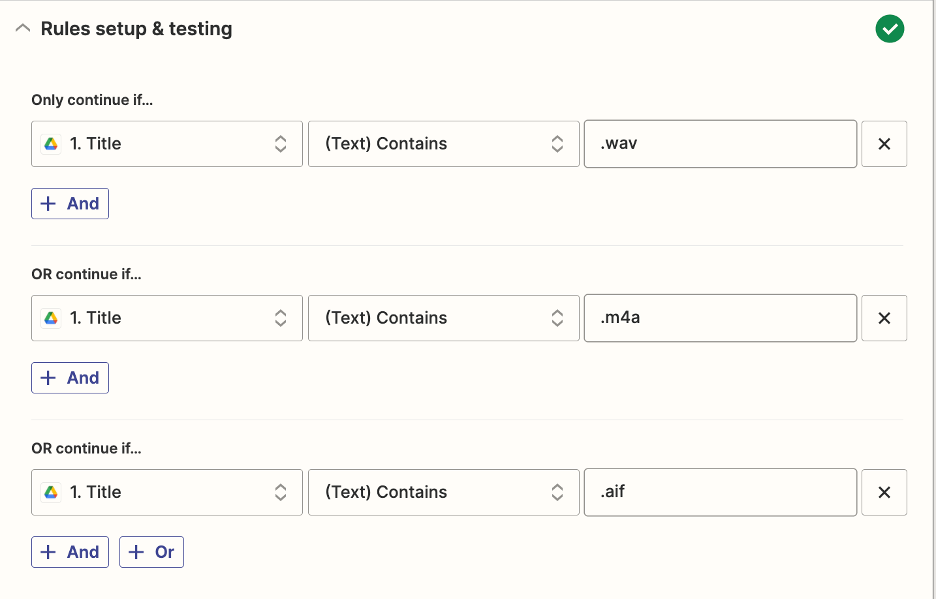
As you can see, the path is checking for certain file extensions to make sure that the new upload is an audio file. I want to transcode audio files to MP3, but set your rules according to what files you would like to transcode.

Zapier Tip : Make sure to have a test file uploaded to your Google Drive folder to test the zap on as you go. This will ensure that every step is working as expected once you go to publish your zap at the end!

Step 2 – Adding The Transcode Action 

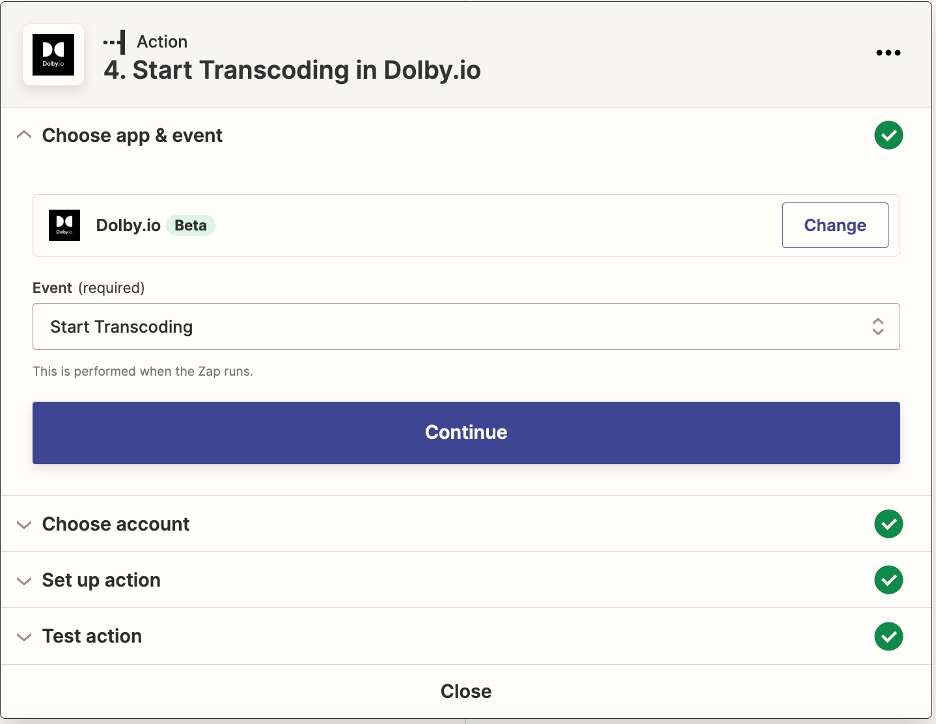
Next we want to add our first action to our path. Since we want to start transcoding, our action will be from Dolby.io. You can find this app by typing ‘dolby’ into the search bar.

Shown is the action selection menu. there is a search bar at the top of the screen that has 'dolby' written in it. Since this is being searched, the only app shown is 'Dolby.io' which next to it has a small green rounded off rectangle that says 'Beta.'

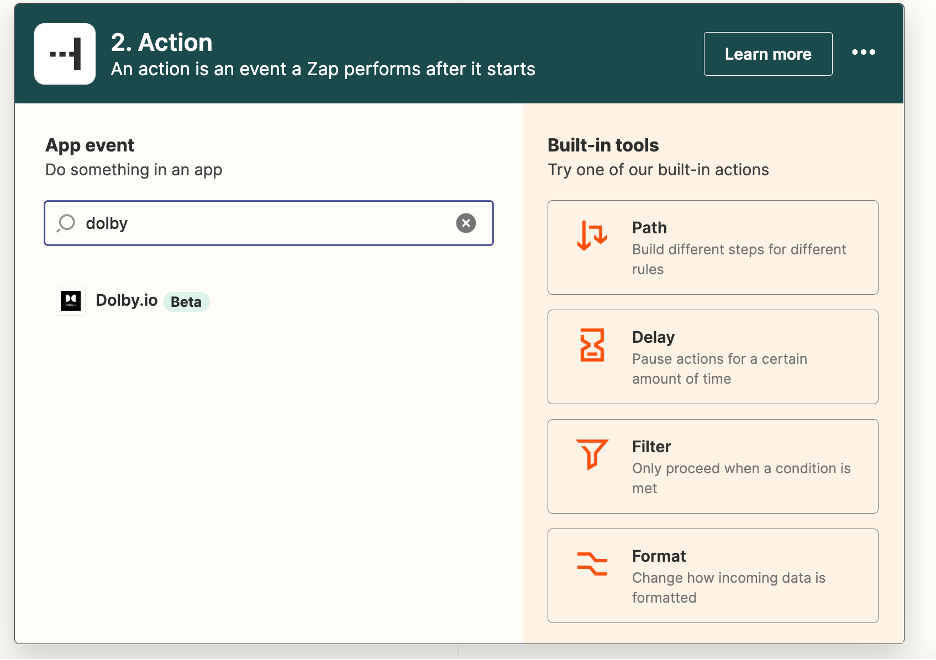
Once you add the action, choose ‘Start Transcoding in Dolby.io’ as the event.

This is an action setup menu for the app 'Dolby.io.' The Event selected is 'Start Transcoding.' Below, there is a large blue rectangle that says 'Continue' for the user to click.

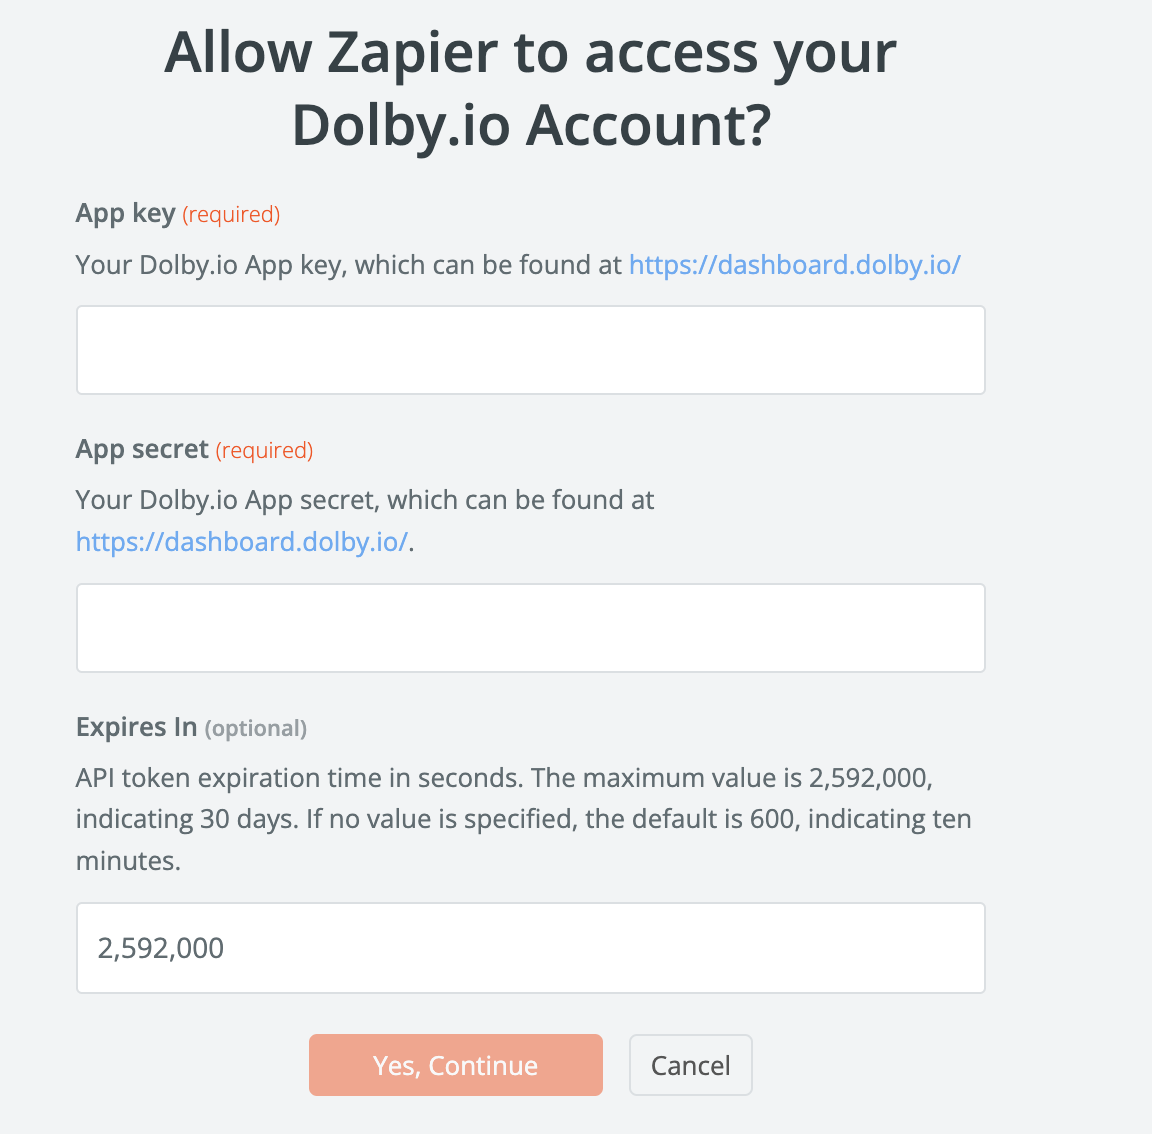
This is where your personal Dolby.io account comes in. To be able to use Dolby.io’s integration with Zapier, you must authenticate your account with your unique media API key. This can be found in the Dolby.io Dashboard once you log in.

Shown is the Dolby.io dashboard that users see after signing up. In the middle of the screen, below a message that says 'Welcome, E' there is a white box that has the names of 'Applications' in it. Listed is an app called 'My First App.' to the right of this, there is some blue font that says 'Get API Keys.' This is where the user needs to click to get their API keys.

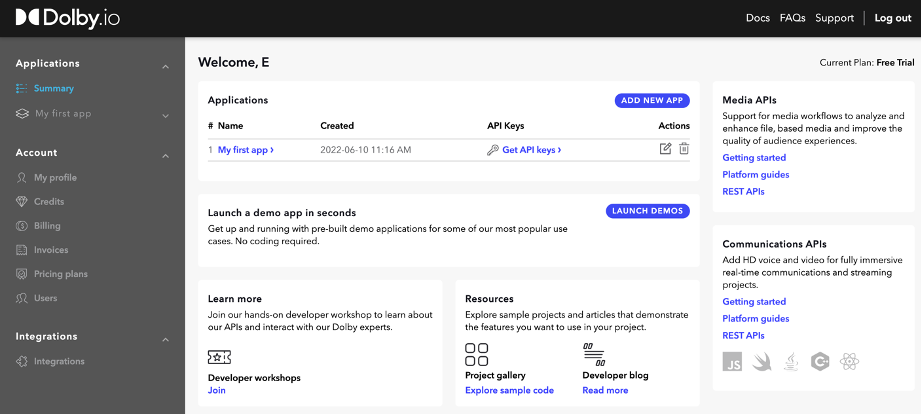
Click on ‘Get API keys.’ This is where both your app key and app secret key are kept. Once you’ve done so, return to Zapier. There will be a pop up asking for access to your Dolby.io account – this is where you will paste your app keys and specify how long you would like Zapier to be authenticated for. Below, I used the maximum value to allow Zapier to access my account for 30 days. When this time runs out, Zapier will automatically make a new token, so don’t worry about having to reauthenticate later on.

Pop menu from Zapier that says 'Allow Zapier to access your Dolby.io Account?' There are three text boxes for the user to interact with.
First, a text box titled 'App key (required)' asks for 'Your Dolby.io App key, which can be found at https://dashboard.dolby.io/signin'.
Second, a text box titled 'App secret (required)' asks for 'Your Dolby.io App secret, which can be found at https://dashboard.dolby.io/signin'.
Finally, a text box titled 'Expires in' asks for a length of time before 'API token expiration time in seconds. The maximum value is 2,592,000, indicating 30 days. If no value is specified, the default is 600, indicating 10 minutes.' The user has typed '2,592,000' into this box.
At the bottom of the image there are two buttons. One is orange with white text that says 'Yes, Continue.' The other is white with black text and says 'Cancel'

With your account now authenticated, choose the following settings for the remainder of this action block:

Shown is the setup action menu for 'Start Transcoding in Dolby.io.' There are three text boxes. The first text box is titled 'Input URLs' and the user has selected '1. File: (Exists but not shown)' - this is not typed in rather is selected from a menu.
The second box is titled 'Output URL' and inside it is 'dlb:// 1.Title: preview-l.wav' the first part, 'dlb://' is hand typed in. The filename is selected and will be different for each person.
The third box is titled 'FIle Type' and selected is 'mp3.' At the bottom there is a white button with blue text that says 'Refresh fields' and a blue button that says 'Continue.'

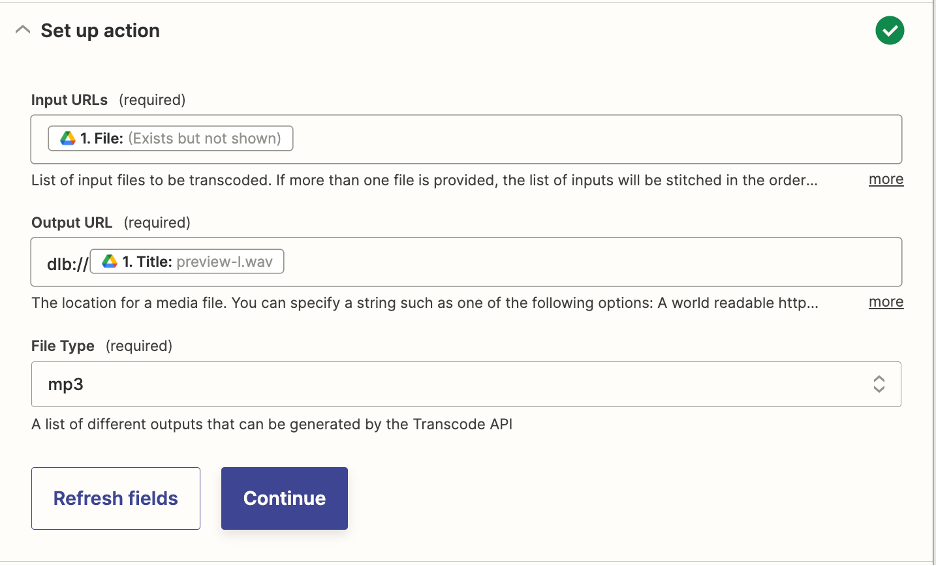
Feel free to change the ‘File Type’ to match what you need.

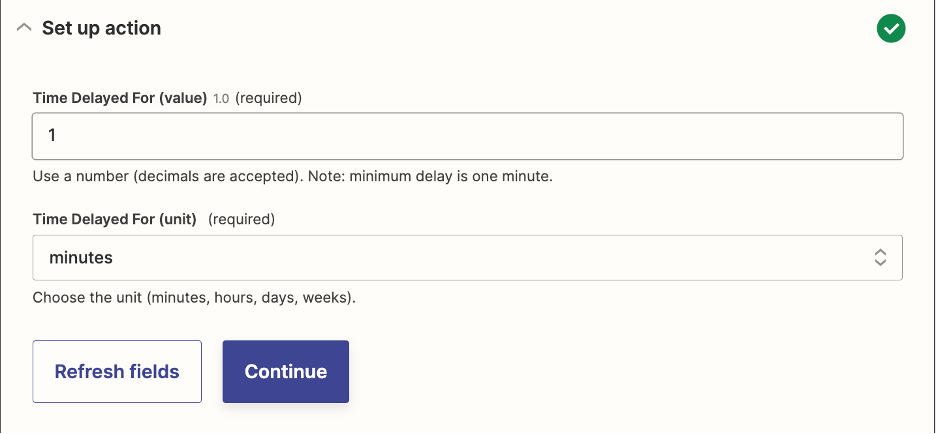
Step 3 – Giving Dolby.io Time to Transcode Your Files

Transcoding files isn’t instantaneous, so let’s add a delay to give Dolby.io ample time to process our file. This can be done with another built-in tool from Zapier, called ‘Delay.’ Choose the following settings:

Shown is the event selection menu for a new action. The app is Delay by Zapier and the 'Event' is 'Delay For.' At the bottom, there is a large blue rectangle that says 'Continue' for the user to click.

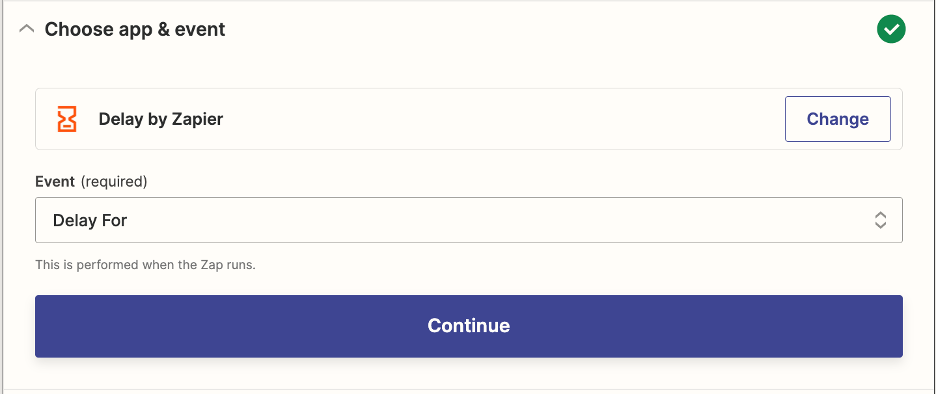
For my zap, I will be using a delay of one minute. This is because the files I’m using are fairly short. Adjust this delay block to be longer, if needed, to accommodate your transcoding needs!

This is the set up action menu for the action 'Delay For.' There is a text box titled 'Time Delayed For (value) 1.0 (required)' and in the box is written '1'
There is a second box, which is a drop down menu called 'Time Delayed For (unit) (required)' and selected is 'minutes'
At the bottom there is a white button with blue text that says 'Refresh fields' and a blue button that says 'Continue'

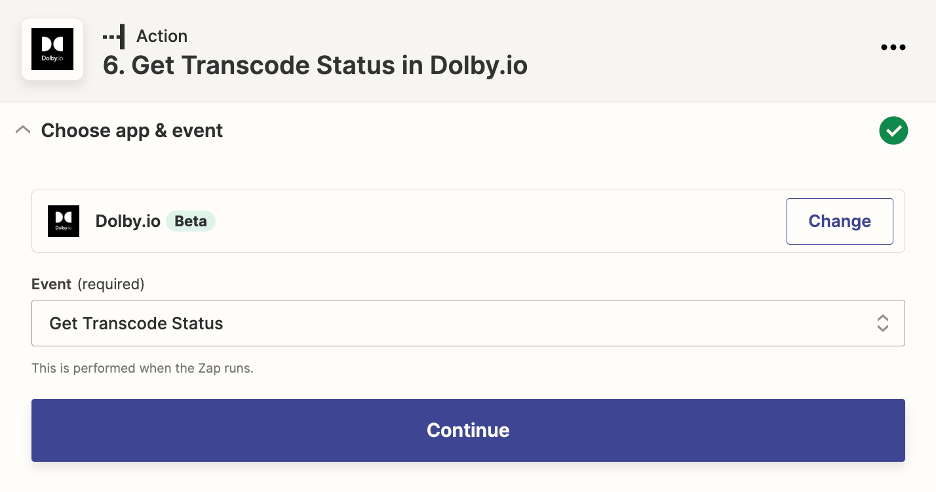
Step 4 – Testing to Ensure Transcoding was Successful

It’s recommended to add the next two blocks, but they are included for error checking purposes. The first block will check the status of transcoding and the second block only allows the zap to continue if transcoding was completed successfully. This prevents the zap from accidentally attempting to download a file that is not transcoded yet.

First, we’ll check the status of our transcoding. Add another Dolby.io action with the event ‘Get Transcode Status’ and choose the following settings:

This is a new action menu for the app 'Dolby.io' and the 'Event' selected in the drop down box is 'Get Transcode Status'. 
At the bottom is a blue rectangular button that says 'Continue'
shown is the set up action menu for the action 'Get Transcode Status'.
There is one text box menu titled 'Job ID'. In the box is '4. Job ID: 5fbf5bab-ecde-4...39-71e6893c0419' this is selected from a drop down menu and will be slightly different from user to user. 
There are two buttons at the bottom of the screen. One is white with blue text and says 'Refresh Fields' and the other is a blue button that says 'Continue'

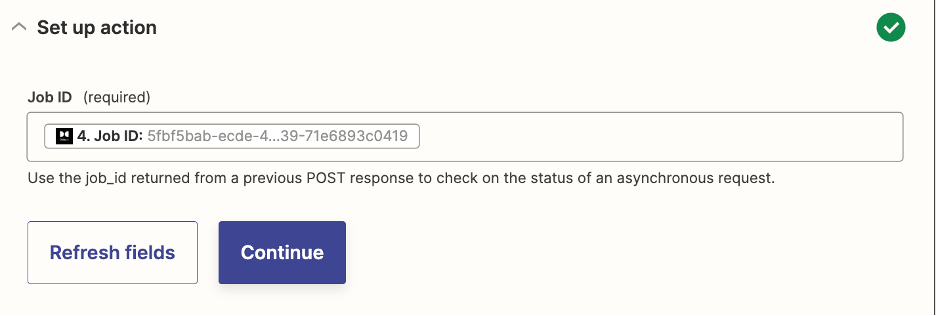
The job ID needed in the ‘Set up action’ menu is returned by the code block ‘Start Transcoding in Dolby.io.’

Next, add the ‘filter’ action. This is also a built-in tool provided by Zapier.

Choose the following settings for the filter:

Shown is the 'Filter setup & testing' menu for the action Filter, which is a built-in tool from Zapier. There is one rule listed that has three text boxes. Above the rule it says 'Only continue if...'  In the first box selected is '6. Status', the next box says '(Text) Contains' and the last box has 'Success' typed into it.
Below the rule are two buttons to add a new rule, they say '+ And' and '+ Or'
At the bottom is a blue button that says 'Continue' for the user to click

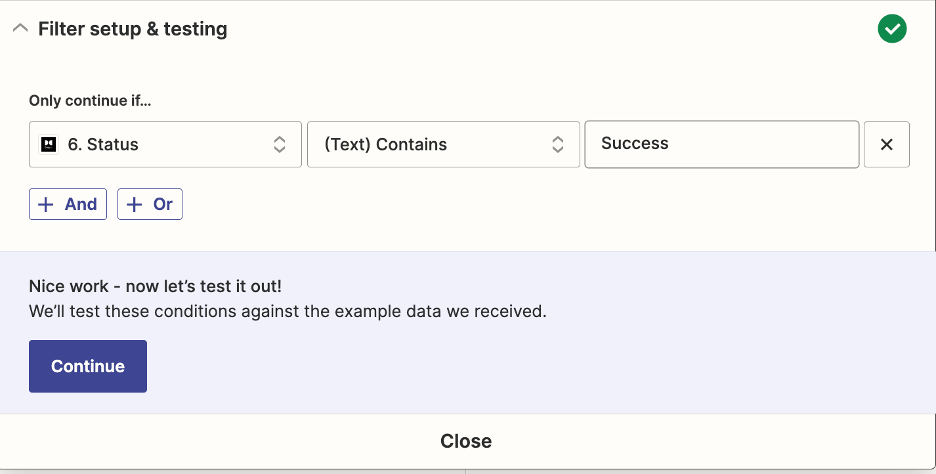
These settings will only allow the zap to continue if the ‘Status’ result from ‘Get Transcode Status in Dolby.io’ returns as successful.

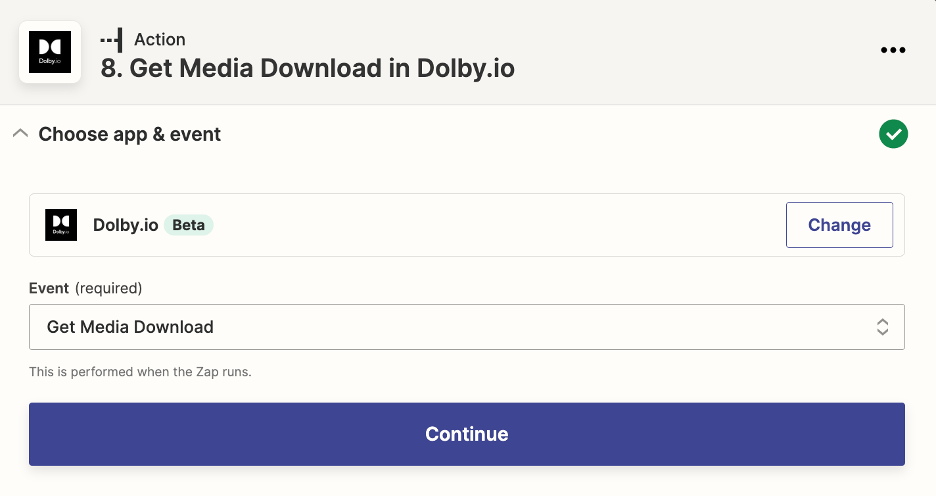
Step 5 – Preparing Transcoded Files for Download

Before being able to upload our transcoded files to Google Drive, we must download them from Dolby.io’s temporary media cloud. To do so, add a new action from Dolby.io and choose the following settings:

Shown is the action event selection menu for the app Dolby.io. The 'Event' selected is 'Get Media Download' 
At the bottom of the screen is a blue rectangular button that says 'Continue' for the user to click.
Shown is the set up action menu for the action 'Get Media Download'
There is one text box with the title 'URL (required)' in the text box is 'dlb:// 1. Title: preview-l.wav'. 'dlb://' is handtyped in, while '1. Title: preview-l.wav' is selected from a drop down menu. The name of the file will differ from user to user.
At the bottom of the screen are two buttons. One is white with blue text and says 'Refresh fields' the other is blue and says 'Continue'

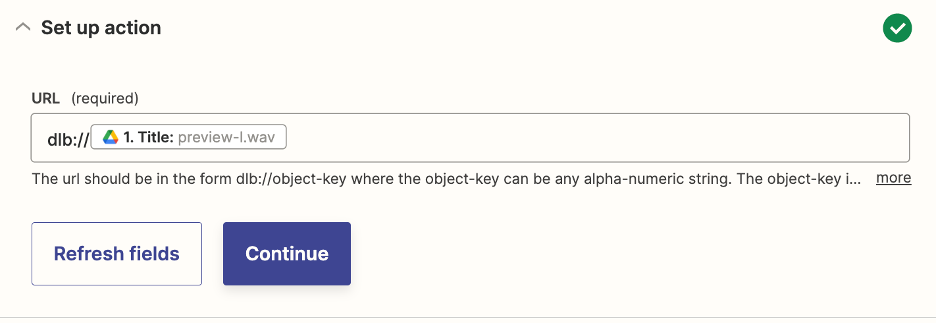
Make sure the URL here matches the one you specified in the action ‘Start Transcoding in Dolby.io.’

Step 6 – Uploading Transcoded Files to Google Drive

Now the only thing we have left to do is upload our transcoded files to Google Drive.

Add a Google Drive action and choose the following settings:

Shown is the event selection menu for the app Google Drive. The 'Event' selected is 'Upload File'
Below, there is a blue rectangular button that says 'Continue' for the user to click.
Shown is the 'set up action' menu for the action 'Upload File'
First, there is a drop down menu titled  'Drive'. Selected is 'My Google Drive'
Next, there is a drop down menu titled 'Folder'. Selected is 'Transcoded Files'. The name of the drive and folder will differ from user to user.
Next, there is a drop down titled 'File (required)'. Selected is '8. URL: https://media-a...&x-id=GetObject' this is a URL returned by an earlier action in the zap.
Next, there is a drop down titled 'Convert to Document?' Selected is 'False'.
Next, there is a text box titled 'FIle Name'. Written is '1. Title: preview-l.wav -transcode'. The first part of the file name is selected from a drop down menu, and will be different user to user. '-transcode' is typed by hand into the box.
FInally, there is a drop down menu titled 'File Extension'. Selected is 'mp3'
At the bottom there are two buttons. One is white with blue text and says 'Refresh fields', the other is blue and says 'Continue'

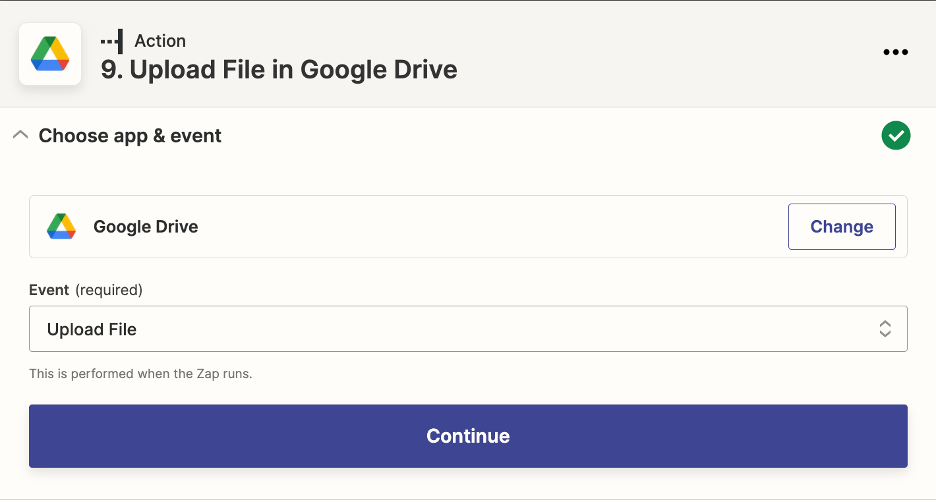
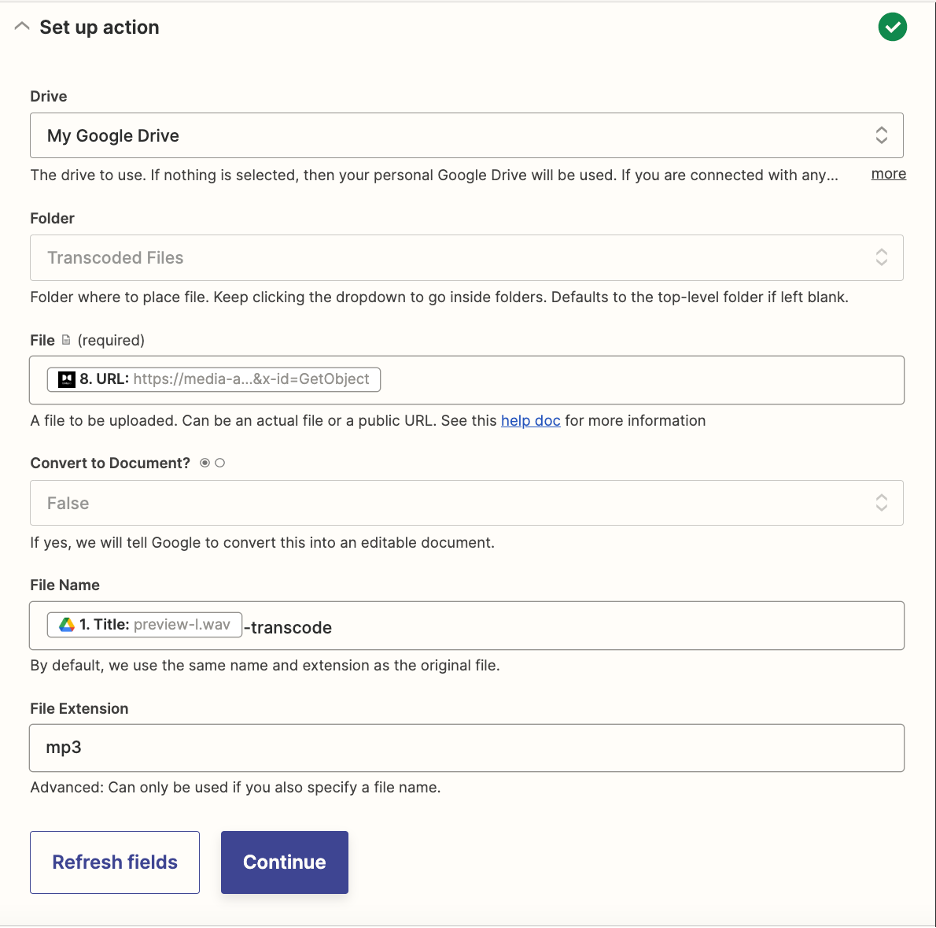
Choose the drive and folder name that work best for you. It should be a public folder so that the file can be written to it. The file URL is the URL returned by ‘Get Media Download in Dolby.io.’

It’s recommended to add some sort of indicator to the filename to show that the file has been transcoded, like I did above. Additionally, don’t forget to specify the new file extension! I chose MP3 as the extension because it matches the type of transcoding I decided to do in the action ‘Start Transcoding in Dolby.io.’

Configuring Transcoding for Video Files – Path B

We have transcoding for audio files all set up now!

Let’s hop over to Path B and configure it to transcode video files into MP4s. This path will be almost identical to Path A. All the actions are the same – they just have slightly different settings.

Here are the steps we will have to take:

  1. Setting up Path Rules
  2. Adding the Transcode Action
  3. Giving Dolby.io Time to Transcode Your Files
  4. Testing to Ensure Transcoding was Successful
  5. Preparing Transcoded Files for Download
  6. Uploading Transcoded Files to Google Drive

The italicized steps will be the same as before. Feel free to look back at the previous sections for a reminder of how to set each step up. This portion of the guide will focus on steps 1, 2, and 6.

Step 1 – Setting up Path Rules

The first difference will be in the path rules. Open up Path B and set the rules according to the file extensions you are looking for. In my case, I want to convert video files that aren’t MP4 into MP4. Here are the rules I chose for my case:

Shown are the path rules for Path B. There are two rules shown. The first rule has 'Only continue if...' written above it. In the first drop down menu, '1. Title' is selected. The next drop down menu has '(Text) Contains' selected. The last part of the rule is a text box which has '.mov' written in it. Below this rule is a button with '+ And' written in it, giving the user the option to add to the rule.
The second rule as 'OR Continue if...' written above it. The first drop down menu has '1. Title' selected. The second drop down menu has '(Text) Contains' selected. The last box, a text box, has '.m4v' written in it. Below this rule are two buttons - one that says '+ And' and one that says '+ Or'

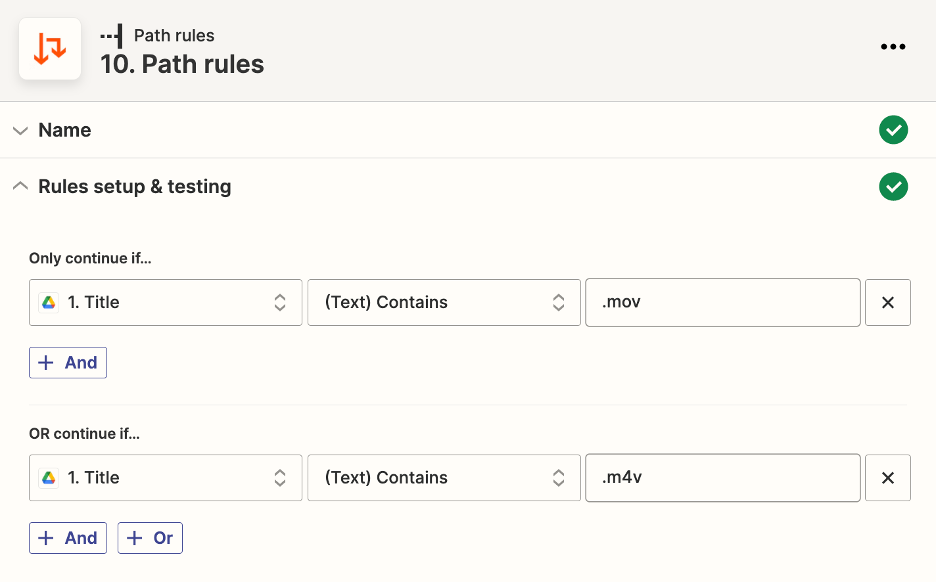
Make sure you have a sample file in your Google Drive to test this path with like we did for path A.

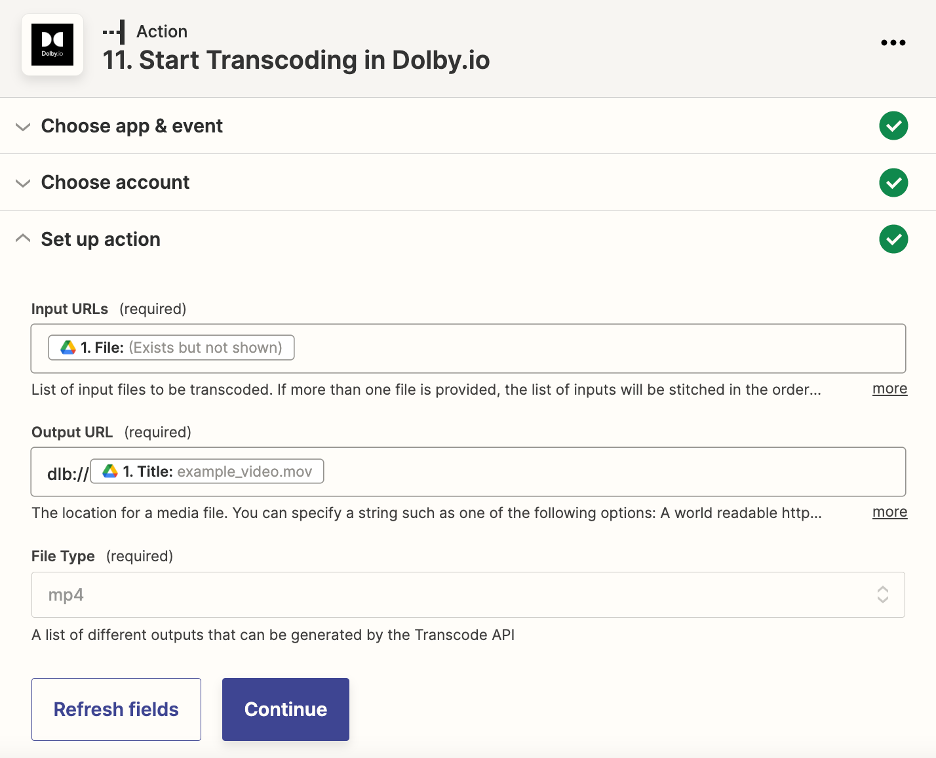
Step 2 – Adding The Transcoding Files Action

The next change will be when we call the action ‘Start Transcoding in Dolby.io.’ Add the action like before and choose the following settings:

set up action menu for action 'Start Transcoding in Dolby.io'
First drop box is titled 'Input URLs (required)' and selected is '1. FIle: (Exists but not shown)'
Next, there is a text box titled 'Output URL (required)'. Written in the box is 'dlb:// 1. Title: example_video.mov' where 'dlb://' is typed in and the latter half is selected from a drop down menu. The file name will change from person to person.
The last drop down menu is titled 'File Type (required)' and selected is 'mp4'
Below the menus are two buttons. One is white with blue text and says 'Refresh fields' and the other is a blue button that says 'Continue'

Step 6 – Uploading The Transcoded Video Files

Steps 3-5 are going to be the same as path A. Feel free to look back at the guide for these steps as you include them into path B.

Once you have transcoded the file, waited for transcoding to finish, checked to ensure the file is ready to be downloaded, and downloaded the file, you are ready to upload the transcoded file to Google Drive.

Add a Google Drive action like before and choose the following settings:

set up action menu for action 'Upload File in Google Drive'.
First drop down menu is titled 'Drive'. The menu says 'Choose value...' which is where the user will choose the appropriate drive name.
The next drop down menu is titled 'Folder' and selected is 'Transcoded FIles'. This folder name will differ user to user.
The next drop down box is titled 'File (required)' and selected is '15. URL: https://media-a...&x-id=GetObject' this URL is returned by an earlier action in the zap.
Next, there is a drop down menu titled 'Convert to Document?' and selected is 'False'.
Next, there is a text box titled 'File Name' with '1. TItle: exmaple_video.mov -transcoded' written in it. The first part of this is selected from a drop down menu, and '-transcoded' is hand typed in after. The file name will differ from user to user.
The final drop down menu is titled 'File Extension' and 'mp4' is selected.
Below all the user input boxes are two buttons. One is white with blue text that says 'Refresh fields' and the other is blue and says 'Continue'.

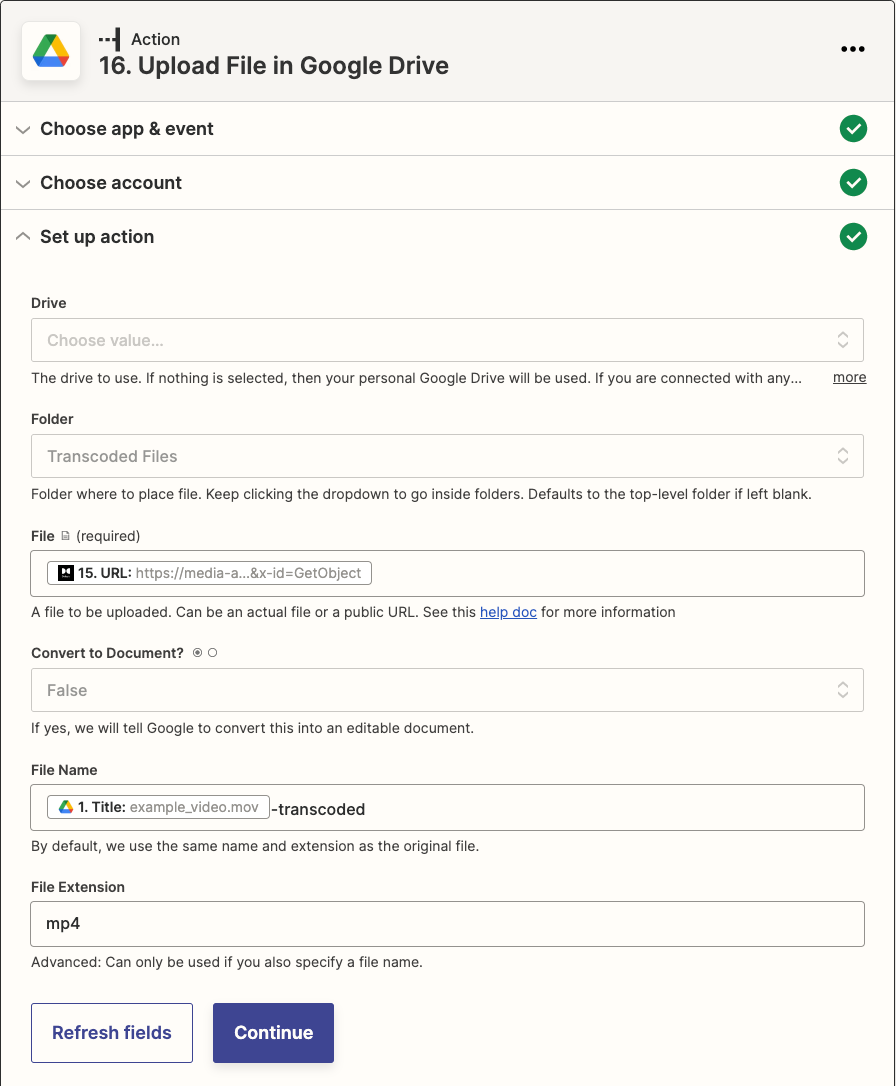
The folder you choose to write to must be made public in order for Dolby.io to write the transcoded output file to that drive location.

The difference for this action from path A is I changed the file extension to MP4 to match the type of transcoding we chose.

Publishing Your Zap and Transcoding Files

Both paths of our zap have now been configured! Hit the publish button to make your own personal zap ready for use.

Now, if you look at your dashboard, you should be able to see that your zap is published and turned on. Below, you can see I have two zaps that use Dolby.io! There is a post explaining the other zap listed if you are interested in learning how to use Zapier, OneDrive, and Dolby.io to enhance your audio files.

Shown is the Zapier dashboard once a user is signed in. On the left, there is a way to select different menus to view, selected is the menu 'Zaps'. Within that menu, there are different 'Folders'. Selected is the folder 'Home'. Inside of 'Home', there are two different zaps shown. One is titled 'Enhancing Podcast Audio' and is listed as being 'On' currently. The second zap, the one created in this guide, is called 'Transcoding Files' and is also listed as being 'On'.

Let’s test out the zap to see if it’s working. I’ll upload a couple files that need to be transcoded to the Google Drive folder I specified as the trigger for my new zap.

Shown are Two files uploaded to the Google Drive named 'My Drive' in the folder 'Files to Transcode'. 
The first file is titled 'episode-50.m4a' and the second file is named 'video_example.mov'.

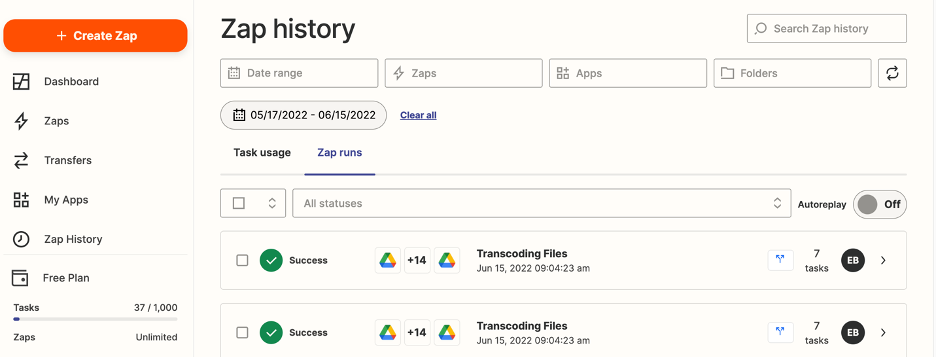
To see the zap in action, you can go to the ‘Zap History’ tab of the dashboard to see what zaps have already run and which ones are in progress. Keep in mind – it may take a few minutes for the tab to update!

Shown is the zapier dashboard once a user signs in. On the left, there are a bunch of menus to select. Once 'Zap History' is selected, the user can see the status of their zap runs. Shown is two zap runs of the zap 'Transcoding Files' that are currently running.

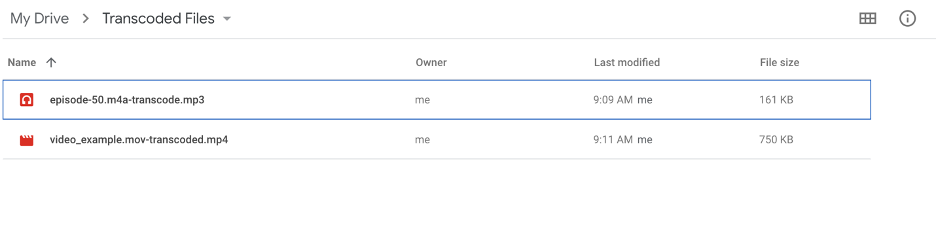
Zap runs will be reflected in the ‘Zap History’ tab once they have finished. Additionally, you will be able to see the transcoded files in the folder you specified.

Shown is the zapier dashboard once a user signs in. On the left, there are a bunch of menus to select. Once 'Zap History' is selected, the user can see the status of their zap runs. Shown is two zap runs of the zap 'Transcoding Files' that just finished running.
Shown is the contents of a Google Drive folder called 'Transcoded Files' inside the drive 'My Drive'. There are two files one named 'episode-50.m4a-transcode.mp3' and the other is named 'video_example.mov-transcoded.mp4'

Now that you have this workflow set up using Google Drive, Zapier, and Dolby.io, all you have to do anytime you need files transcoded is upload them to Google Drive. Additionally, if you end up needing to transcode more unique file types, you can simply add an extra path or more rules to accommodate your new transcoding needs.

The new Dolby.io integration with Zapier is great for transcoding files, but there are lots of different actions available as well! If you are interested in learning more about what is possible with the Dolby.io media APIs, check out our documentation.

What can you build with Zapier and Dolby.io?

Leave a Comment

E. Bennett

Developer Relations

Get Started

Drive real-time interactions and engagement with sub-second latency

We are more than just a streaming solutions provider; we are a technology partner helping you build a streaming ecosystem that meets your goals. Get started for free and as you grow, we offer aggressive volume discounts protecting your margins.

Developer Resources

Explore learning paths and helpful resources as you begin development with Dolby.io.

Copy link
Powered by Social Snap