With the asynchronous nature of the Dolby.io Media APIs, often we find that taking advantage of our post-processing solutions requires more effort than one single API call to achieve a proper end result. While this is something that we have solved in the past using solutions such as sample apps, integration platforms, and video tutorials, these all abstract the logic of the cycles in a more linear manner. An alternative to these methods is to use Postman’s new Flows feature to create a graphical flow chat that will not only be able to run the API calls, but also highlight important variables that need to be passed between calls, demonstrate conditional loops, and isolate desired results from the output.
We already love using Postman to share our APIs via their intuitive, yet educational workspaces to use our REST APIs in preconfigured workspaces. It does enough to get rid of the tedious work of setting up a dev environment, while still being technical enough that it doesn’t hide the actual meat of the API request building process from the users. In this tutorial, we will be using the Postman Dolby.io Media APIs Workspace we have created as the basis for creating this workflow, containing all of the endpoints and examples needed to build our flow chart.
What are Postman Flows?
Postman Flows are a beta feature provided by Postman to provide a way to visualize your API calls to chain requests, handle data, and create real world workflows directly within Postman’s environment. This allows you not only to use Postman as your API interface, but also to provide examples of common ways people would use an API suite. This way of displaying API calls happens to work very well with Dolby.io Media APIs, as often somebody using one Media API will need to also use a few others to obtain the result. This then can provide an educational experience for us to show developers what we expect an average use case of our API suite would look like. See the below picture for an example we created for this blog:

Don’t worry if this looks confusing for now, we will go over what this all means and how we made it in a bit.
Choosing which Media API to Use
As this feature is still in a “labs” phase, there are some limitations on what can be done using Postman Flows. Most relevant to Dolby.io Media is the lack of support for uploading and downloading files. This means that any API that requires users upload a binary file or download a finished result are not ideal candidates for this example. We do, however, have an API that fits perfectly with the options provided to us: Diagnose, which is able to display its results directly in the JSON response; no file downloading required! Additionally, if we are working with a publicly available media file URL, there is no need to upload a binary to Postman, allowing us to complete an entire Diagnose workflow using Flows!
Sending the Requests
To begin, we want to add in all of the API Requests we will need as blocks connected in the grid. To do this, we want to add in “Send Request” blocks for each of the Dolby.io calls we will make, Token Generation, Start Diagnosing, and Diagnose Results, also connecting them in that order via the Response output (not Test). This will look something like the following:
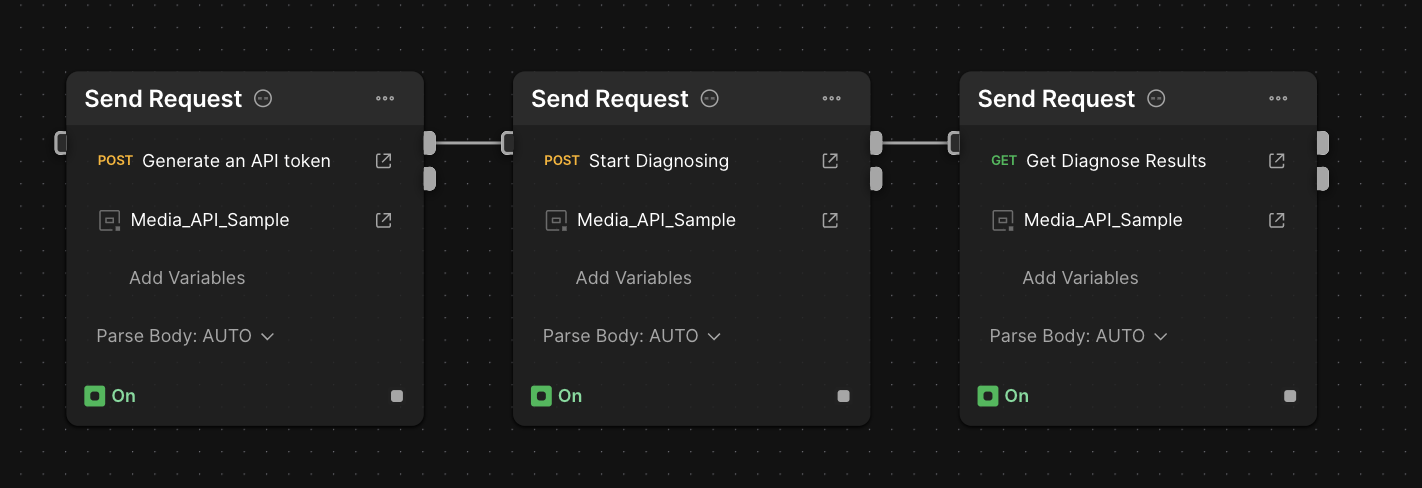
Note how each of these requests already has an Environment set based on the Postman Environment currently active. This is important, as our API calls rely on environment variables to input important information such as API credentials, Input and Output URLs, and the API endpoint URL. We have provided a sample environment within our workspace to use as a starting point, with the important variables to change being app-key, app-secret, input-file-link, and output-file-link.
If we run this flow as is, it will fail. The errors we will receive will be an authentication issue, complaining that we are using invalid credentials. This is because within Postman Flows, environment variables are not updated as requests are chained, even if the requests have tests that change the variables when run in Postman the traditional way, and messages from previous requests are not saved by default. To solve this, we will need to save these variables within our Flow’s own instance.
Sharing the Variables
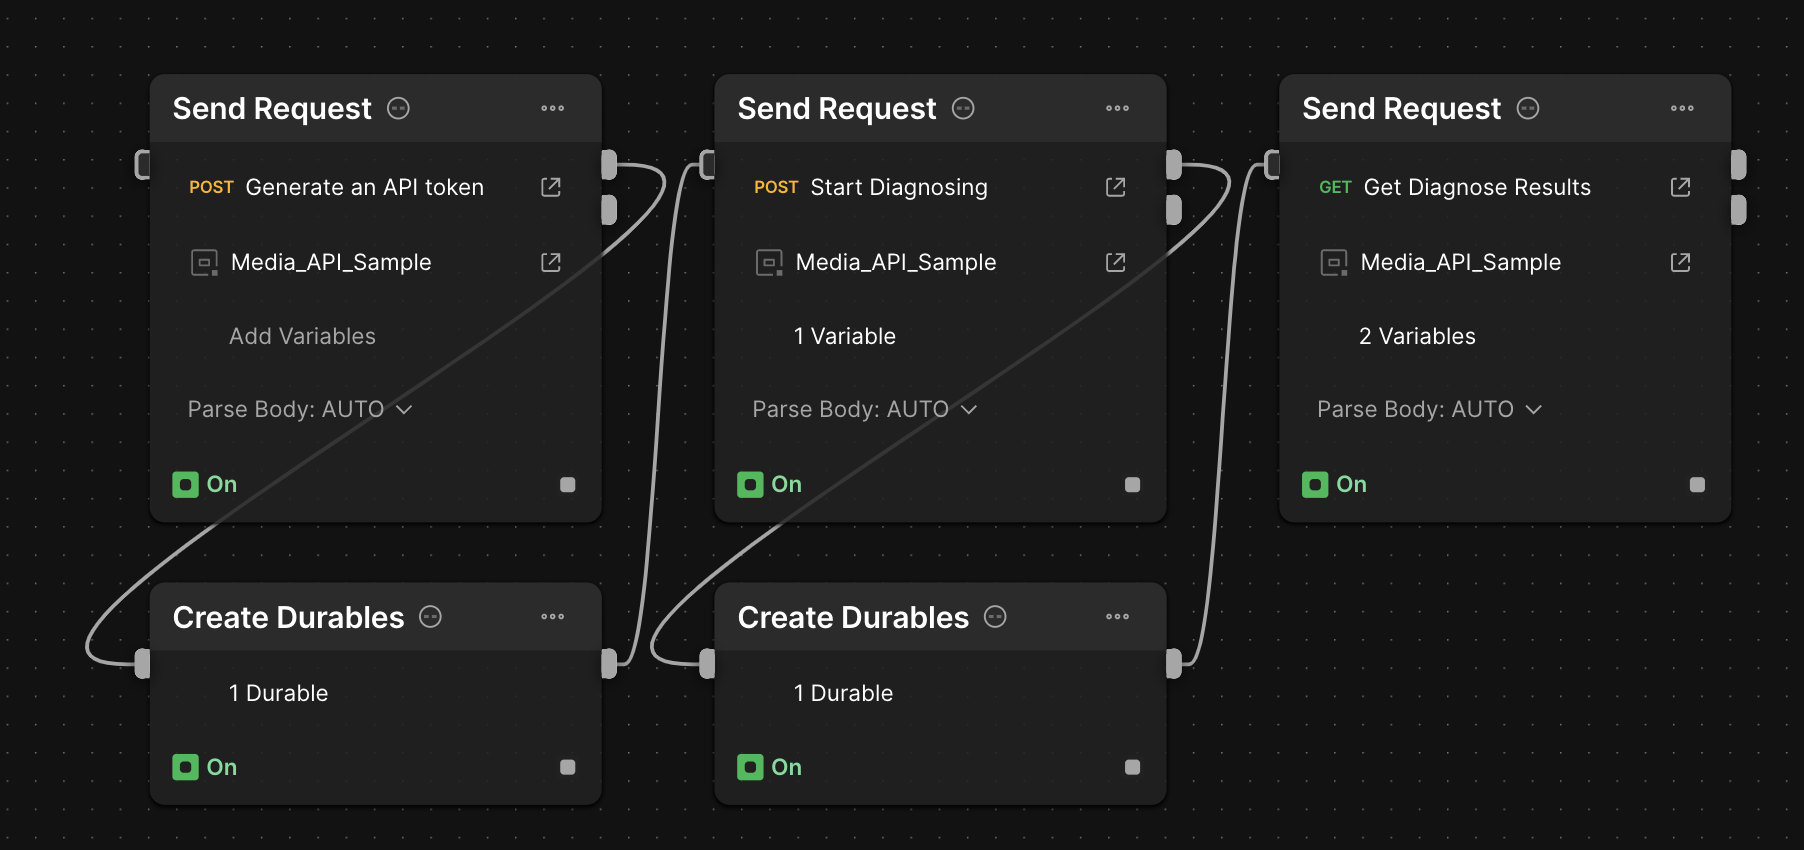
In order to keep variables persistent beyond the direct link between calls, we need to add another step in the chain to explicitly store them. In Postman Flows, this is the Durables feature. We can add Durable blocks to store key response variables within a chain, which in our case will be able to keep our Access Token and our Job ID persistent within our loop.
We can start by adding a Create Durable block in-between Generating an API token, and Start Diagnosing to save the access token for all future API calls:

Then, we can then create another durable between Start Diagnosing and Get Diagnose Results to save our job ID. While technically this isn’t necessary right now, we will need it for the next section.

Finally, we can add the durables as variables directly into the Request blocks:

Which should leave us with a chain that looks something like this after adding the durables into the different requests:
Adding Conditionals and Loops
The above chain should now be able to provide a valid output, but that output will not be the diagnose data, but instead the job status. This is because we haven’t given the job enough time to complete. To solve this, we can use delay loops to keep checking the status until the job is done. In Postman Flows, we can do this with a Delay block to give the servers some time to process the job before we call the Get Results block. We want to make sure we are slotting this block before the Get Diagnose Results, but after the Job ID durable is created. The amount of time for the delay is arbitrary, in this case we chose 5000ms (or 5 seconds) as a reasonable amount of time to wait for small files.
While this fixes the output for small files, we still don’t have a solution for larger files that need more than five seconds to process. The solution to this involves using Condition Blocks connected to the output of Get Diagnose Results, where we can test on the value of the “status” in the body, which if it is not finished yet (condition failed), we want to loop back to the Get Results request to try again. This provides us with a solution similar to that of a “While” loop we would see in code, where we keep going until we get the desired result. When done, it should look something similar to the below image.

Parsing Output
Now that our job has been given the proper time to complete, we want to be able to obtain the output of our labors! This time, we want to remove any unhelpful JSON from the output, and also have a location for an end user to read said output in the first place. To parse output, we can use a “Select” block to select only the result only the result object from the body of the response.
Then, we can add in a “Terminal” block to pipe the end result to a readable location within Postman! The ending block will look similar to this:

And when run, should produce an output in the Terminal by clicking the terminal icon in the sidebar.

Conclusions on Dolby.io with Postman Flows
Using Postman Flows, we were able to generate a real world Dolby.io Media API workflow entirely graphically. Doing this enabled us to add in more usability and automation than normal, adding in filters, and automated loops that remove a significant amount of manual intervention otherwise needed. Providing an illustration like this to demonstrate how a developer can best work with your APIs is invaluable, as it makes the architecture more intuitive. As mentioned before, seeing methods like loops will let engineers intuitively know that for and while functions are necessary, how many helper functions are needed, and so on.
You can find the completed flow on our Media API Workspace here, where you can fork it into whichever API offering best fits your needs. We encourage you to try them out and see how Postman Flows might enhance your Dolby.io API experience. You can also read more about our Postman Workspace at this blog. Feel free to show them off to us on our Twitter!


