


Part of the beauty of using APIs over traditional solutions is the ability to use them programmatically to solve workflows that would otherwise be redundant and time consuming. These benefits can be further improved when we are able to trigger them automatically, eliminating the need for any manual intervention after the process is built. Previously, we have solved this using Webhook and Callbacks to create automations, however with the continuously growing magnitude of Cloud based workflows, we can also keep these automations on the same platforms instead of using third party services, as well as letting it trigger itself. In this blog, we will take advantage of Google Cloud Functions to automatically use Dolby.io Media processing once a new file is uploaded to a Cloud Storage bucket as a demonstration of this capability.
Note: To follow along, head on over to this GitHub repository.
Setting up the GCP Cloud Functions environment
To begin, we will assume you already have your own Google Cloud account and have a Service Account setup for use to use authorized API calls. You can read more about this in GCP’s documentation. We will also assume you have created a bucket for use with this workflow. We can begin by creating a new cloud function using the GCP console.

Start by naming your function, selecting the region that fits best for your needs, and change the Trigger type from HTTP to Cloud Storage. Then, we will need to select the Event type. For most use cases, we will want to use Finalize/Create, which will trigger upon a new file being uploaded to the bucket, though we suggest reading up on which event type is the best fit for you. Then, we want to set the Bucket to the bucket that was created ahead of time.

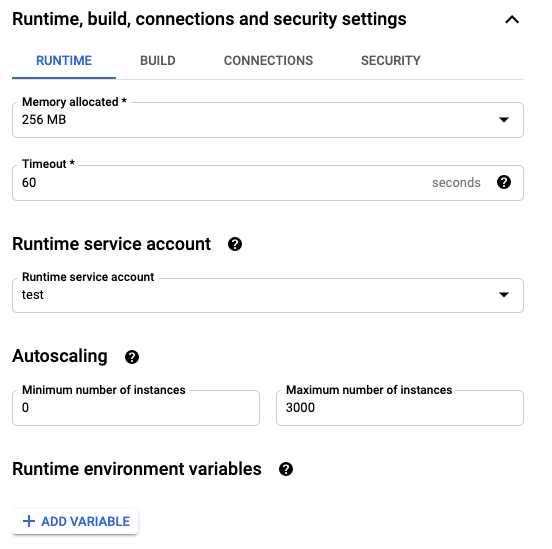
Finally, we need to set the Service Account we created ahead of time to the runtime. We do this by expanding the Runtime, build, connections and security settings line at the bottom of the page, and changing Runtime service account to the name of your authorized Service Account. Modify the other settings as you see fit, then save!
Adding the requirements
For this guide, we will be using the Python 3.9 runtime. You are free to use any other versions are languages you like, but will need to figure out the migration on your own.

First, we want to add the external Python packages we will need to use in requirements.txt. For the baseline project, we require two packages, google-cloud-storage and requests. At the time of writing, the latest versions are 1.42.3 and 2.26.0 respectively, so we will add the following lines:
google-cloud-storage>=1.42.3
requests>=2.26.0
Signing the URLs
We will also need a way for Dolby.io to access the files uploaded to Google Cloud. For this, we will take advantage of their Signed URLs authentication option, which lets us create a temporary URL which points to the file in our bucket. To do this, we’ll create a helper file signedUrls.py to contain this code. First, we will populate it with the generate_download_signed_url function provided by Google’s documentation.

import datetime
import os

from google.cloud import storage

def generate_download_signed_url_v4(bucket_name, blob_name):
    storage_client = storage.Client()
    bucket = storage_client.bucket(bucket_name)
    blob = bucket.blob(blob_name)

    url = blob.generate_signed_url(
        version="v4",
        # This URL is valid for 15 minutes
        expiration=datetime.timedelta(minutes=15),
        # Allow GET requests using this URL.
        method="GET",
    )

    print("Generated GET signed URL:")
    print(url)
    print("You can use this URL with any user agent, for example:")
    print("curl '{}'".format(url))
    return url
And likewise with the generate_upload_signed_url in the same file:
def generate_upload_signed_url_v4(bucket_name, blob_name):
    storage_client = storage.Client()
    bucket = storage_client.bucket(bucket_name)
    blob = bucket.blob(blob_name)

    url = blob.generate_signed_url(
        version="v4",
        # This URL is valid for 15 minutes
        expiration=datetime.timedelta(minutes=15),
        # Allow PUT requests using this URL.
        method="PUT",
    )

    print("Generated PUT signed URL:")
    print(url)
    print("You can use this URL with any user agent, for example:")
    print(
        "curl -X PUT -H 'Content-Type: application/octet-stream' "
        "--upload-file my-file '{}'".format(url)
    )
    return url
Calling Dolby.io Media APIs in GCP
Finally with everything set up, we can add the Dolby.io workflows into our function. There are many options of workflows that might be useful, such as Enhancing new audio files, Analyze Speech recordings to automatically gather the metadata, or even using our Transcode API to convert the encoding format.
To start, we want to import all the proper libraries and setup the API call. In this example we are using Transcode as the endpoint, so ensure you properly replace the code as needed. Ensure you fill in the <API_KEY> with your Dolby.io Media API Key, and <GCP_BUCKET_NAME> with the name of your bucket.
import os
import requests
# Import our helper functions to presign GCP urls
from signedUrls import *

url = "https://api.dolby.com/media/enhance"
headers = {
    # Set your Dolby.io Media API key here
    "x-api-key": "<API_KEY>",
    "Content-Type": "application/json",
    "Accept": "application/json",
}
# Input your GCP bucket name here
bucketName = "<GCP_BUCKET_NAME>"
# This will be automated with the Cloud Function
fileName  = ""
For the body of the API calls, we want to use our signed URL helper functions to define the input and output. Note that for the output, we want to ensure that the file is not processed again after it has been uploaded. This can be done by using conditional statements, separating buckets, or using an alternative storage solution (especially if you are going to continue processing the file). In this example, we will just prepend <a href="https://dolby.io/">dolby.io</a>- to the start of each filename.
body = {
  "input" : generate_download_signed_url_v4(bucketName, fileName),
  # Specifically renaming the file to know that it is processed
  "output" : generate_upload_signed_url_v4(bucketName, "dolbyio-"+fileName)
}
Finally, we create the function ran by the trigger. By default this is named hello_gcs, so if you change it, ensure that you change the “Entry point” as well!
def hello_gcs(event, context):
    file = event
    # Set filename
    global fileName
    fileName = {file['name']}
    # Exit function if dealing with post-processed file
    if fileName.startswith("dolbyio-"):
        return
    print(f"Processing file: {fileName}.")
    # Make Dolby.io API call
    response = requests.post(url, json=body, headers=headers)
    response.raise_for_status()
    # This will log the job_id to the Cloud Function logs.
    print(response.json())
Once all of your customizations have been done, Deploy and upload a file! The function has been made!

Next Steps with Dolby.io on GCP
This is a good way to use Dolby.io in an even more automated way than using webhooks alone, as this way we can start the process itself, reducing nearly all manual intervention after it is set up. You can view the source code for this project on GitHub.
We do suggest modifying this code to fit your specific needs. Some examples of this could be:
- Taking advantage of GCP’s Secrets Manager to save API keys and automate bucket names, and more.
- Using different API endpoints, or multiple together to add to your workflow.
- Organizing the workflow in more robust ways to separate pre-processed and post-processed files.
- Read more at GCP’s Storage Triggers Documentation for other languages and further resources.
You additionally might want to be able to see a job’s status. To do this, you will need to call the get results endpoint with the job_id provided in the logs.
If you are using other cloud platforms, this should translate relatively well! For example, check out a related post on Azure here! Happy hacking!


")