


In April of 2022 Epic games officially released the Unreal Engine 5, the latest iteration in a near 24-year history of game engine development. With the new engine came a slew of promotional footage highlighting massive strides in audio fidelity, graphical quality, and computational scale. In addition to the improvement in end-user experience, Epic Games also announced that Unreal Engine 5 would continue to support Pixel Streaming as a plugin on both Windows and Linux. Pixel Streaming allows game developers to design their games to be run on the cloud and streamed using WebRTC through a browser for the end user to play. This is perfect because, as the promotional footage highlighted, games will be getting a lot more intense on players’ hardware.
Pixel Streaming does come with one key limitation, a dependency on latency. Because the user is controlling the game through a browser connected to a server and the server has to stream the content to the player, any slight delay is immediately noticeable. No player wants to input an action such as clicking and wait seconds for the result. For single-player games this usually isn’t an issue. With Pixel Streaming, however, as soon as you introduce multiple viewers and players the latency grows exponentially. This is where Dolby.io Millicast offers a solution with the Unreal Engine 5 plugin, which scales the real-time WebRTC stream to hundreds or even thousands of players around the world.
In this guide, I’ll be exploring how to install and use the Dolby.io Millicast Publisher Plugin for setting up scalable WebRTC streams from inside Unreal Engine 5.
Dolby.io Millicast Plugins for the Unreal Engine 5
To get started with building in streaming functionality we need to install the Dolby.io Millicast Unreal Engine Publisher Plugin from GitHub. To install an Unreal Engine Plugin from GitHub follow this guide here.
In addition to installing the Dolby.io Millicast Plugin, you’ll also need to create a free Dolby.io Millicast Account. The free account is hard-capped at 50 Gigabytes of data transfer a month, which will be plenty for building and testing out the Unreal Engine 5 plugin.
Interested in following along with a project that already has the plugin installed and set up? Check out this GitHub repository which contains a completed version of this guide.
Setting up the Publisher Plugin
With the plugin installed and enabled, we can set up the WebRTC media stream publisher inside of the Unreal Engine. Establishing a connection using WebRTC HTTP Ingest Protocol (WHIP) to the Millicast servers requires two main steps.
Step 1: MillicastPublisherSource Asset
To create the MillicastPublisherSource asset, navigate to the Add button, click on the button and find the Media tab where you should see the Millicast Publisher Source asset. Add it to the project and double-click the asset to configure it. Inside the asset are three headings: Stream, Video, and Audio.
Stream
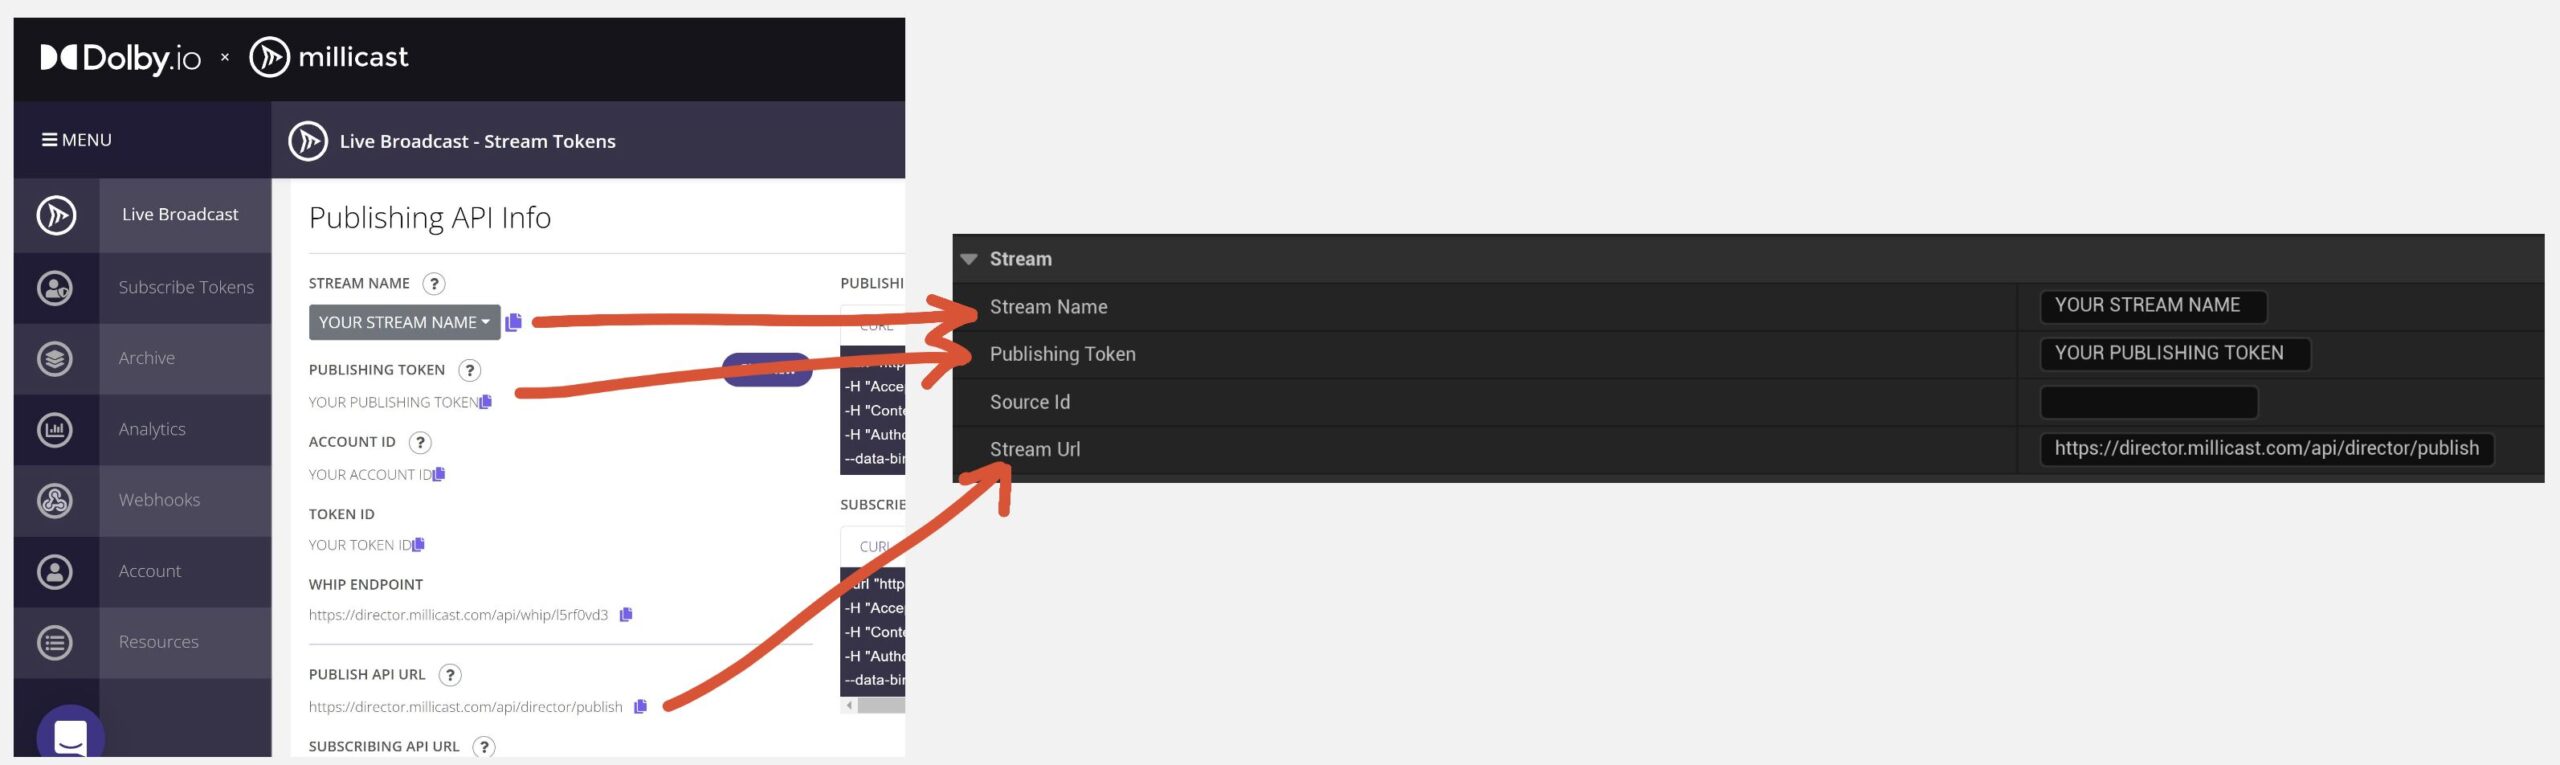
For the stream heading, we need to configure our credentials. These credentials can be found by clicking on an existing stream token or creating a stream token and switching to the API tab (Learn how to use the Dolby.io Millicast Dashboard). To use the plugin we need the listed Stream Name, Publishing Token, and the Publish API URL. For this project, we can disregard the plugin’s Source ID parameter.
Video
There are two ways you can capture video from within the Unreal Engine; Slate Window capture (Player perspective), or virtual camera (a developer-defined perspective such as a static in-game camera). In this guide, we are setting up a player perspective stream, however, if you are interested in setting up one or multiple virtual cameras, check out this guide here.
To capture the player perspective with the Dolby.io Millicast Plugin we need to enable Capture video and specify our render target to None. By default, a None render target will be the player’s perspective.

Audio
The plugin supports capturing audio from within the game or from a device such as a microphone or audio driver. In this guide, we are only interested in capturing audio from the main audio engine submix and can, like with video, leave the submix set to None which defaults to the main submix.

With the Stream, Video, and Audio set up, we have now fully defined the Millicast Publisher Source object which will capture video from the player perspective and audio from the main submix. The audio and video are then delivered to the Dolby.io Millicast server which can then stream the content to tens of thousands of end viewers.
Before we are ready to test our stream, we need to set up our stream logic.
Part 2: Creating a Dolby.io Millicast Blueprint
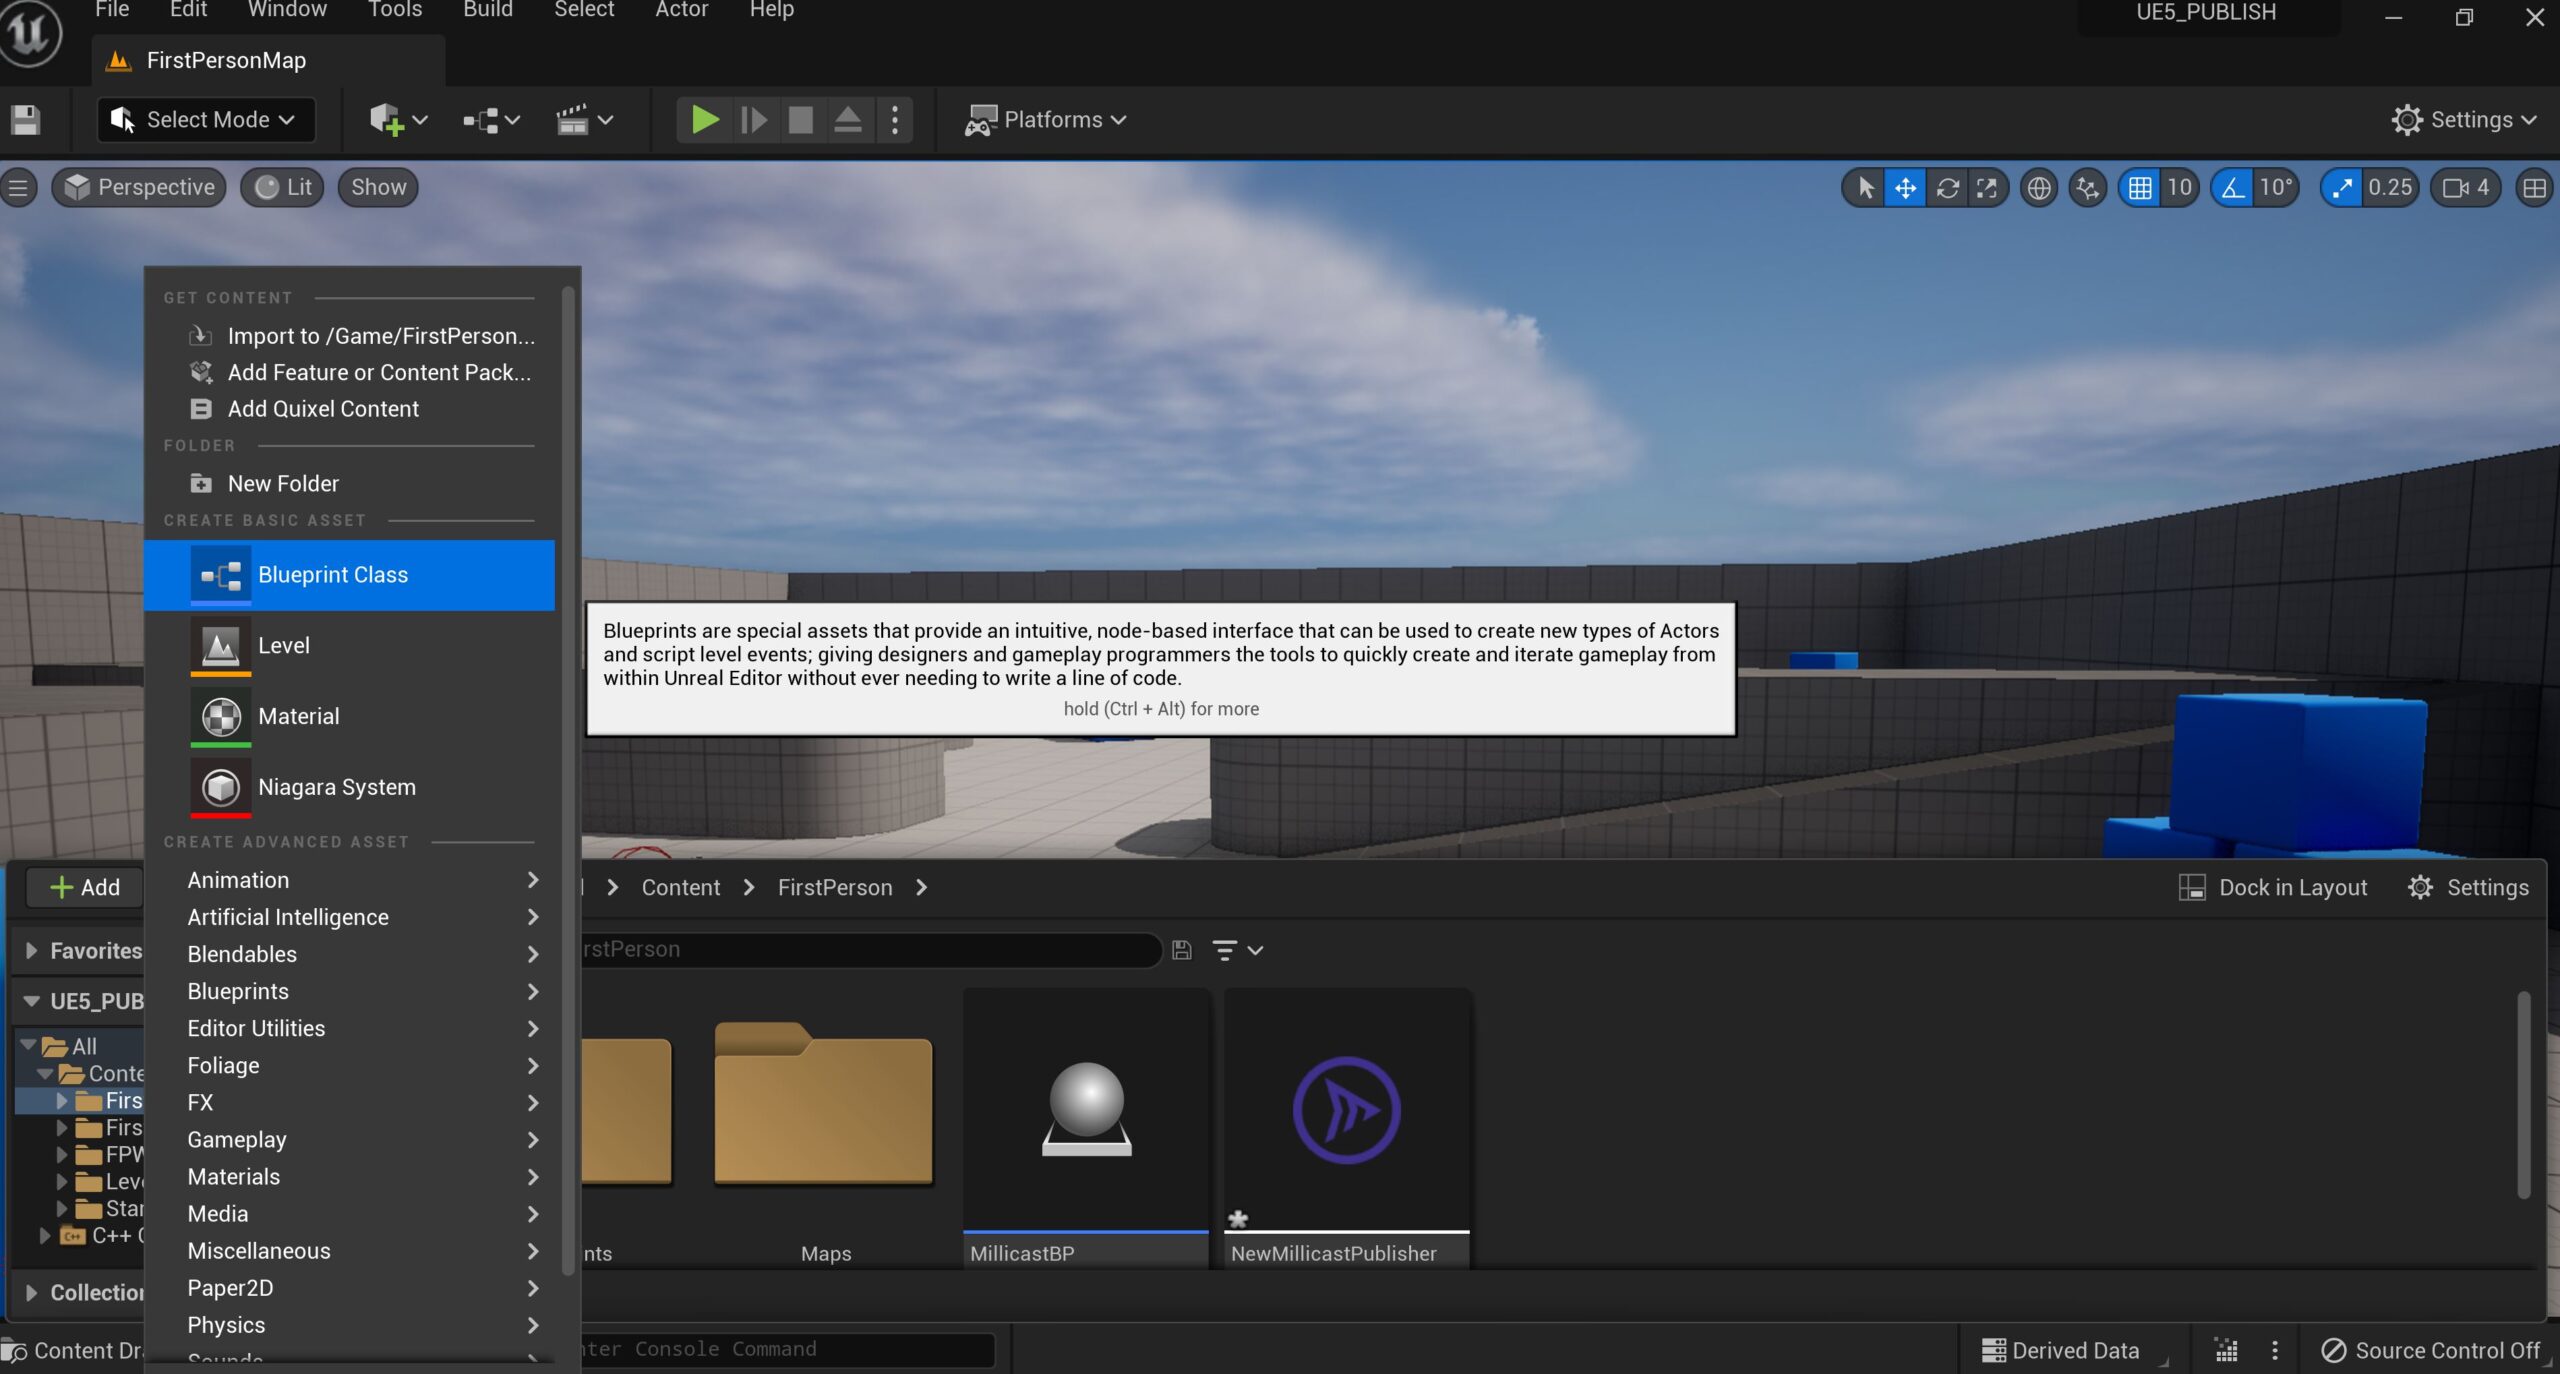
To implement the stream logic we need to add a blueprint class by clicking the + Add button and selecting Blueprint Class. When adding the class make sure to designate that it is an actor blueprint.
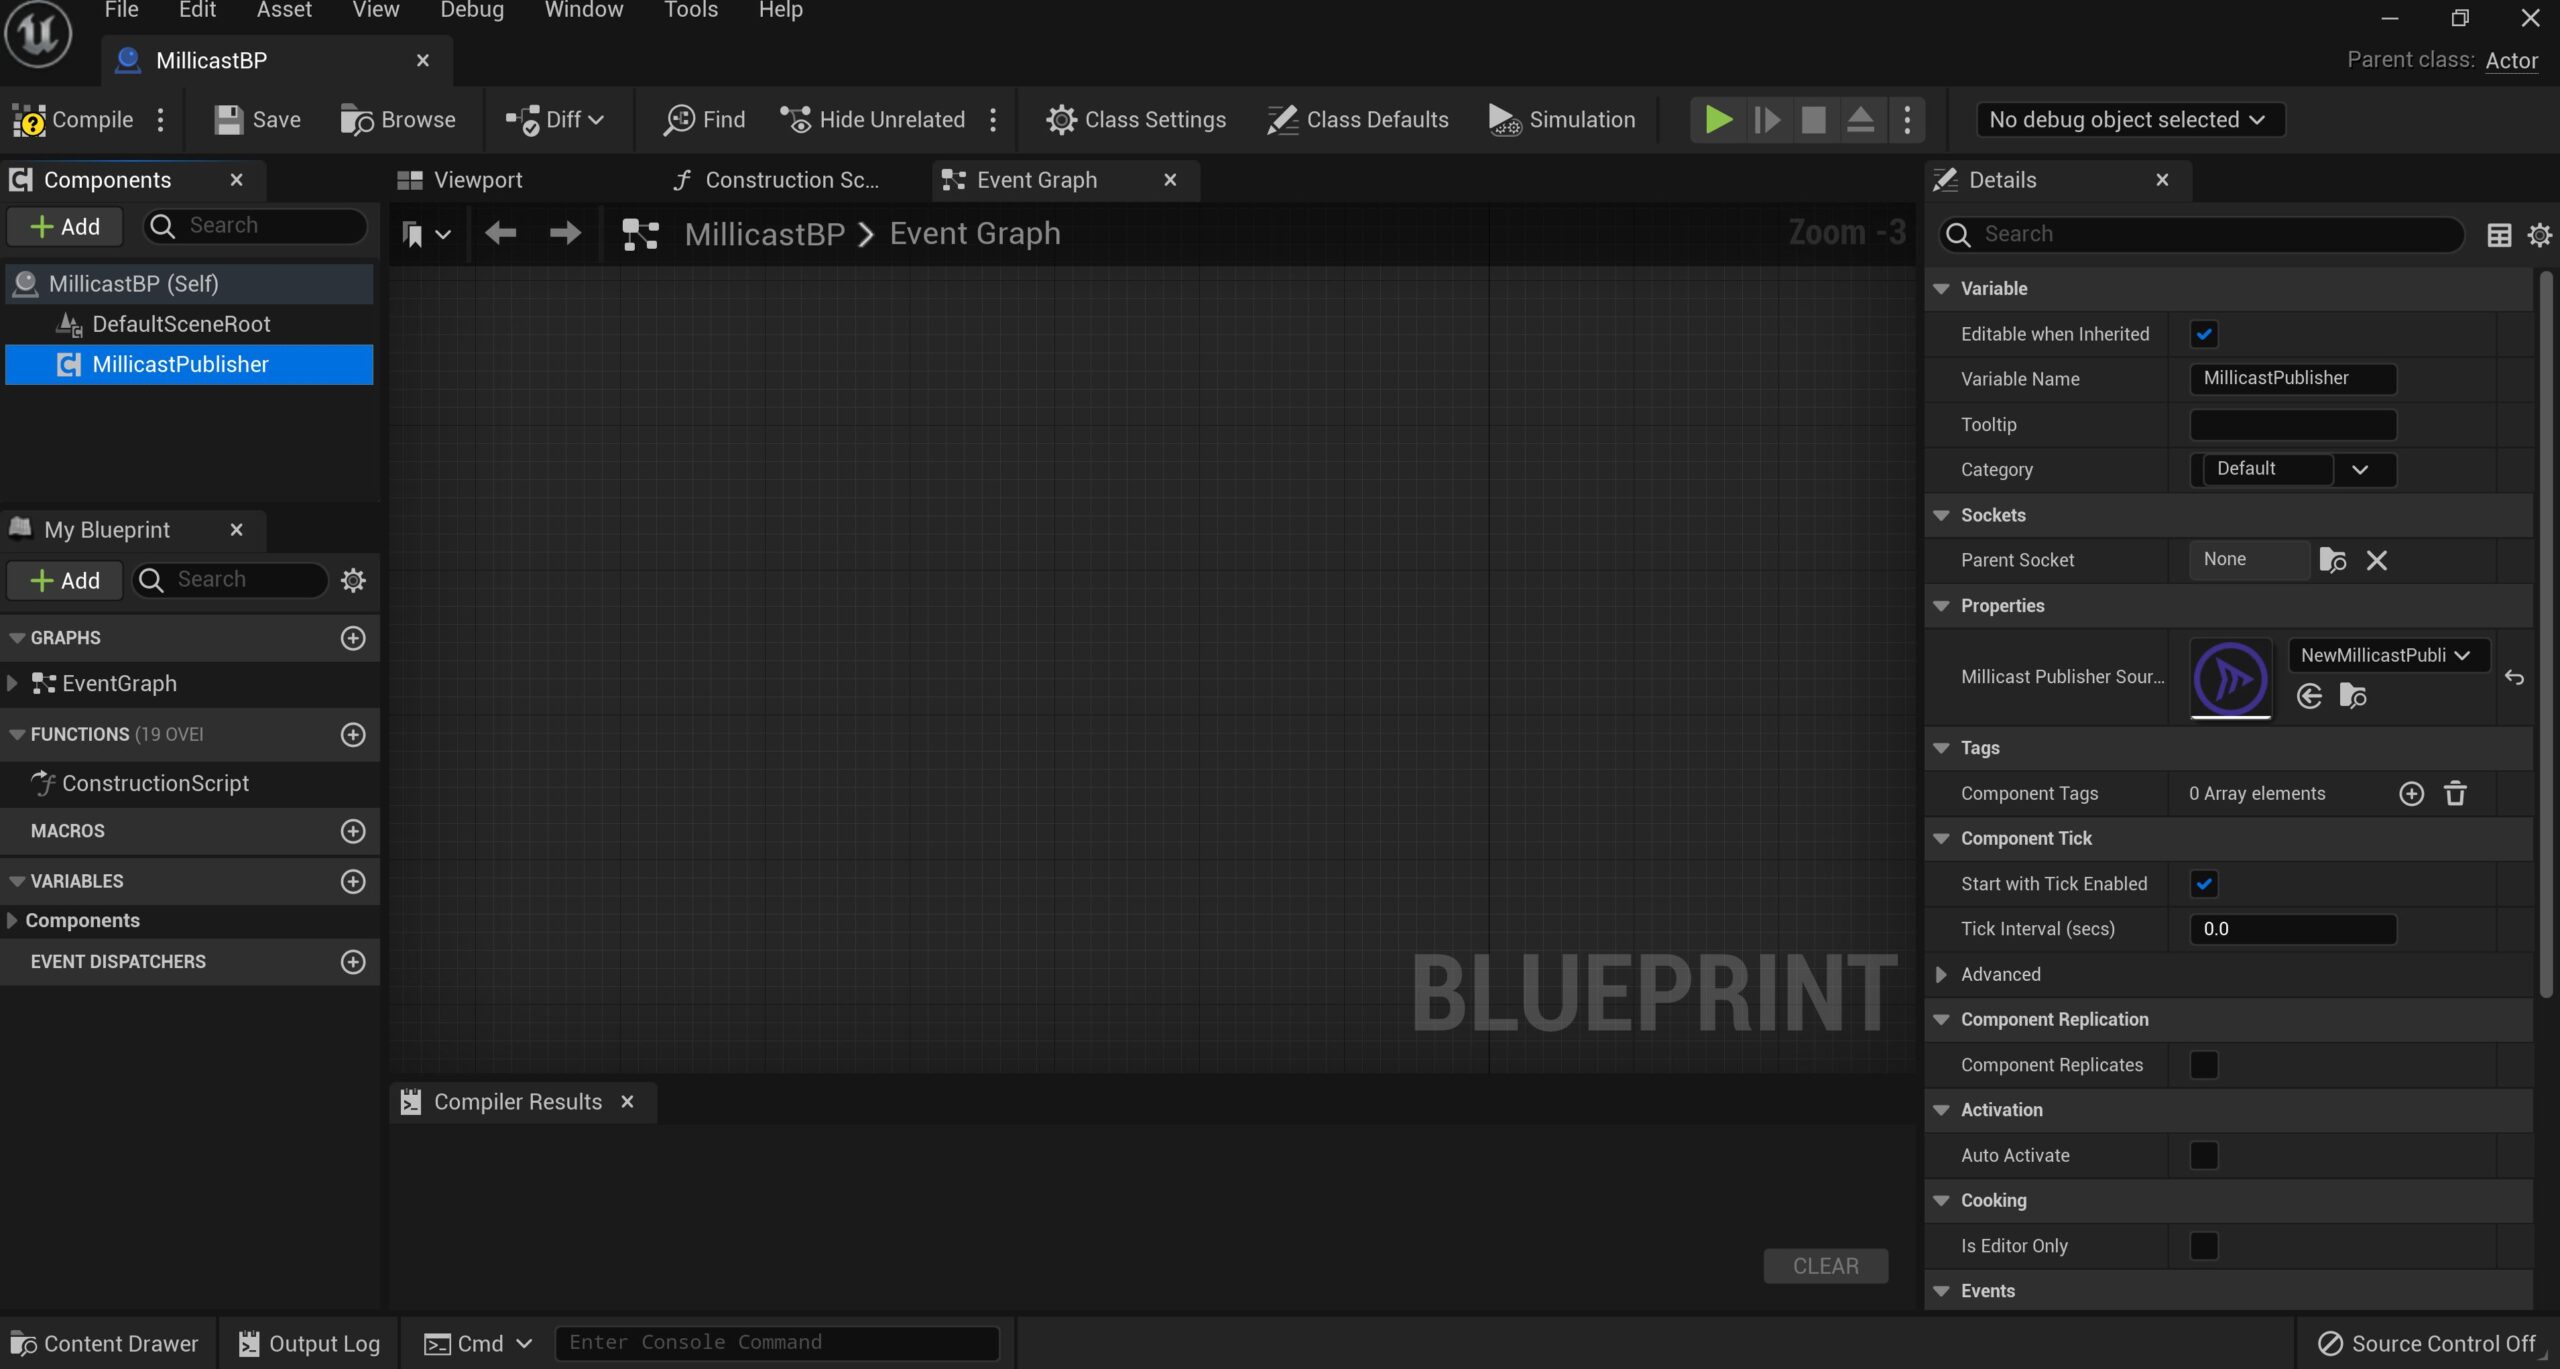
Once you have created the blueprint, open it up and switch over to the Events Graph. For this blueprint, we can disregard the Viewport and Construction script tabs as we are only altering the Events Graph tab. From within the Events Graph tab click on + Add in Components and add the MillicastPublisher component.
Double click on the MillicastPublisher component to open its details. In details, locate the properties header and add the MillicastPublisherSource as the primary property.
Now that the MillicastPublisher is correctly defined we can begin outlining the stream logic on the Events Graph. From the left-hand components menu, drag and drop the MillicastPublisher component onto the Events Graph.
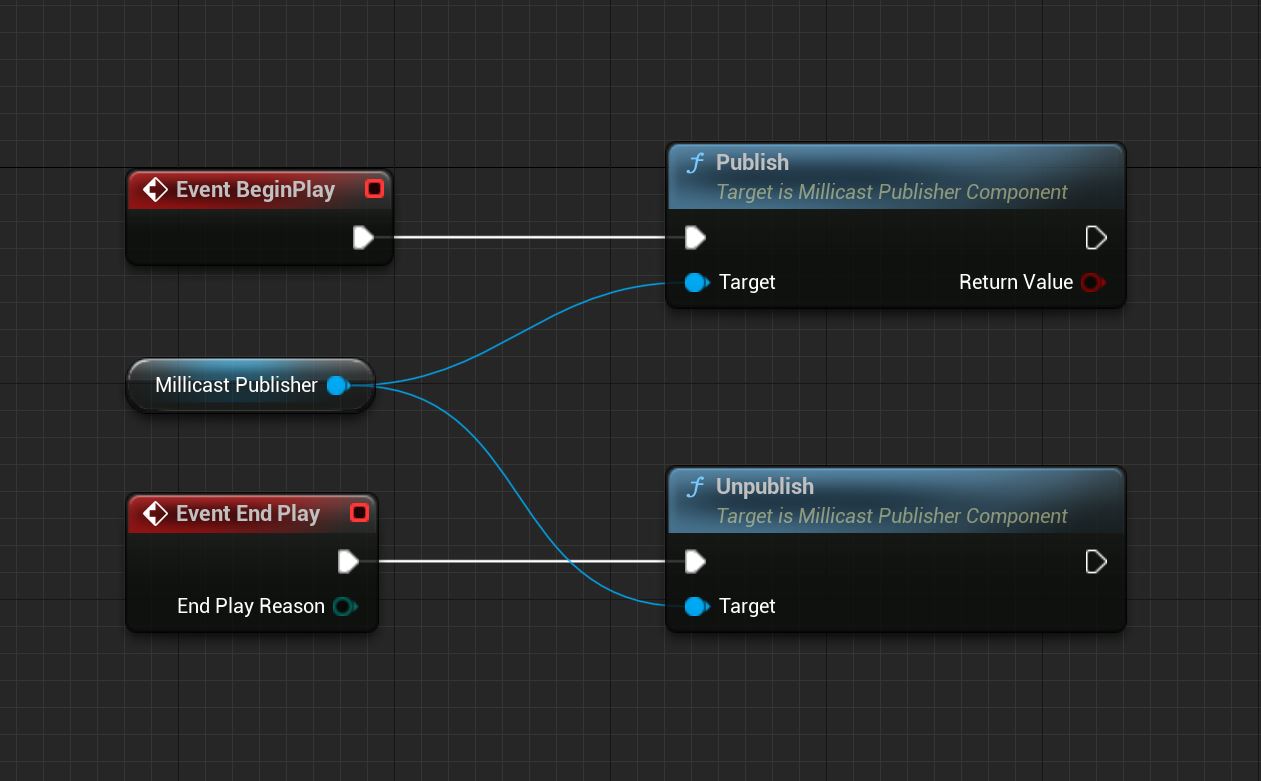
The MillicastPublisher component is required for two key actions relating to the functionality of the outbound media stream, starting (Publish) the stream and stopping (Unpublish) the stream. We want the stream to start when we begin playing the game and we want the stream to stop when we finish playing the game. To do this, right-click on the event graph and search for the Event BeginPlay object and the Event EndPlay object and add them to your Events graph. Next, right-click again on the Events Graph and add the Publish and Unpublish objects to the Events Graph. At this stage, you should have five components/objects on your Events Graph. Link the Event BeginPlay object to Publish, link the Event End Play object to Unpublish, and link the MillicastPublisher component to both Publish and Unpublish. Your Blueprint event graph should look like the following image:
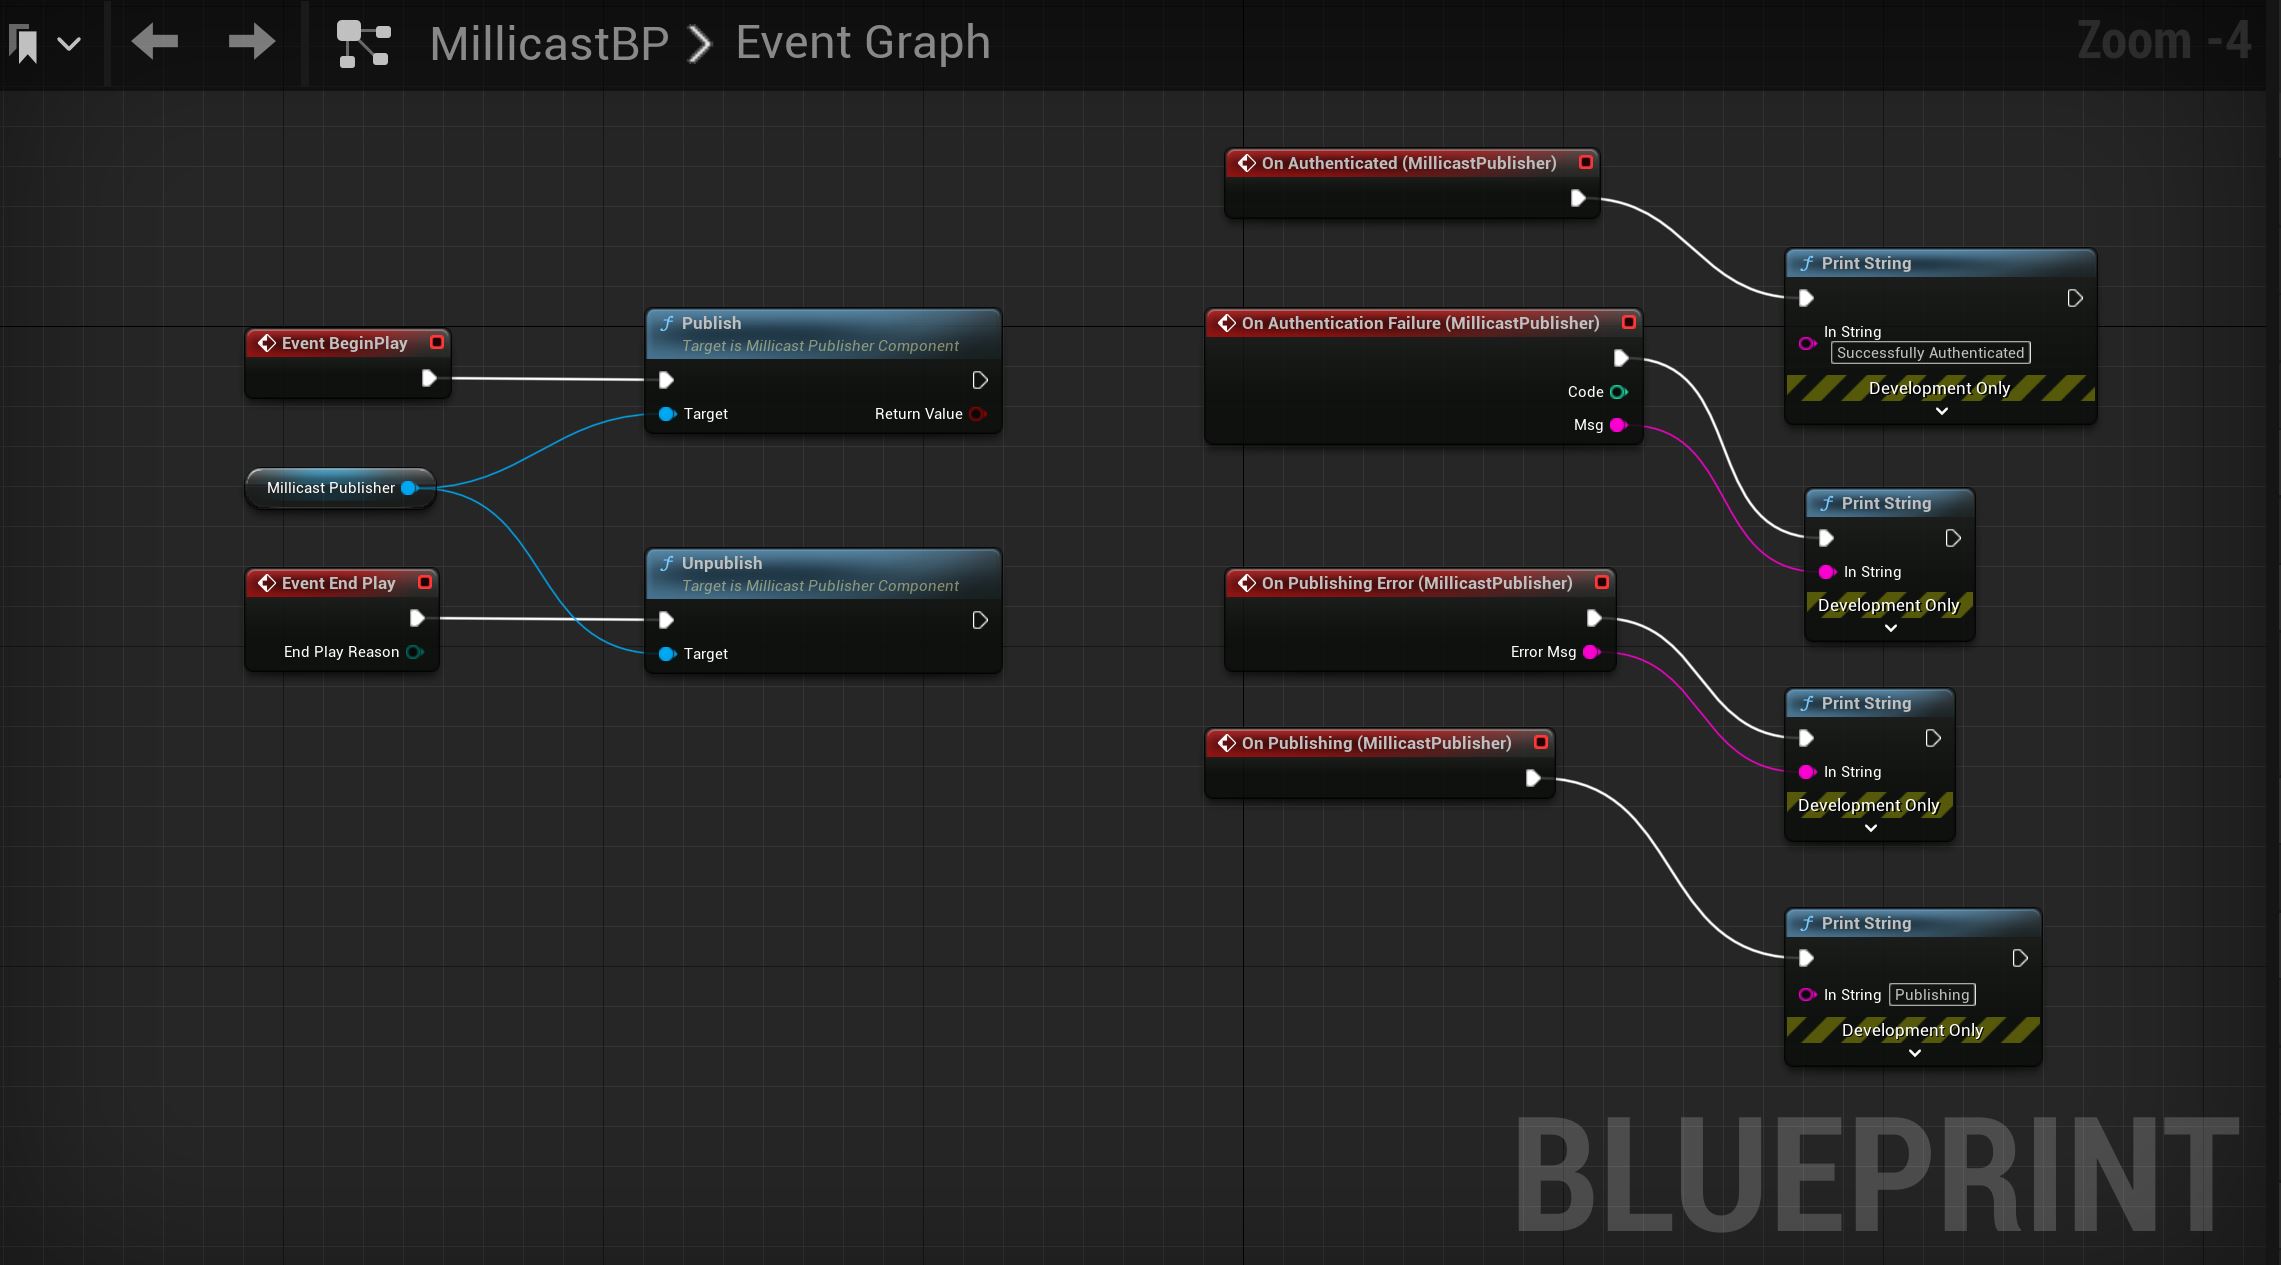
At this stage, your stream is almost ready, however, there is an optional step that will be helpful for troubleshooting in case your stream doesn’t work. This step is adding error logging to your Millicast Blueprint’s Events Graph. If you click on the MillicastPublisher component and scroll on the Details tab to the Events header, you should see eight different events you can add to your Event Graph such as On Authenticated or On Publishing. These are all events that will trigger when their corresponding condition is met, such as when a stream is successfully authenticated. It is recommended that you add these events to your Event Graph and link them to print functions so that you can log and track events as they occur. My finished event graph looks like the following image:
With your blueprint now complete, drag and drop the blueprint from your Content Drawer onto Level/Map so that it is connected with the game.
Testing out the WebRTC Livestream
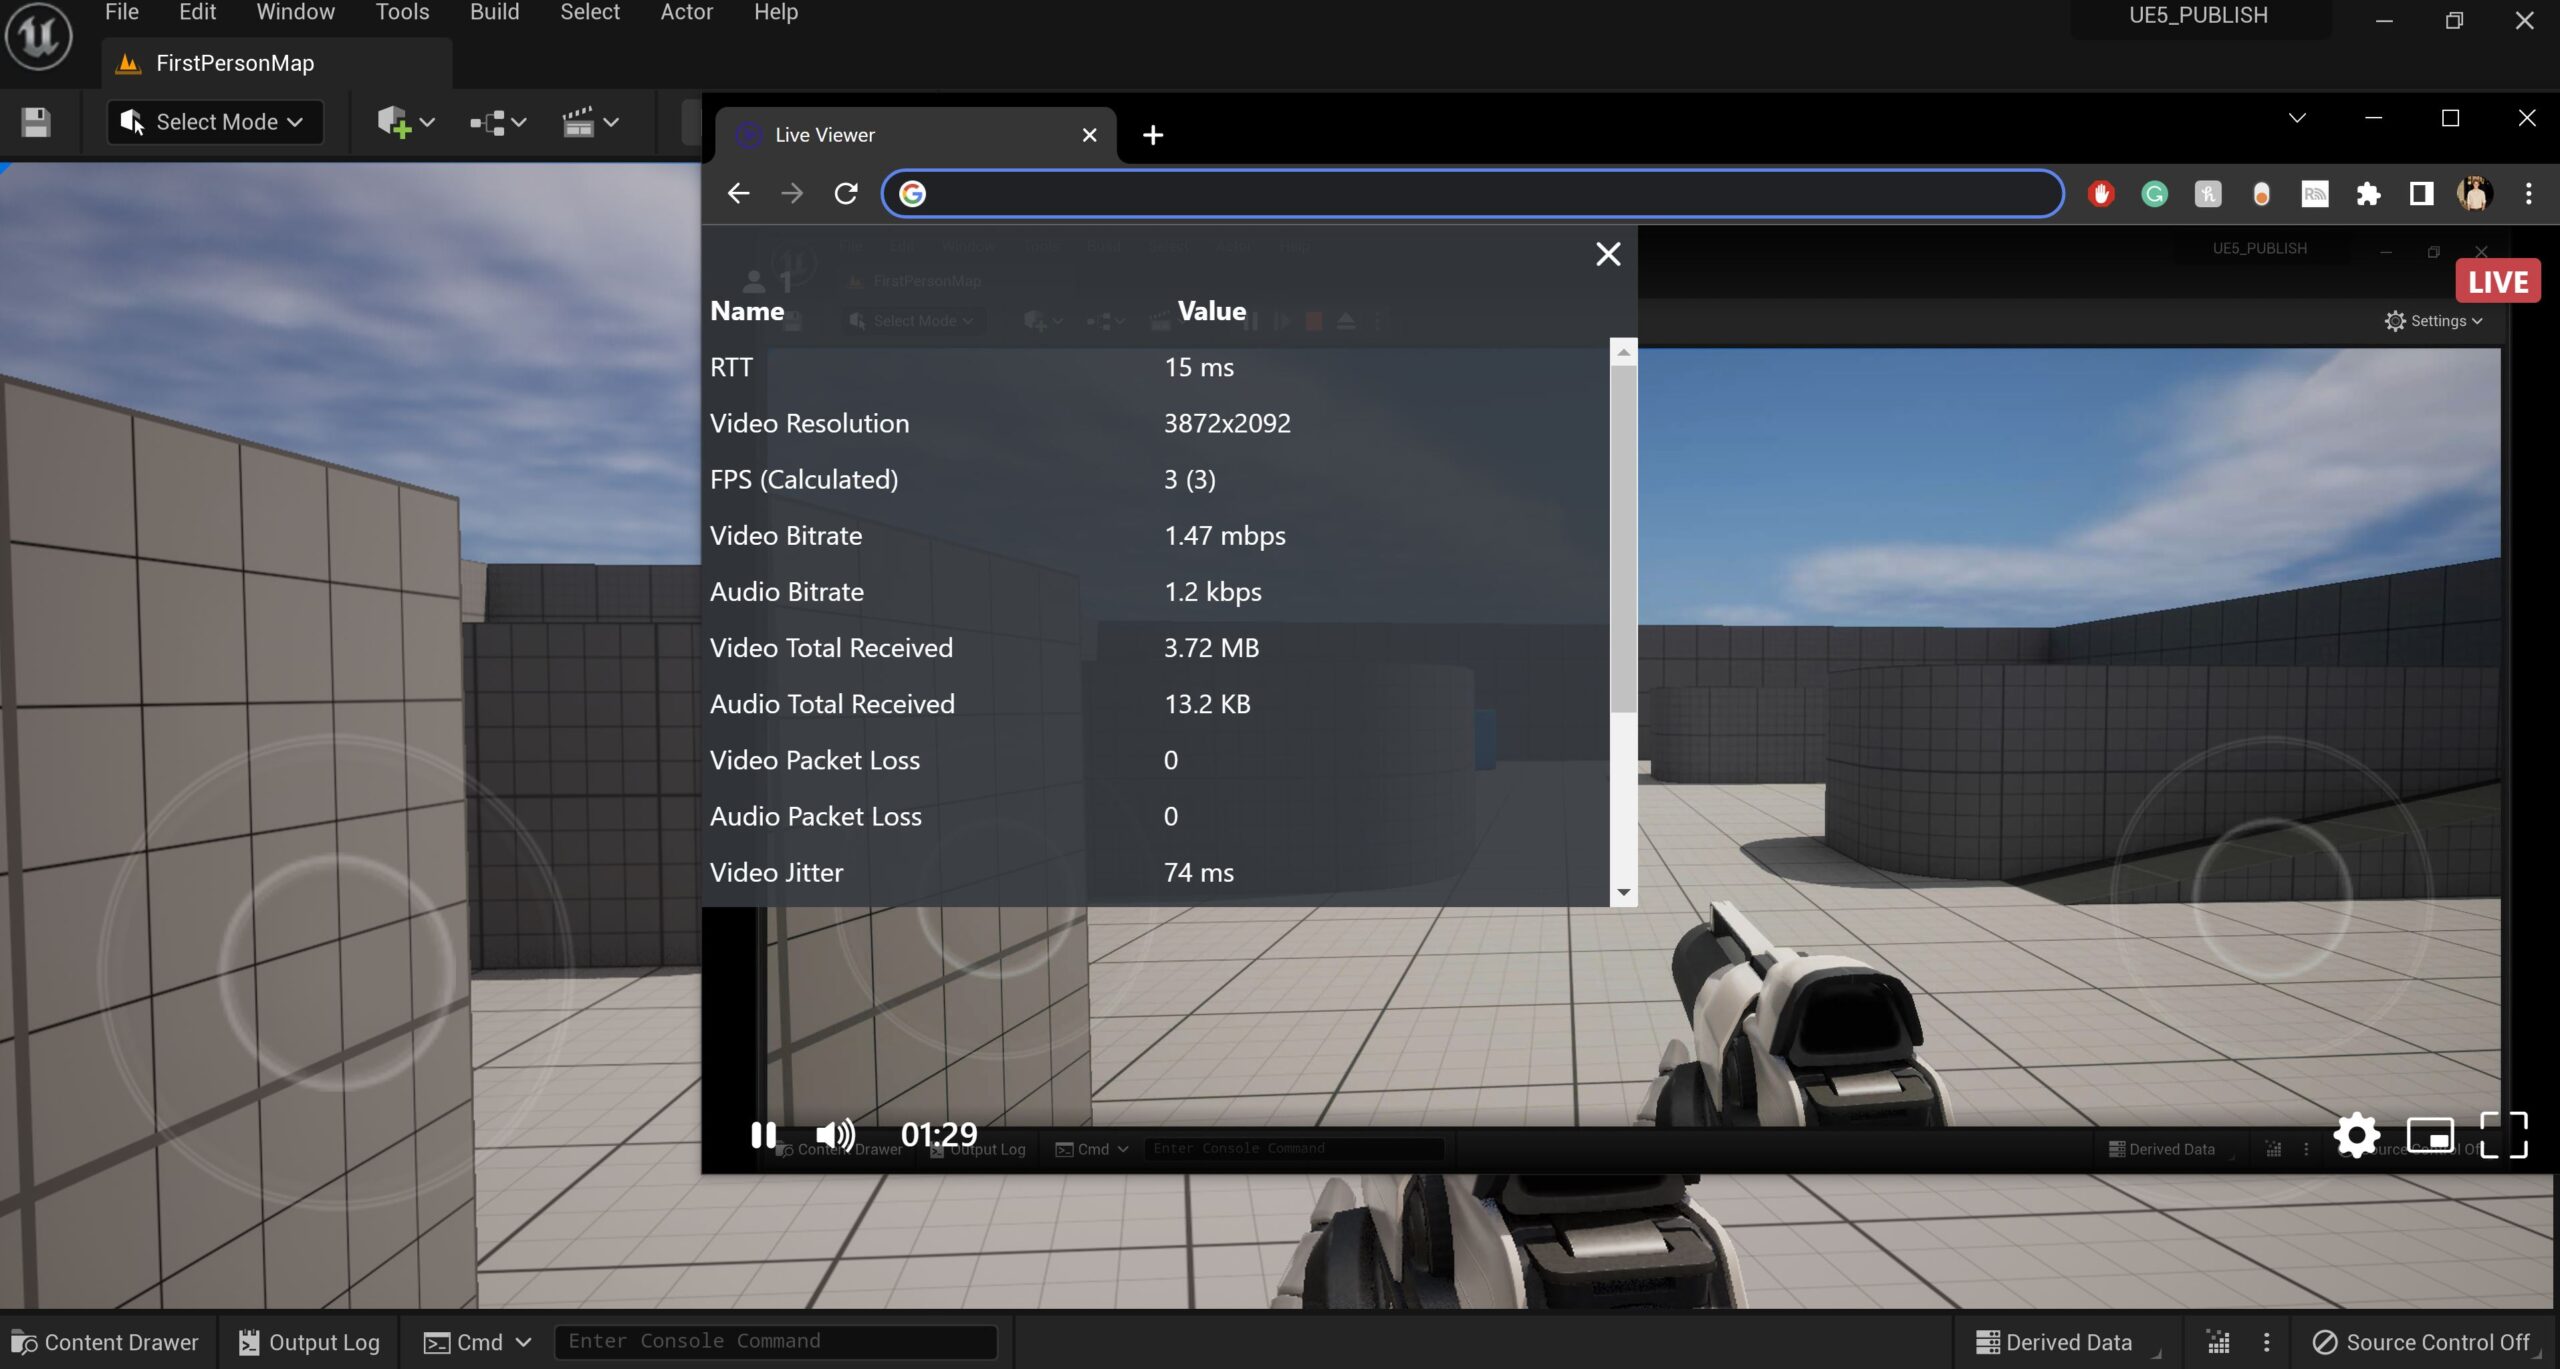
With the MillicastPublisherSource and blueprint created and added to the level, we can now test out the stream. Play the game in the preview window or compile the game into an executable and open it to start a stream.
Your stream will be published to the Dolby.io Millicast endpoint which you can view at Dolby.io Millicast’s hosted player path:
https://viewer.millicast.com?streamId=[YOUR_ACCOUNT_ID]/[YOUR_STREAM_NAME]. Additionally, you can embed the stream into an iframe for building out a custom website viewer like so:
<iframe src="https://viewer.millicast.com?streamId=[YOUR_ACCOUNT_ID]/[YOUR_STREAM_NAME]" allowfullscreen width="640" height="480"></iframe>It is important to note that both of the above methods are not secure, leaving the door open for people with the Account ID and Stream Name to join. For a more secure method check out this guide here for utilizing subscriber tokens for a more robust and secure method of connection.
If you are interested in building a Livestream viewer in JavaScript so users can see the output of your in-game stream check out the guide on Building a Low Latency Livestream Viewer.
Final Thoughts on WebRTC, Pixel Streaming, and the Unreal Engine 5 Plugin
Adding scalable WebRTC functionality inside Unreal Engine 5 opens the door to building a range of immersive and interactive experiences that can be easily shared and viewed. If you are interested in learning more about how the Unreal Plugin works, check out Ryan Jespersen’s Making Unreal Real where he goes into more detail about how the tool functions, or check out this guide for building a Livestream Viewer inside the Unreal Engine where you can learn about rendering media streams in-game using similar technology.
Feedback or Questions? Reach out to the team on Twitter, LinkedIn, or via our support desk.


")