

Dolby.io Real-time Streaming is a low-latency WebRTC streaming solution that can deliver 4k video and audio streams to massive audiences all while maintaining under half a second delay anywhere in the world. Because of the scale, speed, and quality of the service, Dolby.io Real-time Streaming supports a range of use cases including Remote Live Production, Broadcasting Sports, and Live Virtual Auctions. In this guide, we’ll help break down how to capture and broadcast with Dolby.io Real-time Streaming, maximize the use of our content delivery network (CDN), and decode streams for playback.
Broadcasting and streaming can be broken down into four main components as delineated by the workflow diagram below:
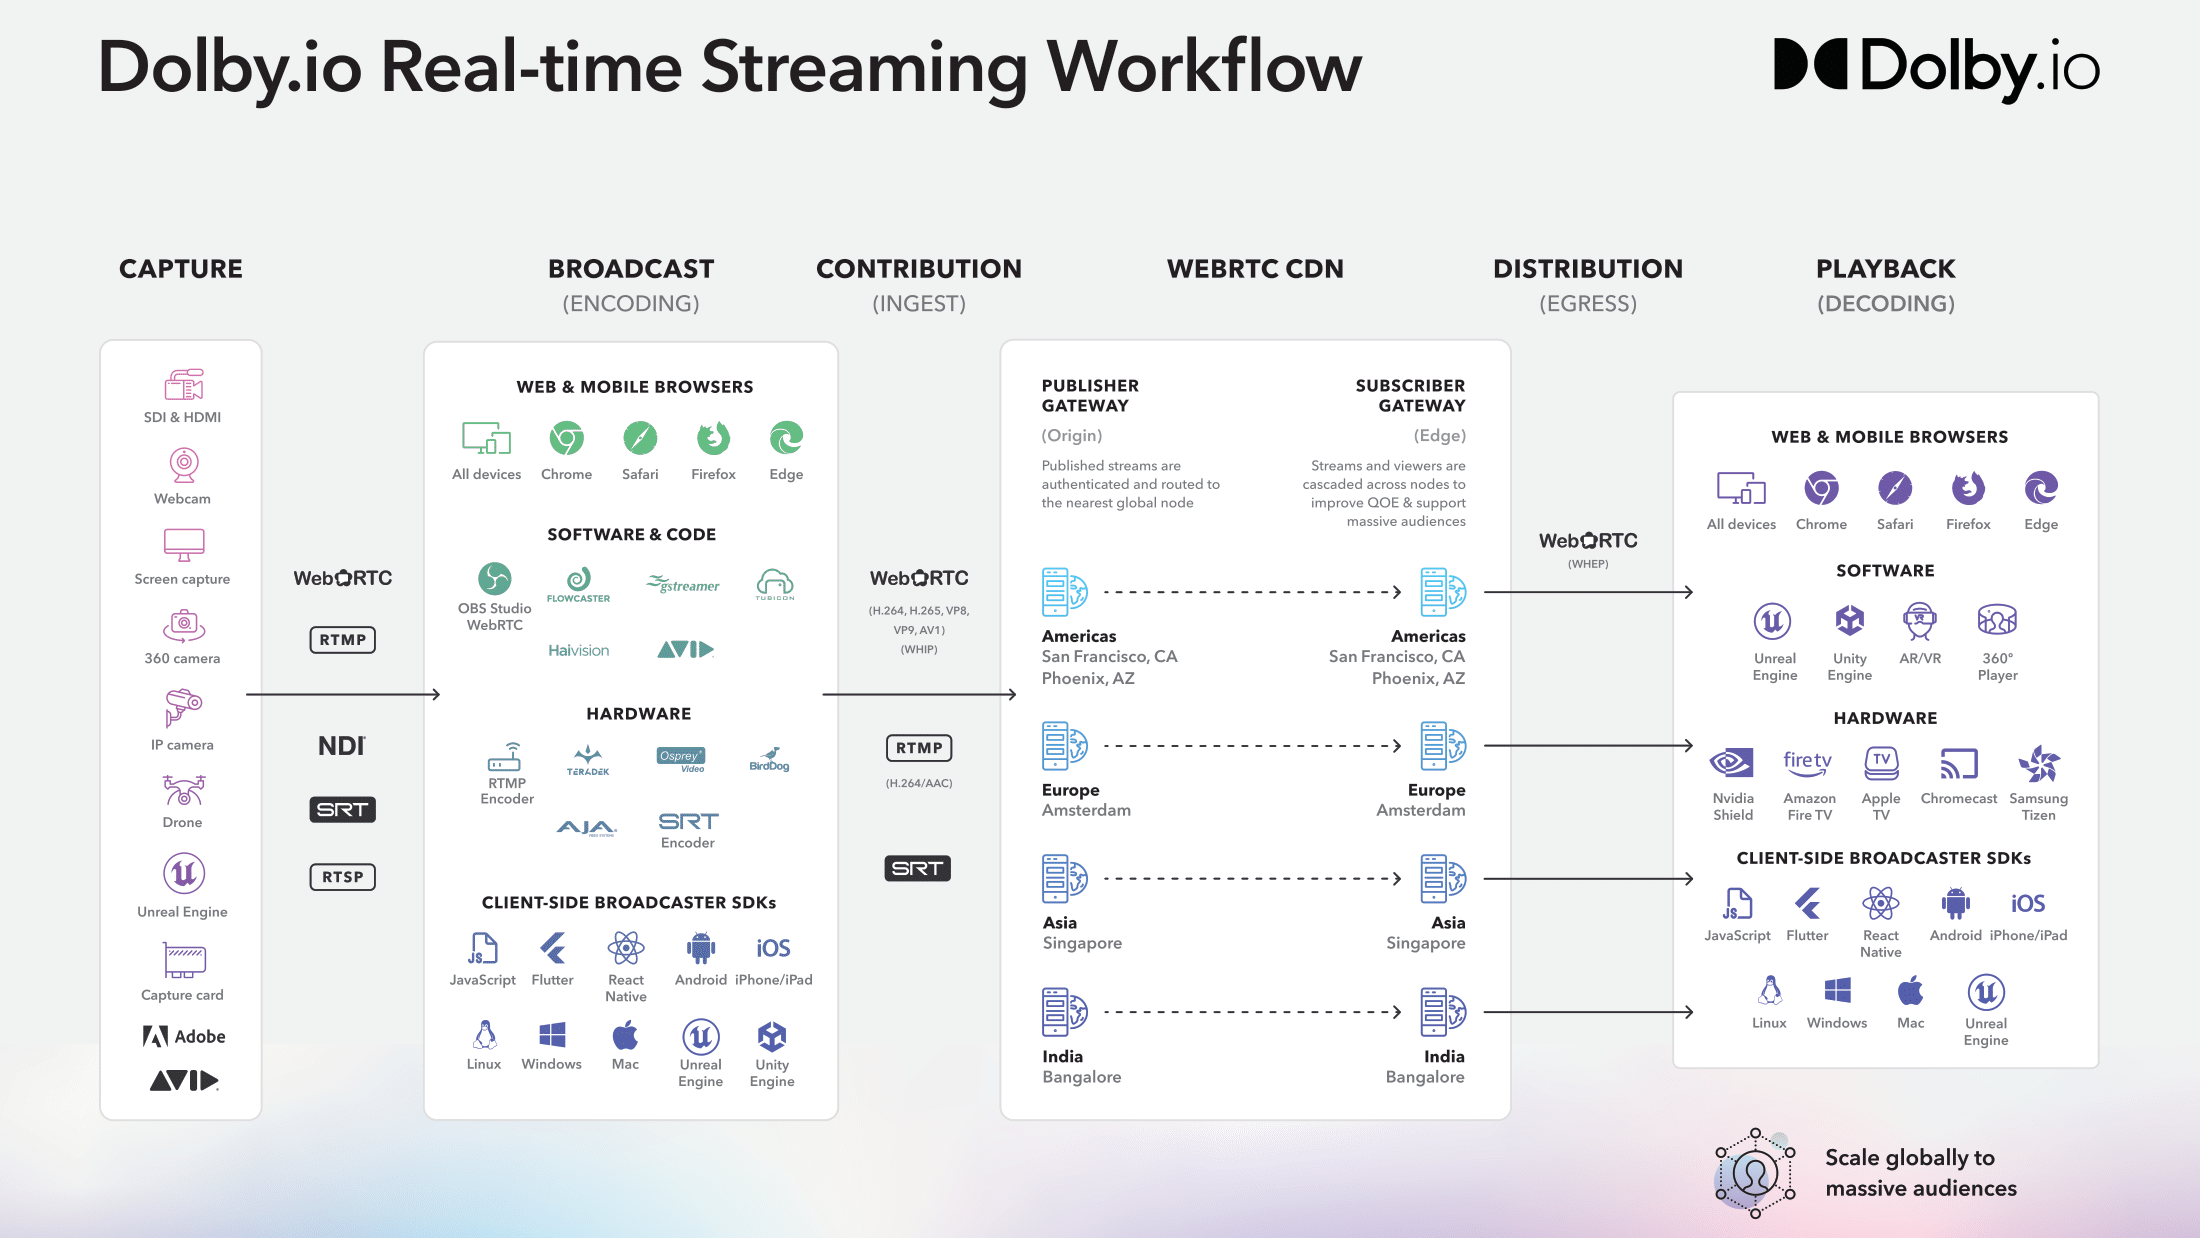
Whether you are broadcasting a stream to hundreds of thousands of viewers, or a select team of video engineers in a production studio, all broadcasts must follow the pattern of Capture, Broadcast, Distribution via the CDN, and Playback.
The Dolby.io Platform
Before we start streaming, it is worth briefly discussing the Dolby.io platform. Dolby.io is a cloud solutions platform offering APIs and SDKs for building real-time streaming solutions. To try out Dolby.io you can create a free account with just an email and get started testing out the services with a generous allotment of complementary credits.
Capturing Content with Dolby.io
To broadcast content you either need a physical camera capturing the content, a virtual camera inside a game engine, or the content available via some content manager such as such as OBS or Adobe Premiere. Content can be captured and delivered to the encoding stage of the diagram via a number of outputs so long as the output can be ingested and encoded by the hardware or software.
Once you are set up and ready to capture content:
- Create a free Dolby.io account,
- Create a token and continue to the broadcasting section below.
Bonus: Try broadcasting from the dashboard in just a few clicks.
Broadcasting Content with Dolby.io
Broadcasting content requires access to the public internet and encoding which can be accomplished via the browser, software, hardware, and via the Dolby.io Client-side broadcaster SDKs. The Dolby.io CDN can ingest contribution streams encoded in three main formats:
WebRTC, an internet transfer protocol that supports video codecs H.264, H.265, VP8, VP9, AV1, and the Opus audio codec.
SRT, a video transfer protocol that can be transmuxed to WebRTC via the Dolby.io CDN and supports H.264*.
RTMP and RTMPs, internet transfer protocols that can be transmuxed to WebRTC via the Dolby.io CDN that supports only the H.264 video codec*.
*SRT and RTMP will automatically have AAC audio transcoded to Opus via the CDN
To learn more about encoding your content for the Dolby.io CDN, check out these guides:
If you are interested in learning about how Dolby.io is able to support broadcasting WebRTC in so many different ways, check out this guide on the WebRTC HTTP Ingest Protocol (WHIP).
WebRTC CDN and Dolby.io Platform
The Dolby.io Streaming CDN offers a range of server-side features that users can toggle and adjust via the REST APIs or the Dashboard to ensure streams are secure, stable, and scalable. To learn more about the CDN features, check out these guides below:
Decoding and Playback with Dolby.io
The final component of the streaming workflow is taking the stream, after it has been passed through the Dolby.io CDN, and playing it back to the end viewer. Similar to the broadcasting side, decoding and playback is supported via web and mobile browsers, software, hardware, and via client-side broadcast SDKs.
If you are interested in learning about how Dolby.io is able to support egressing WebRTC in so many different ways, check out this guide on the WebRTC HTTP Egress Protocol (WHEP).
More Resources
Integrating with the Dolby.io CDN can be done in many different ways, offering an unparalleled level of customization to your use case. Whether it is a broadcast for hundreds of thousands of viewers or a select team of stakeholders, Dolby.io aims to provide the tools and resources to fit your requirements. To learn more about Dolby.io Real-time Streaming check out some of our other resources including:
- Dolby.io Real-time Streaming Documentation
- Dolby.io Blog
- Dolby.io Real-time Streaming REST API Documentation
- Dolby.io Code Samples on GitHub
If you can’t find the resources you need, have questions about the product and pricing, or need to be connected to sales, create a ticket on our contact portal and the team will assist you.

")